LvlUp Changelog

New features and fixes will be reported here
mobile app
conversations
conversation ai
new
improved
3 months ago
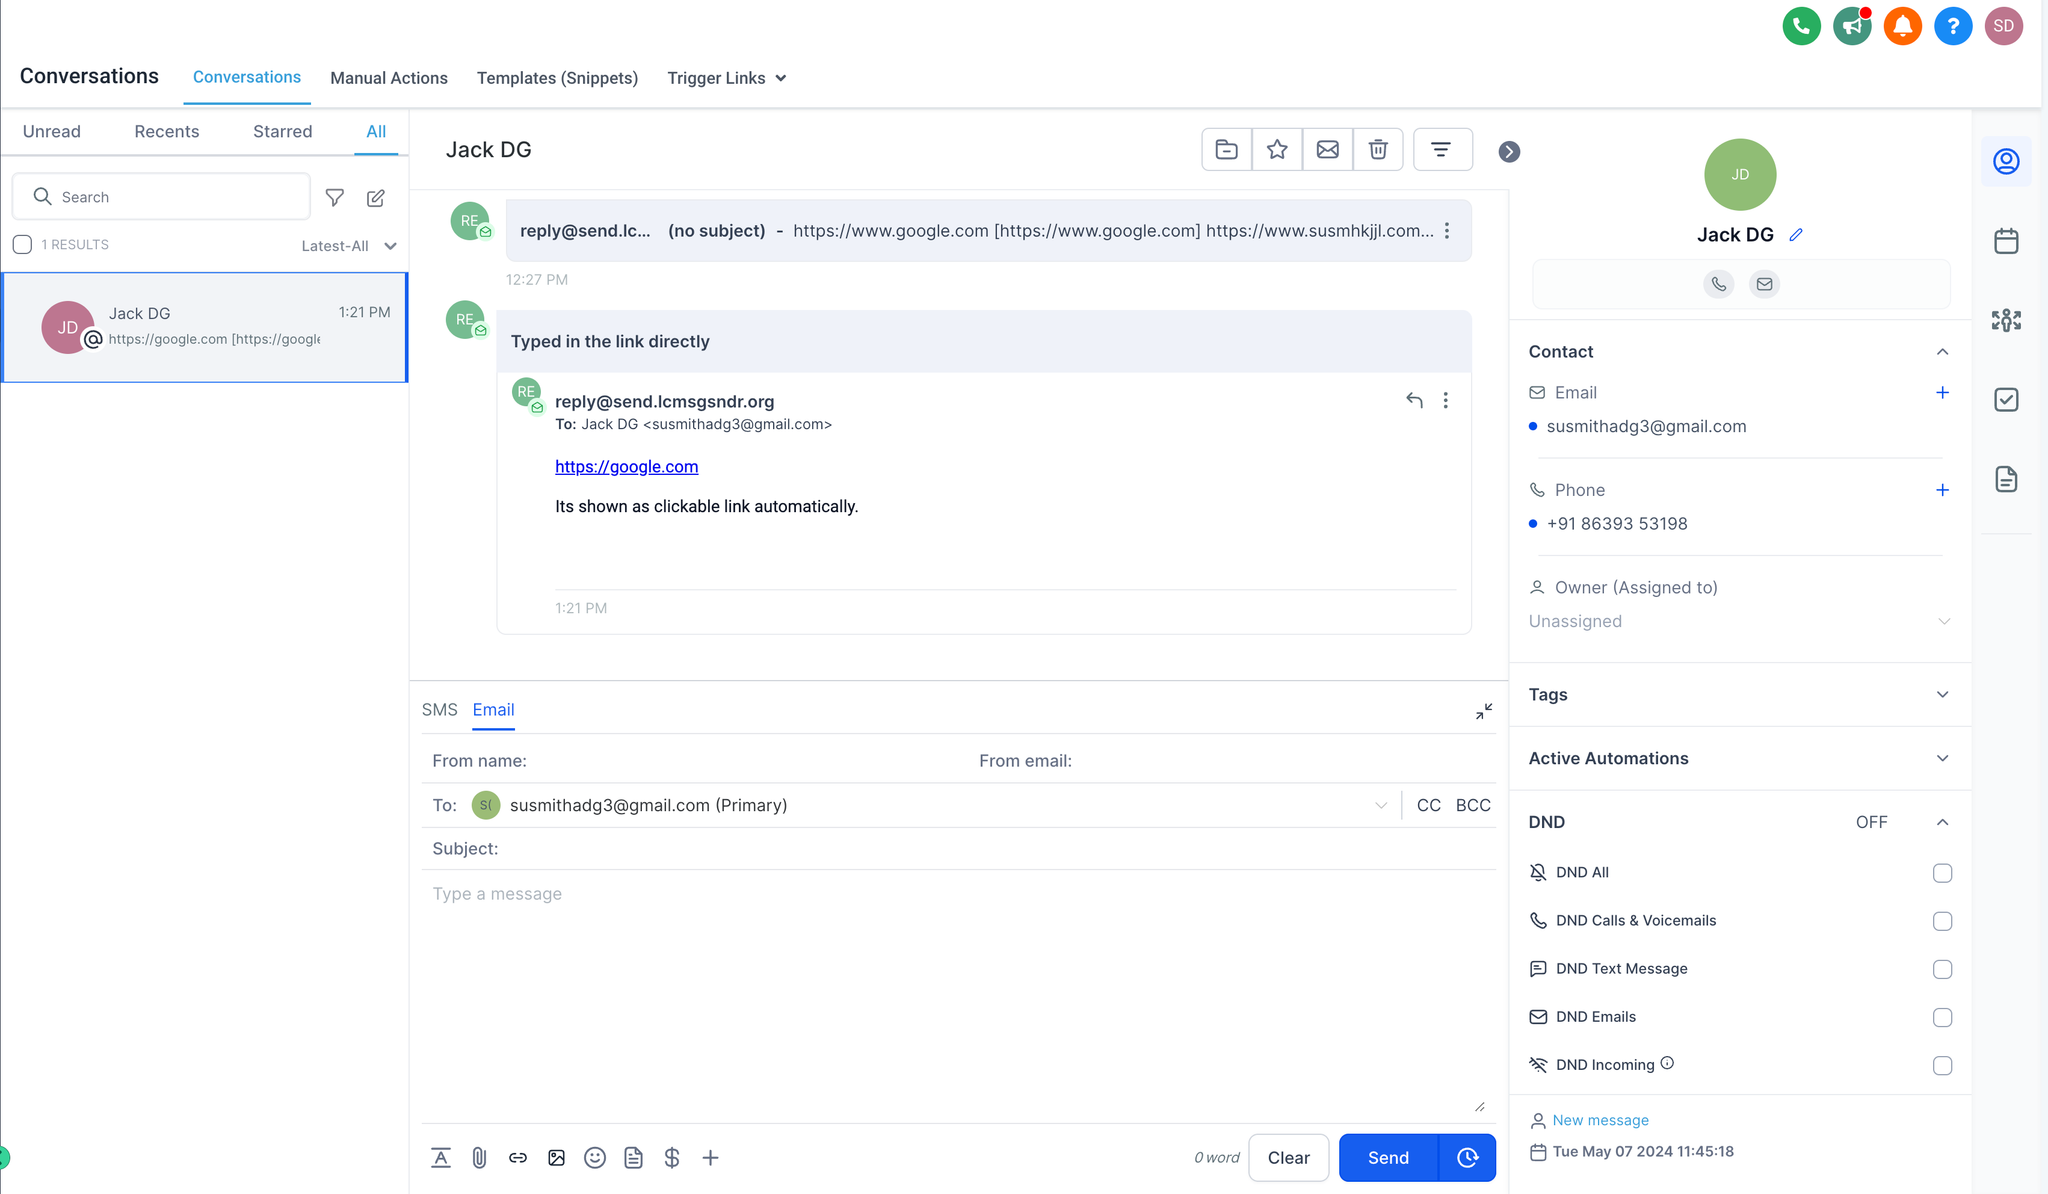
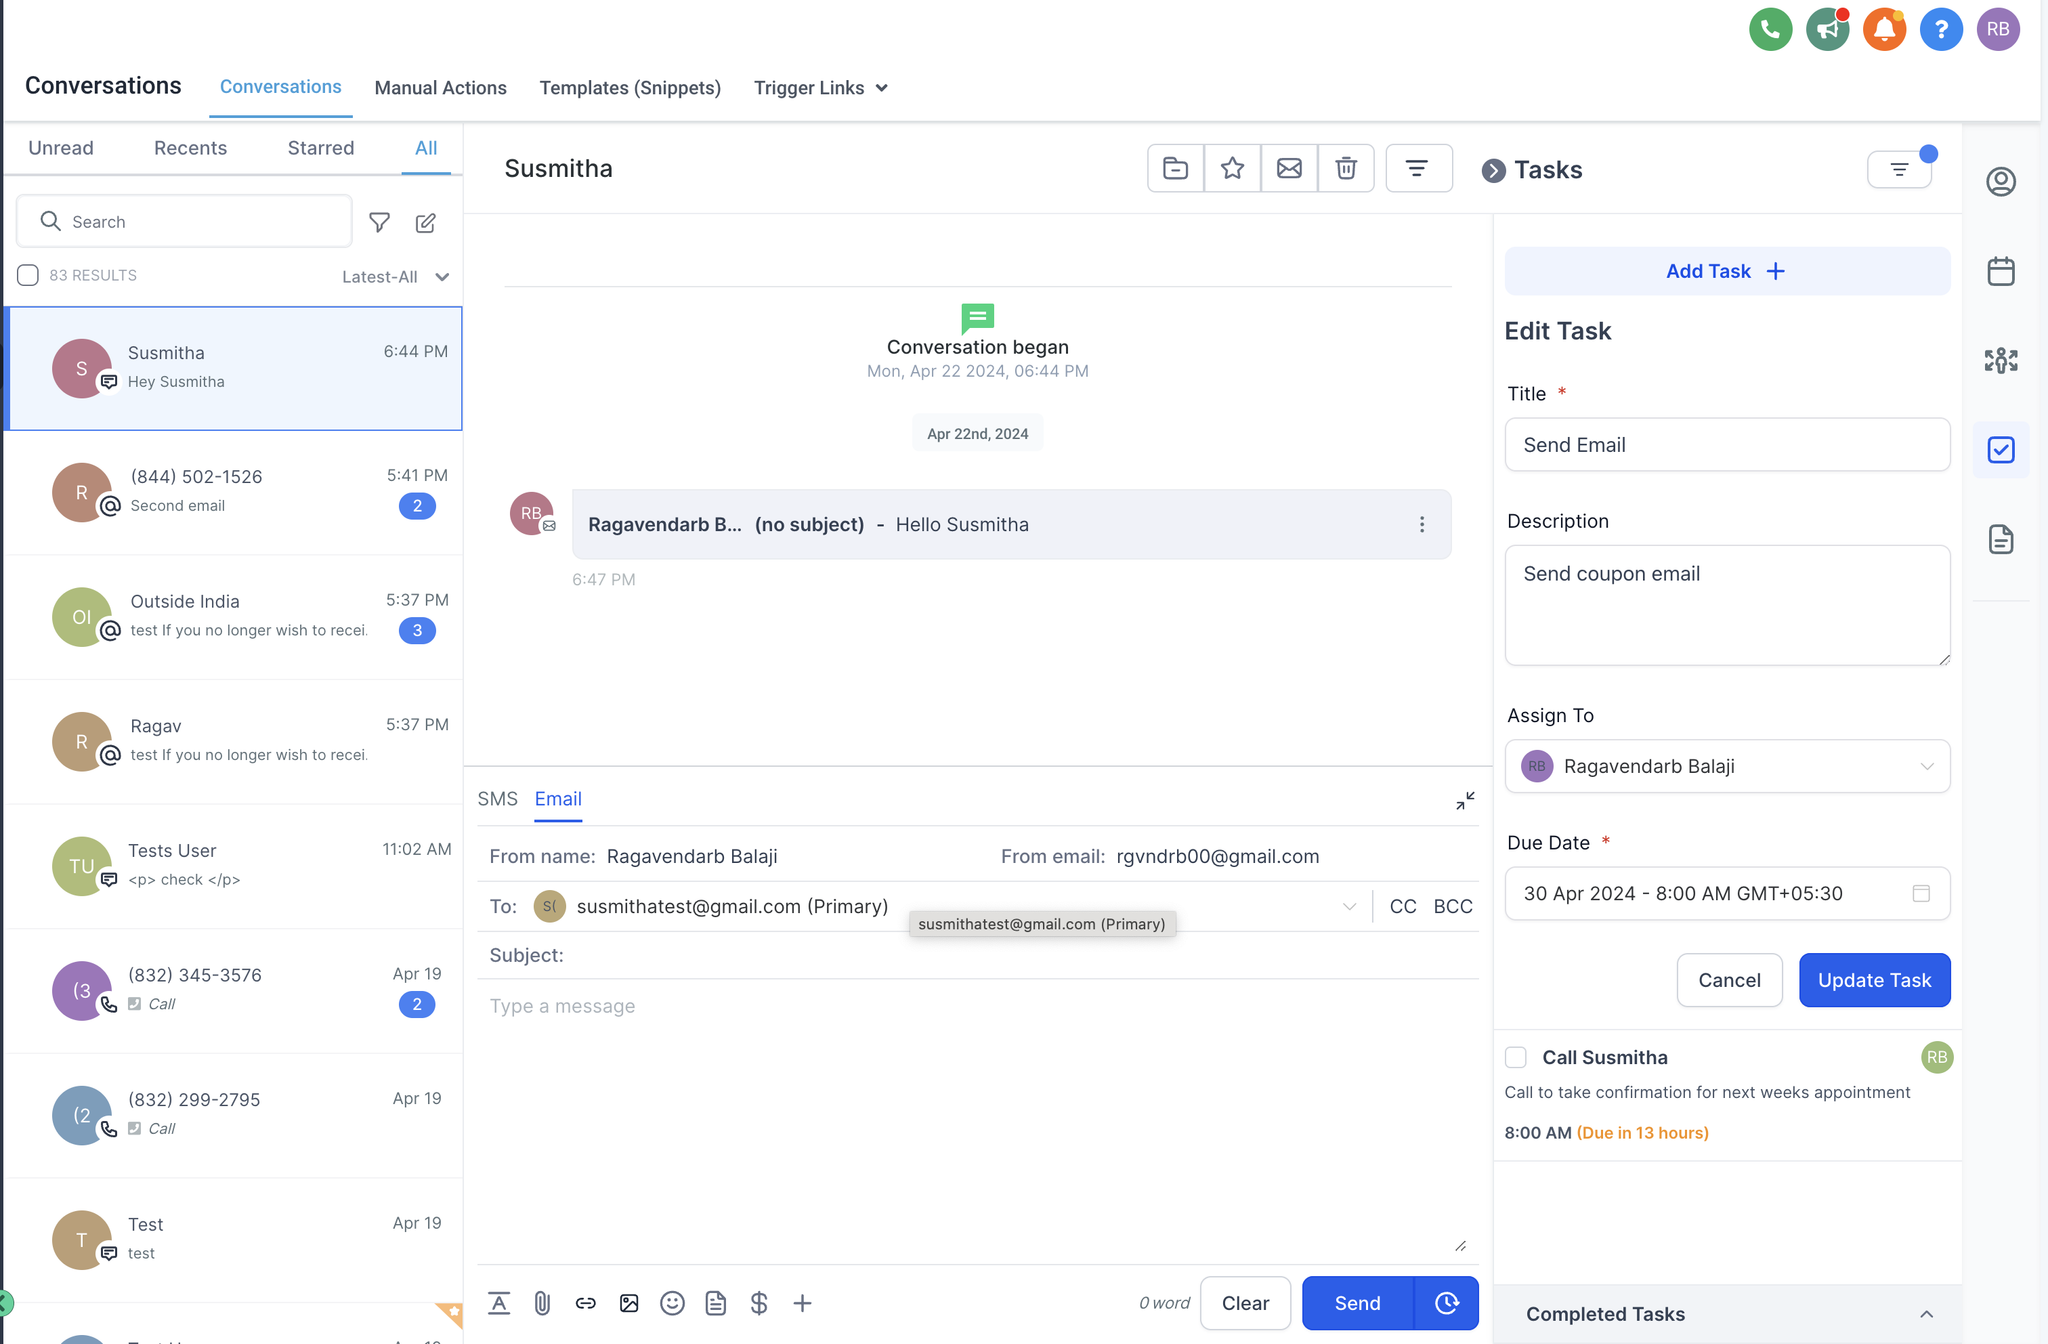
We're excited to announce our latest update to conversations on the mobile app. We have made several improvements to conversations on mobile, including a better view for replies suggested by conversation AI, the ability to send a review request directly from the conversations screen, and the ability to view external call logs. This update is available on LvlUp, LeadConnector, and White-labelled (update needs to be requested) mobile apps.
What's New
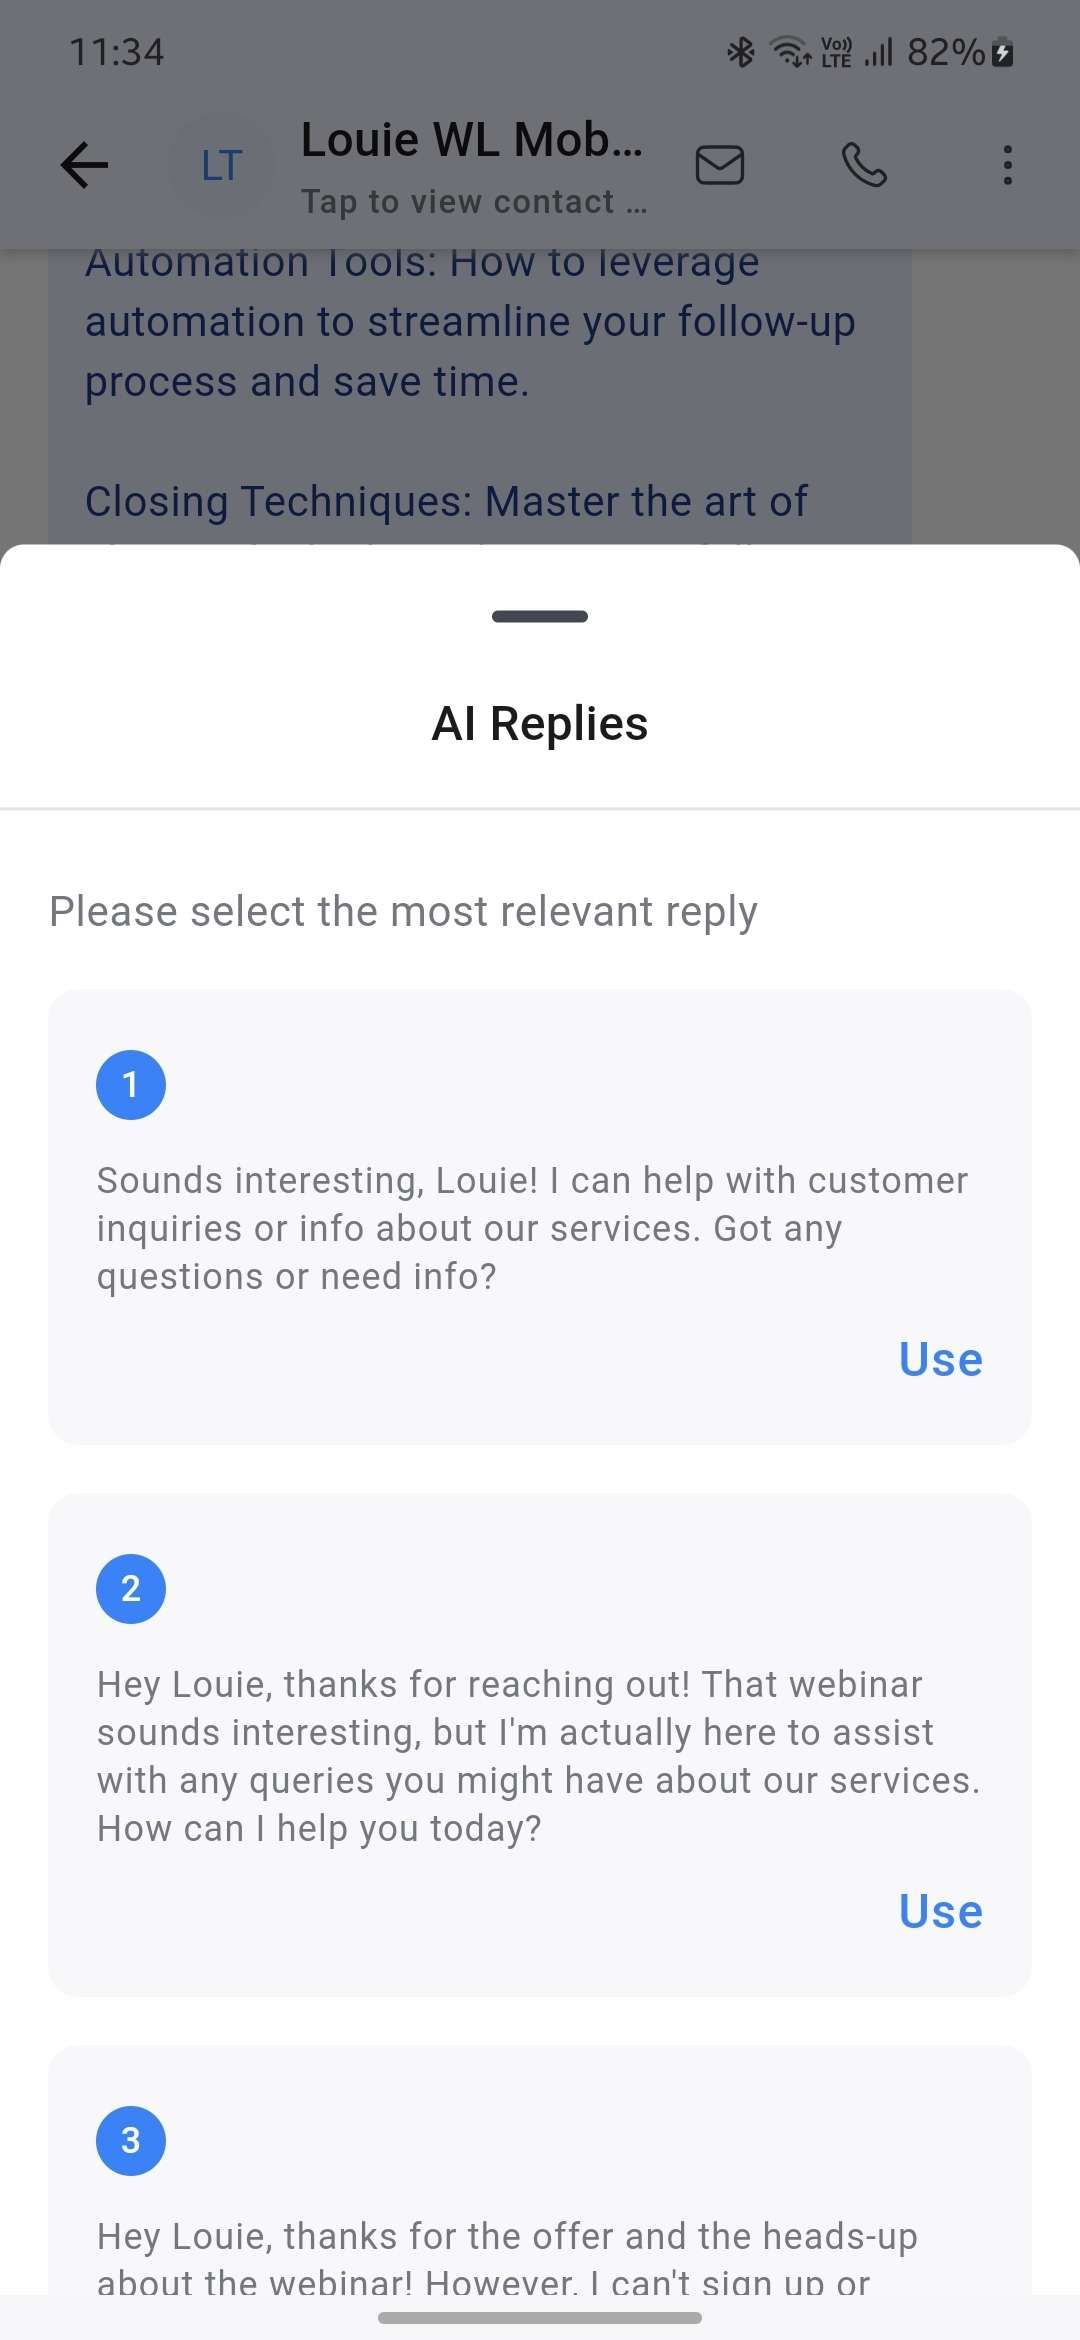
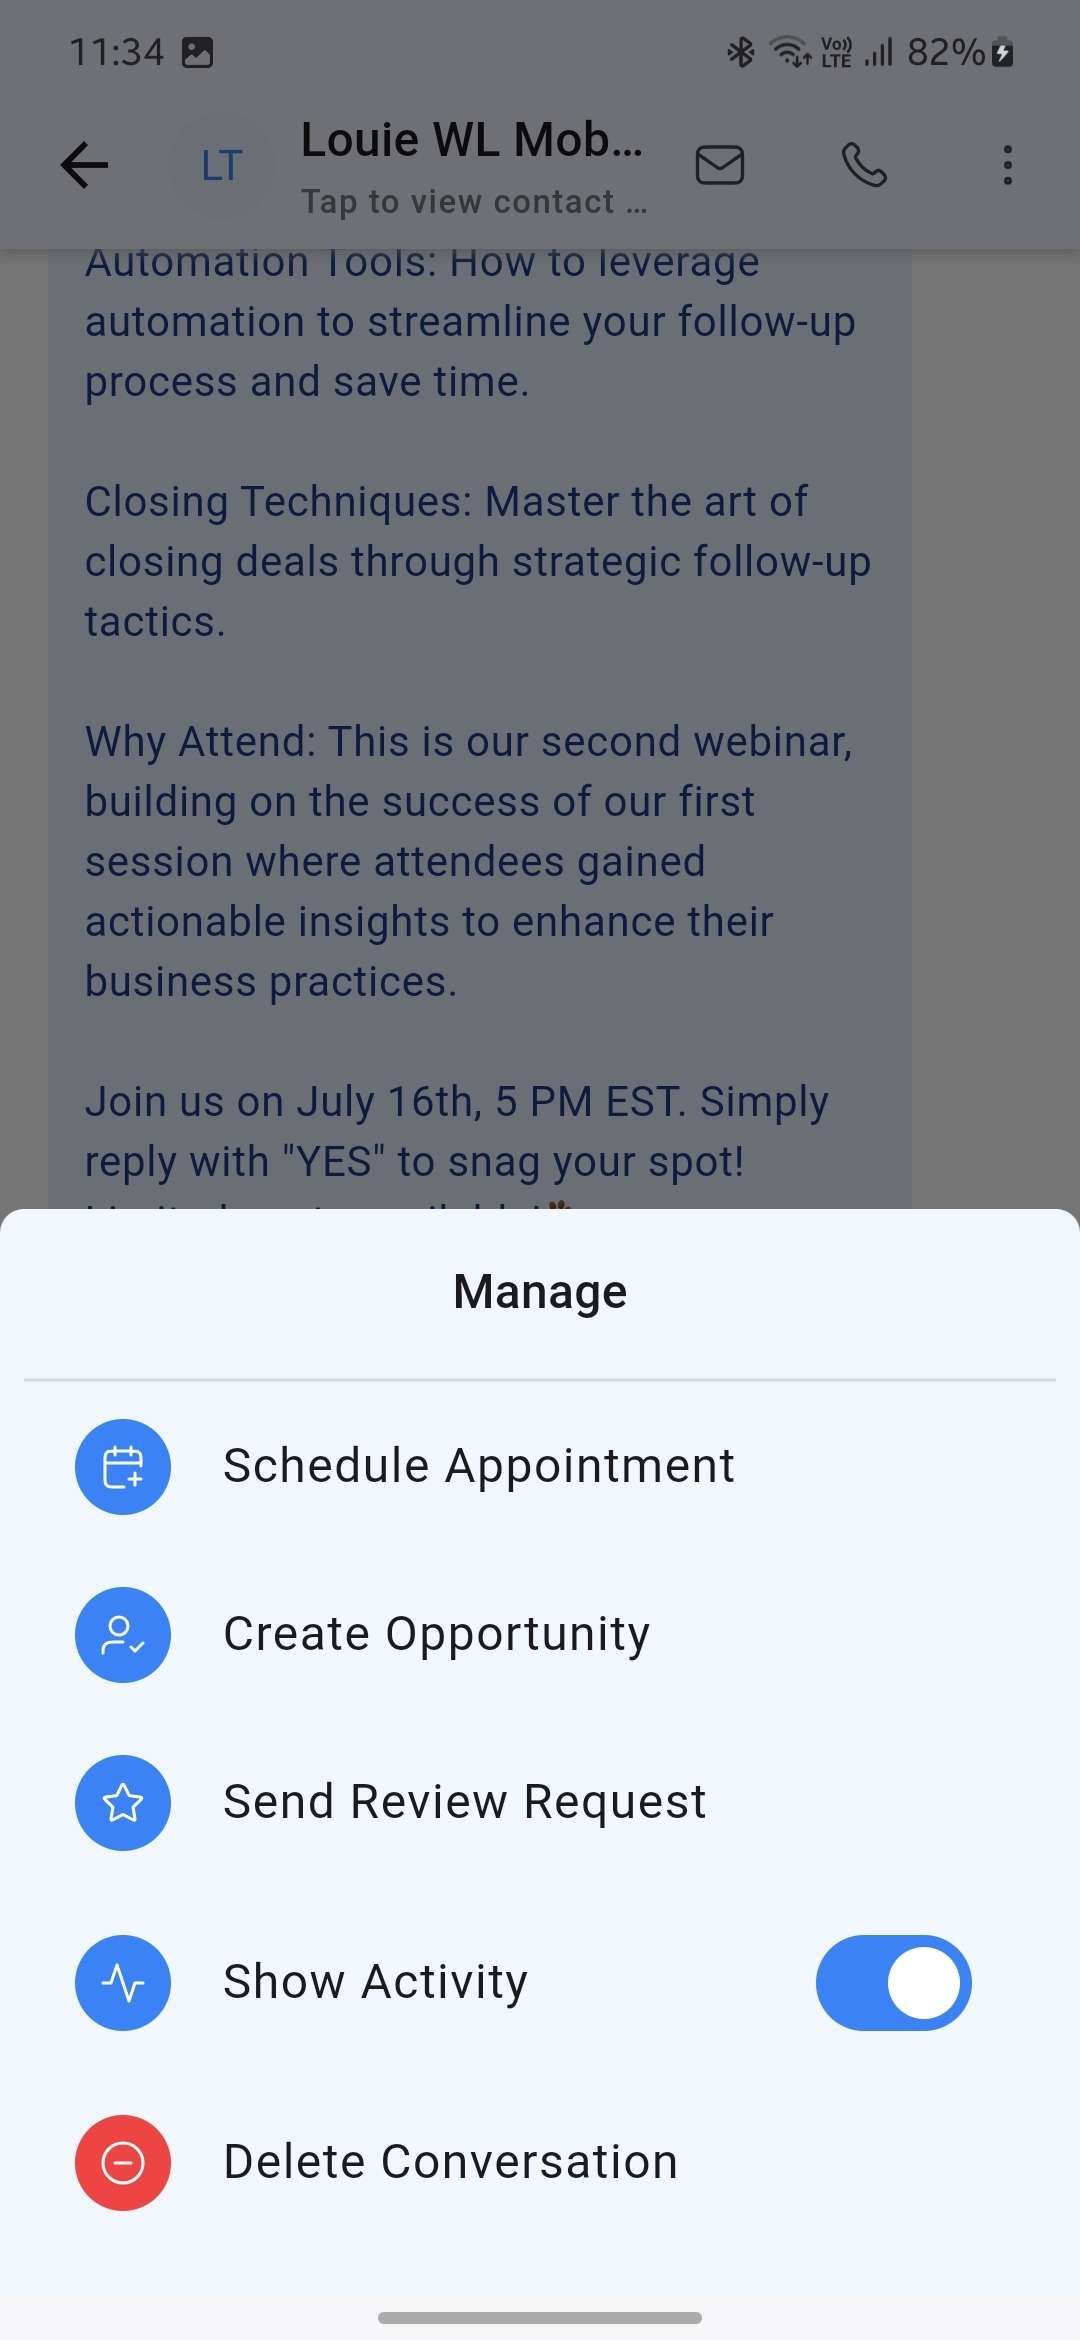
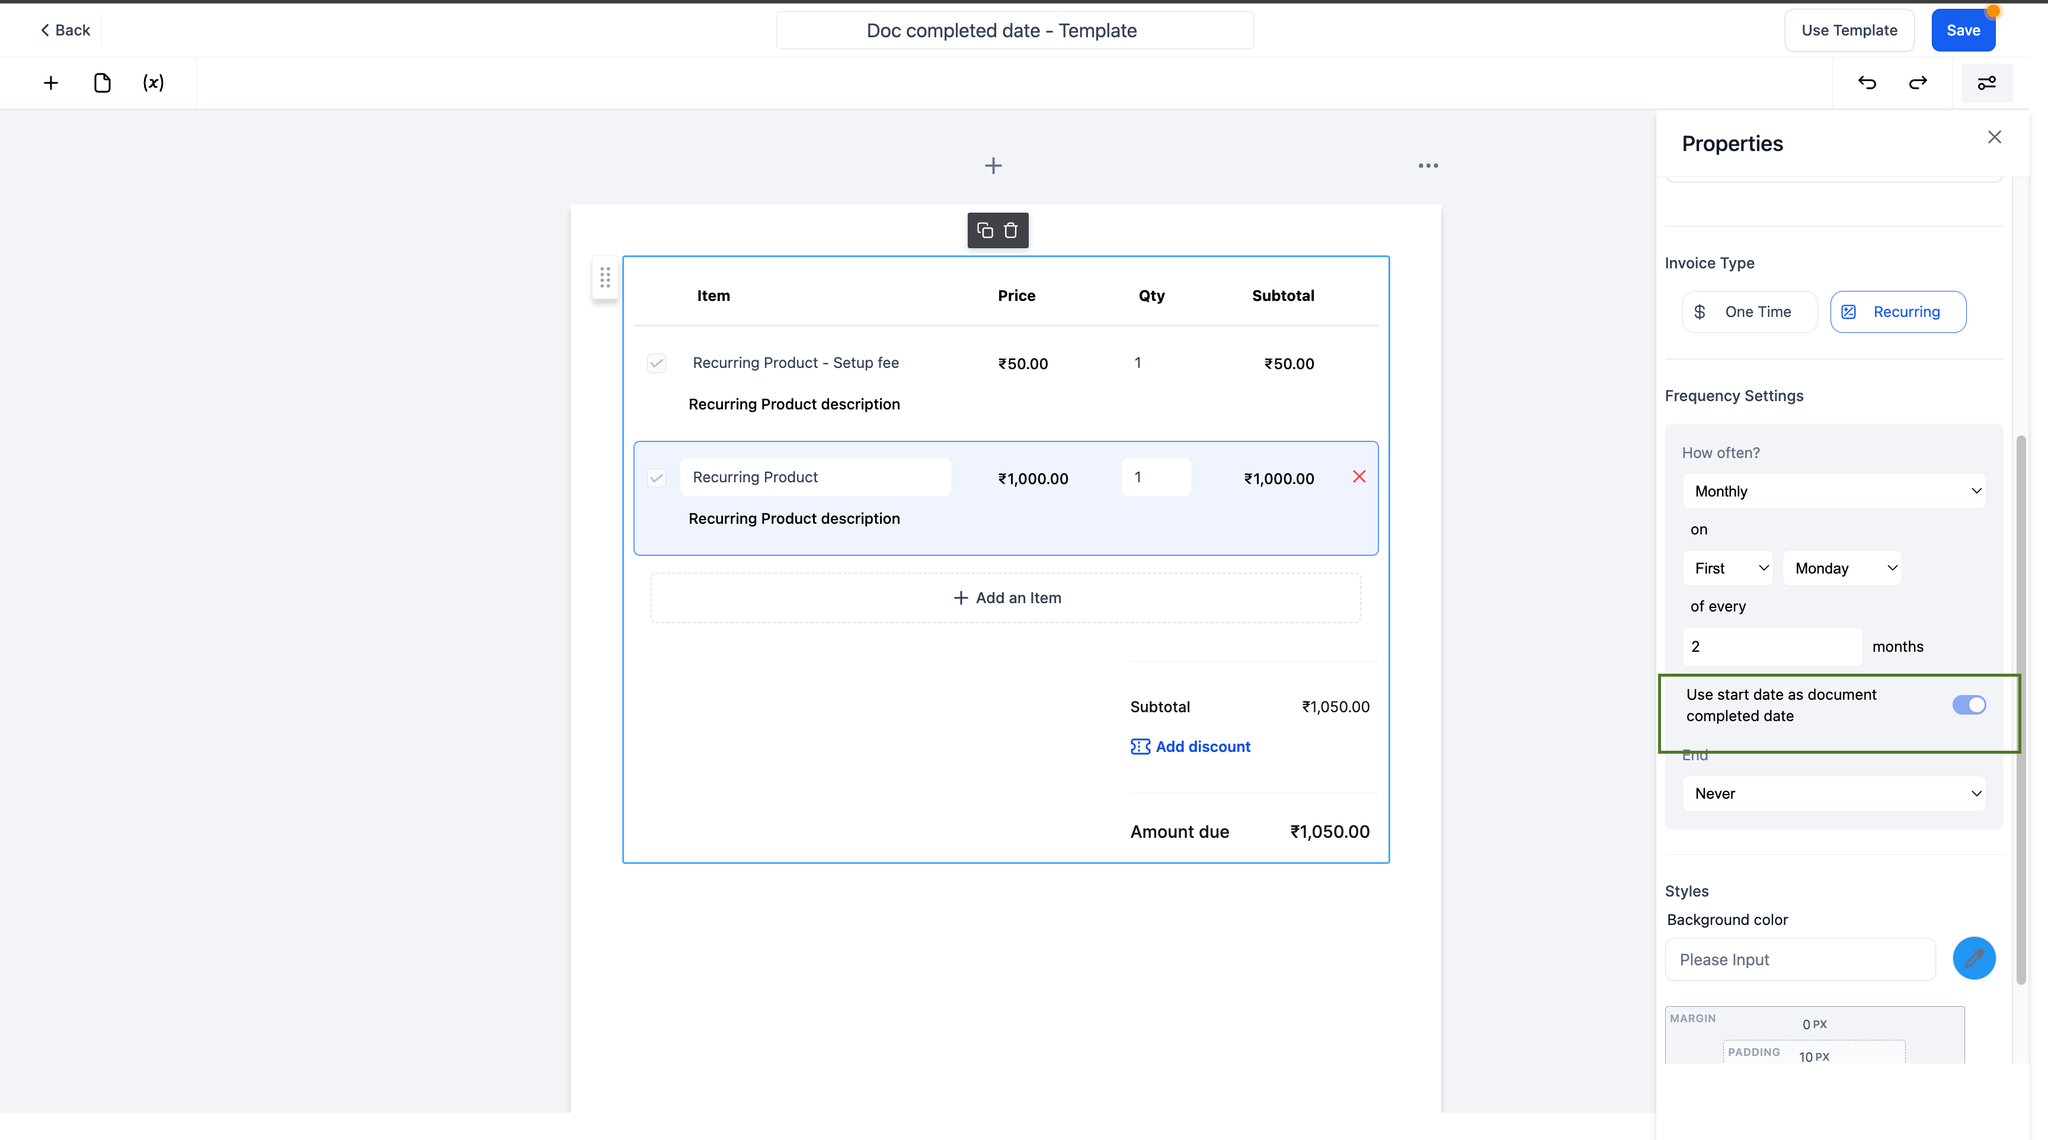
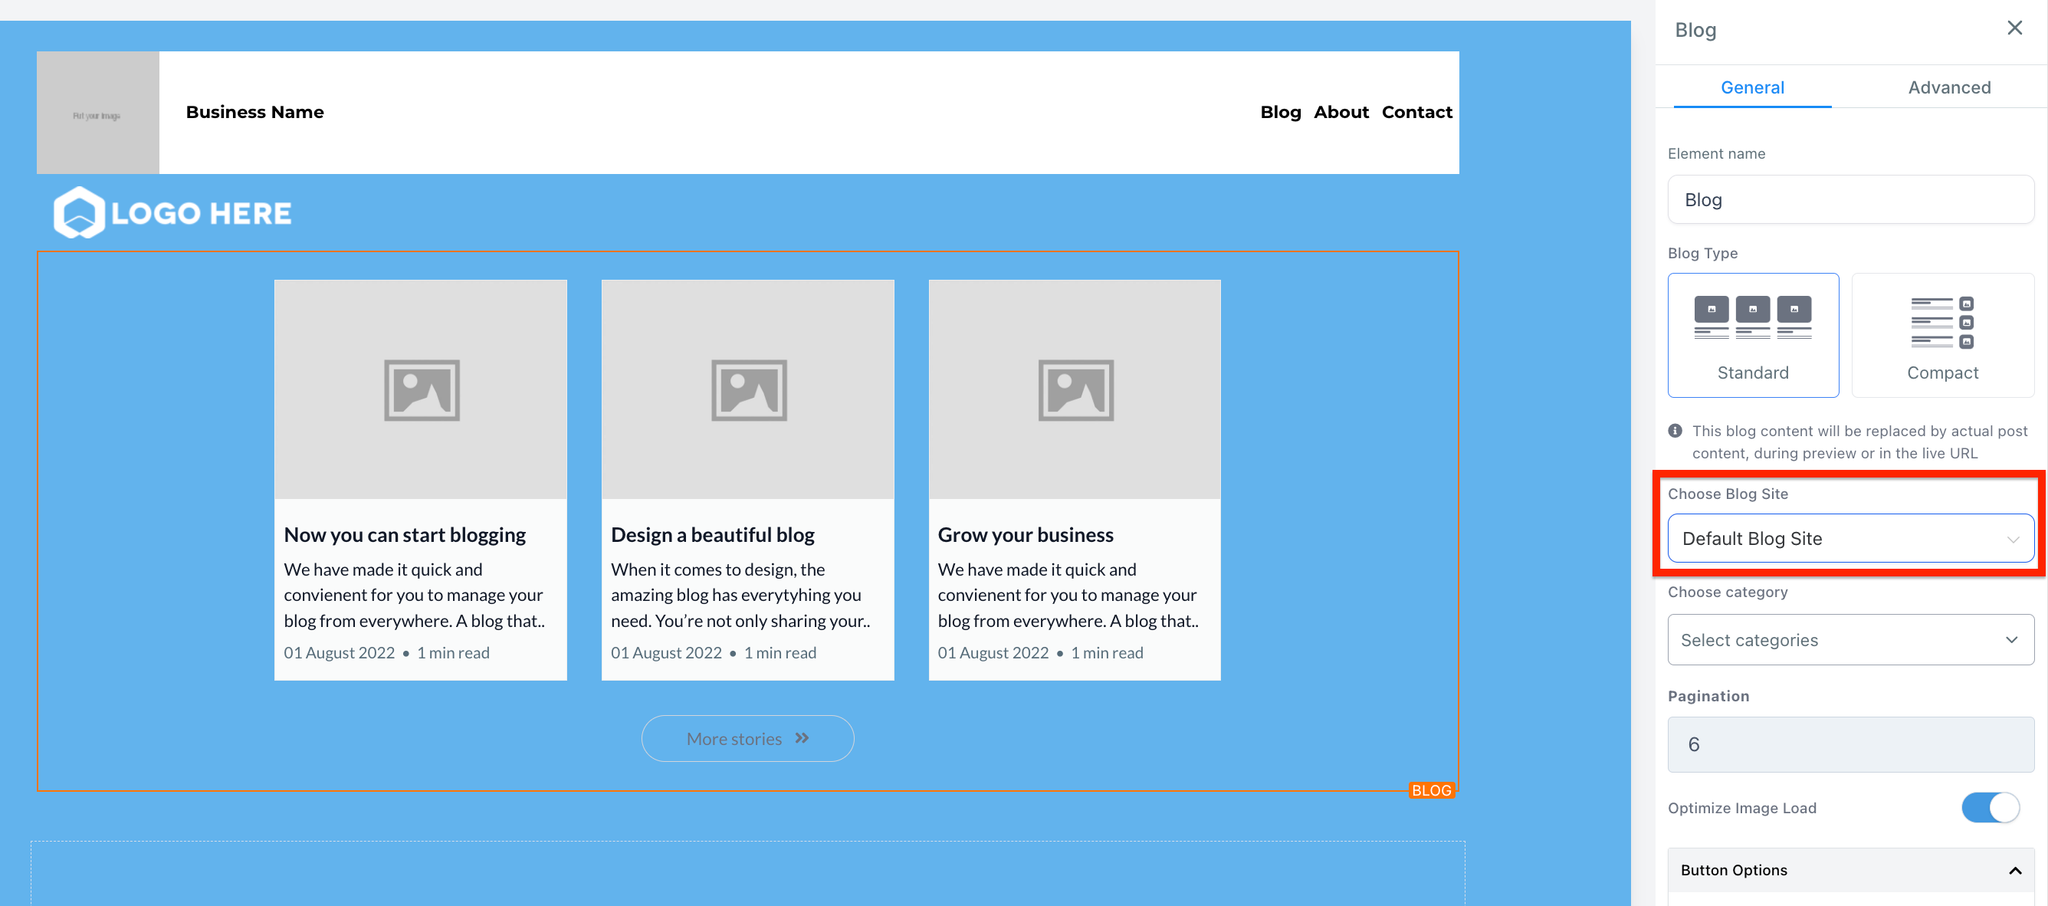
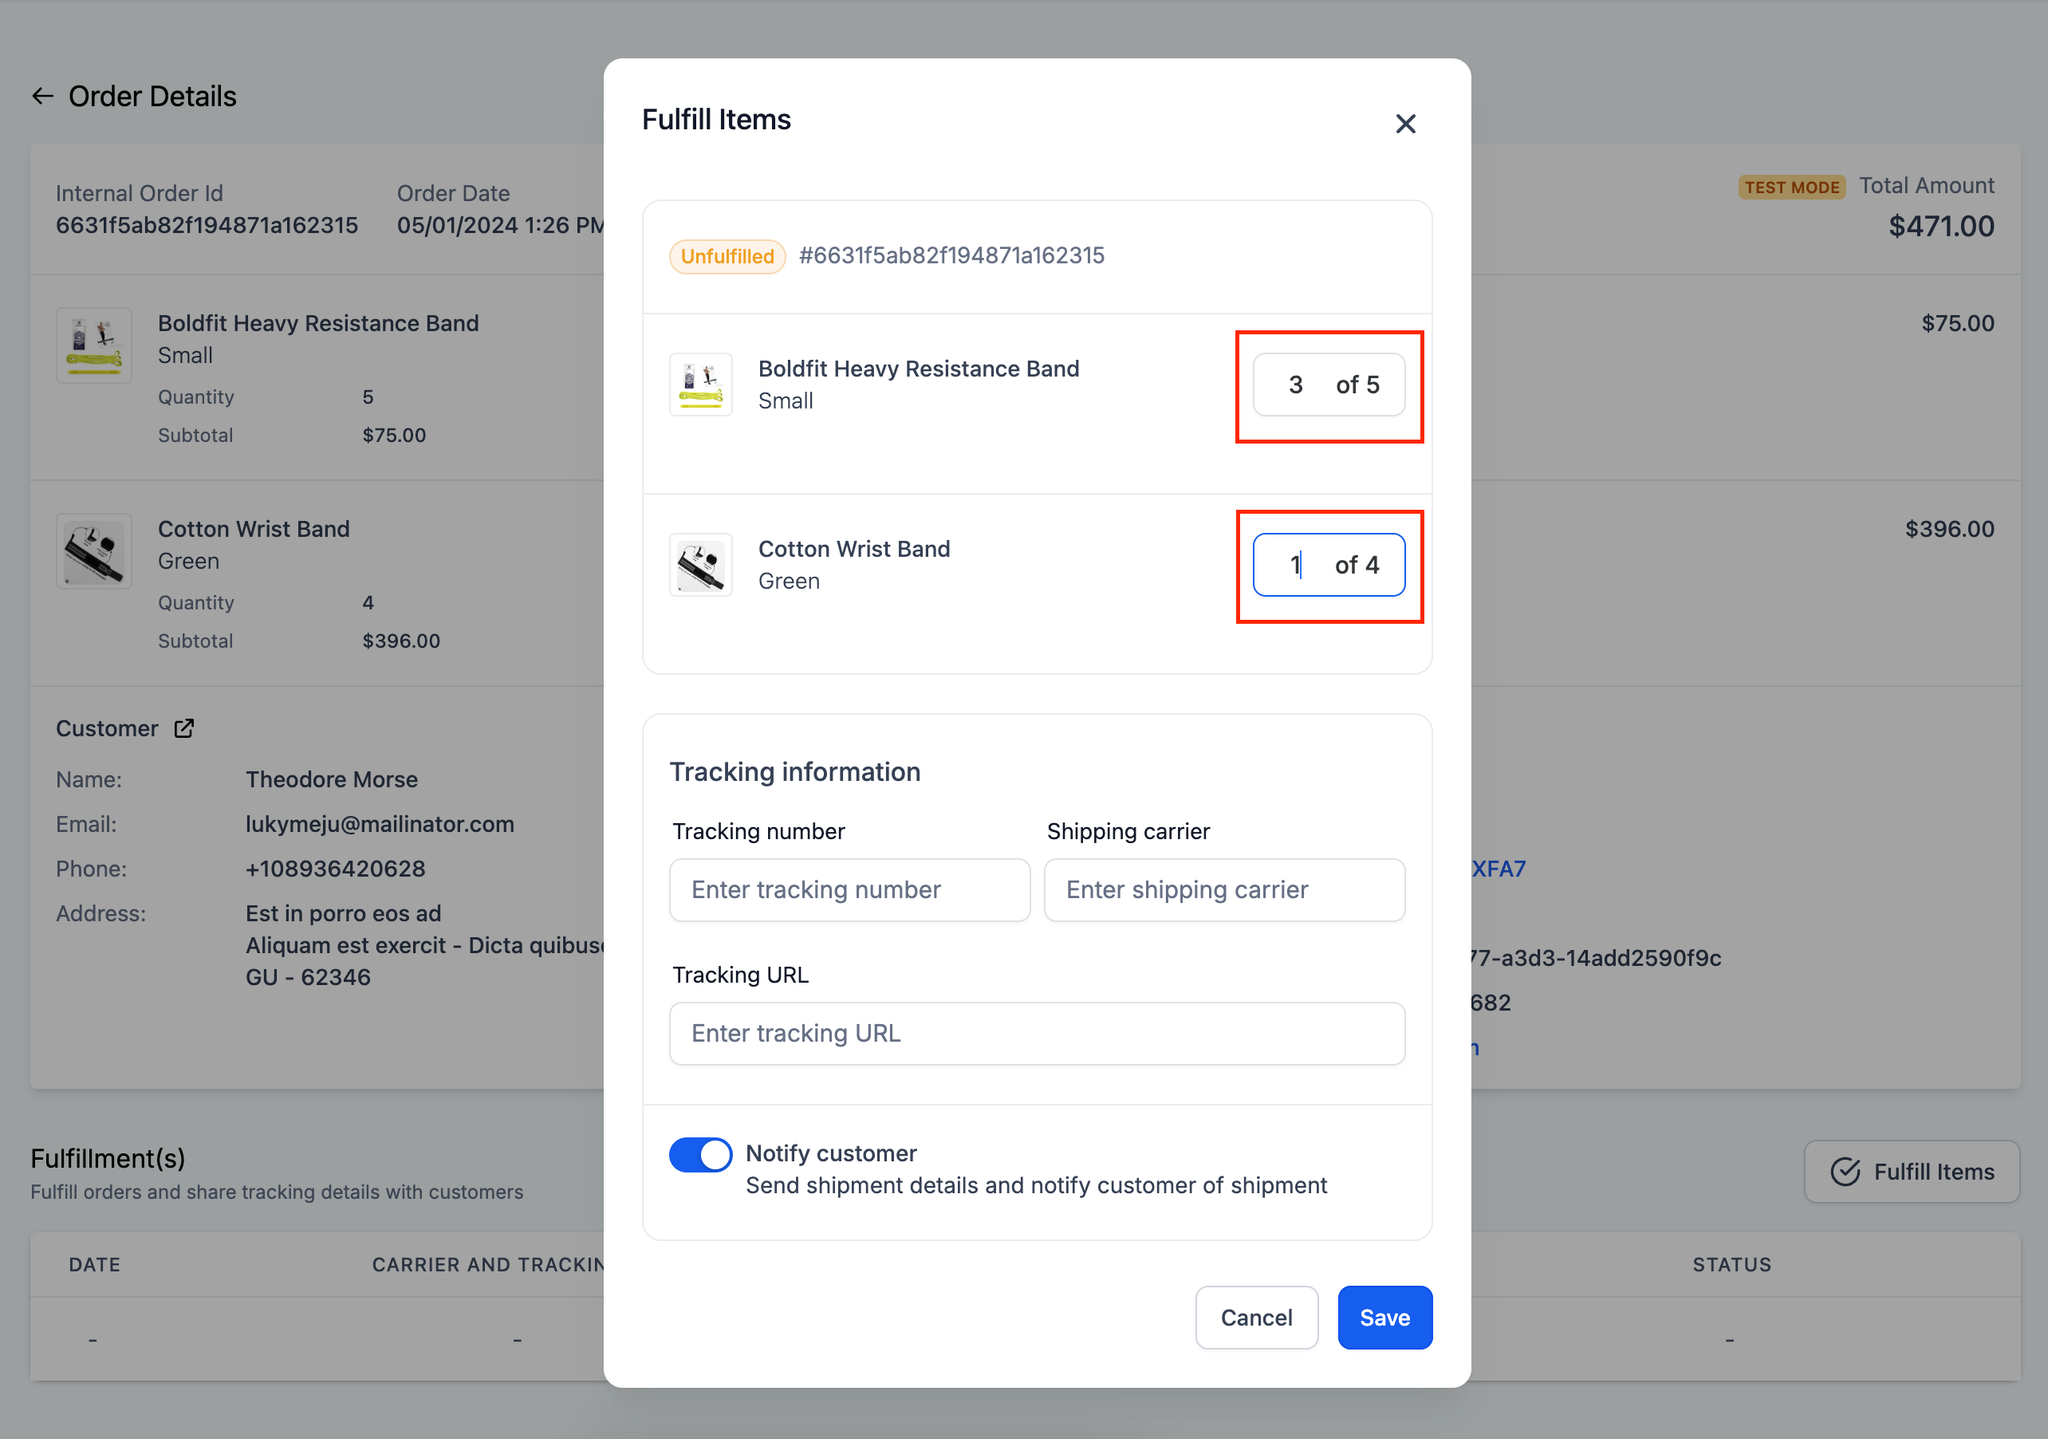
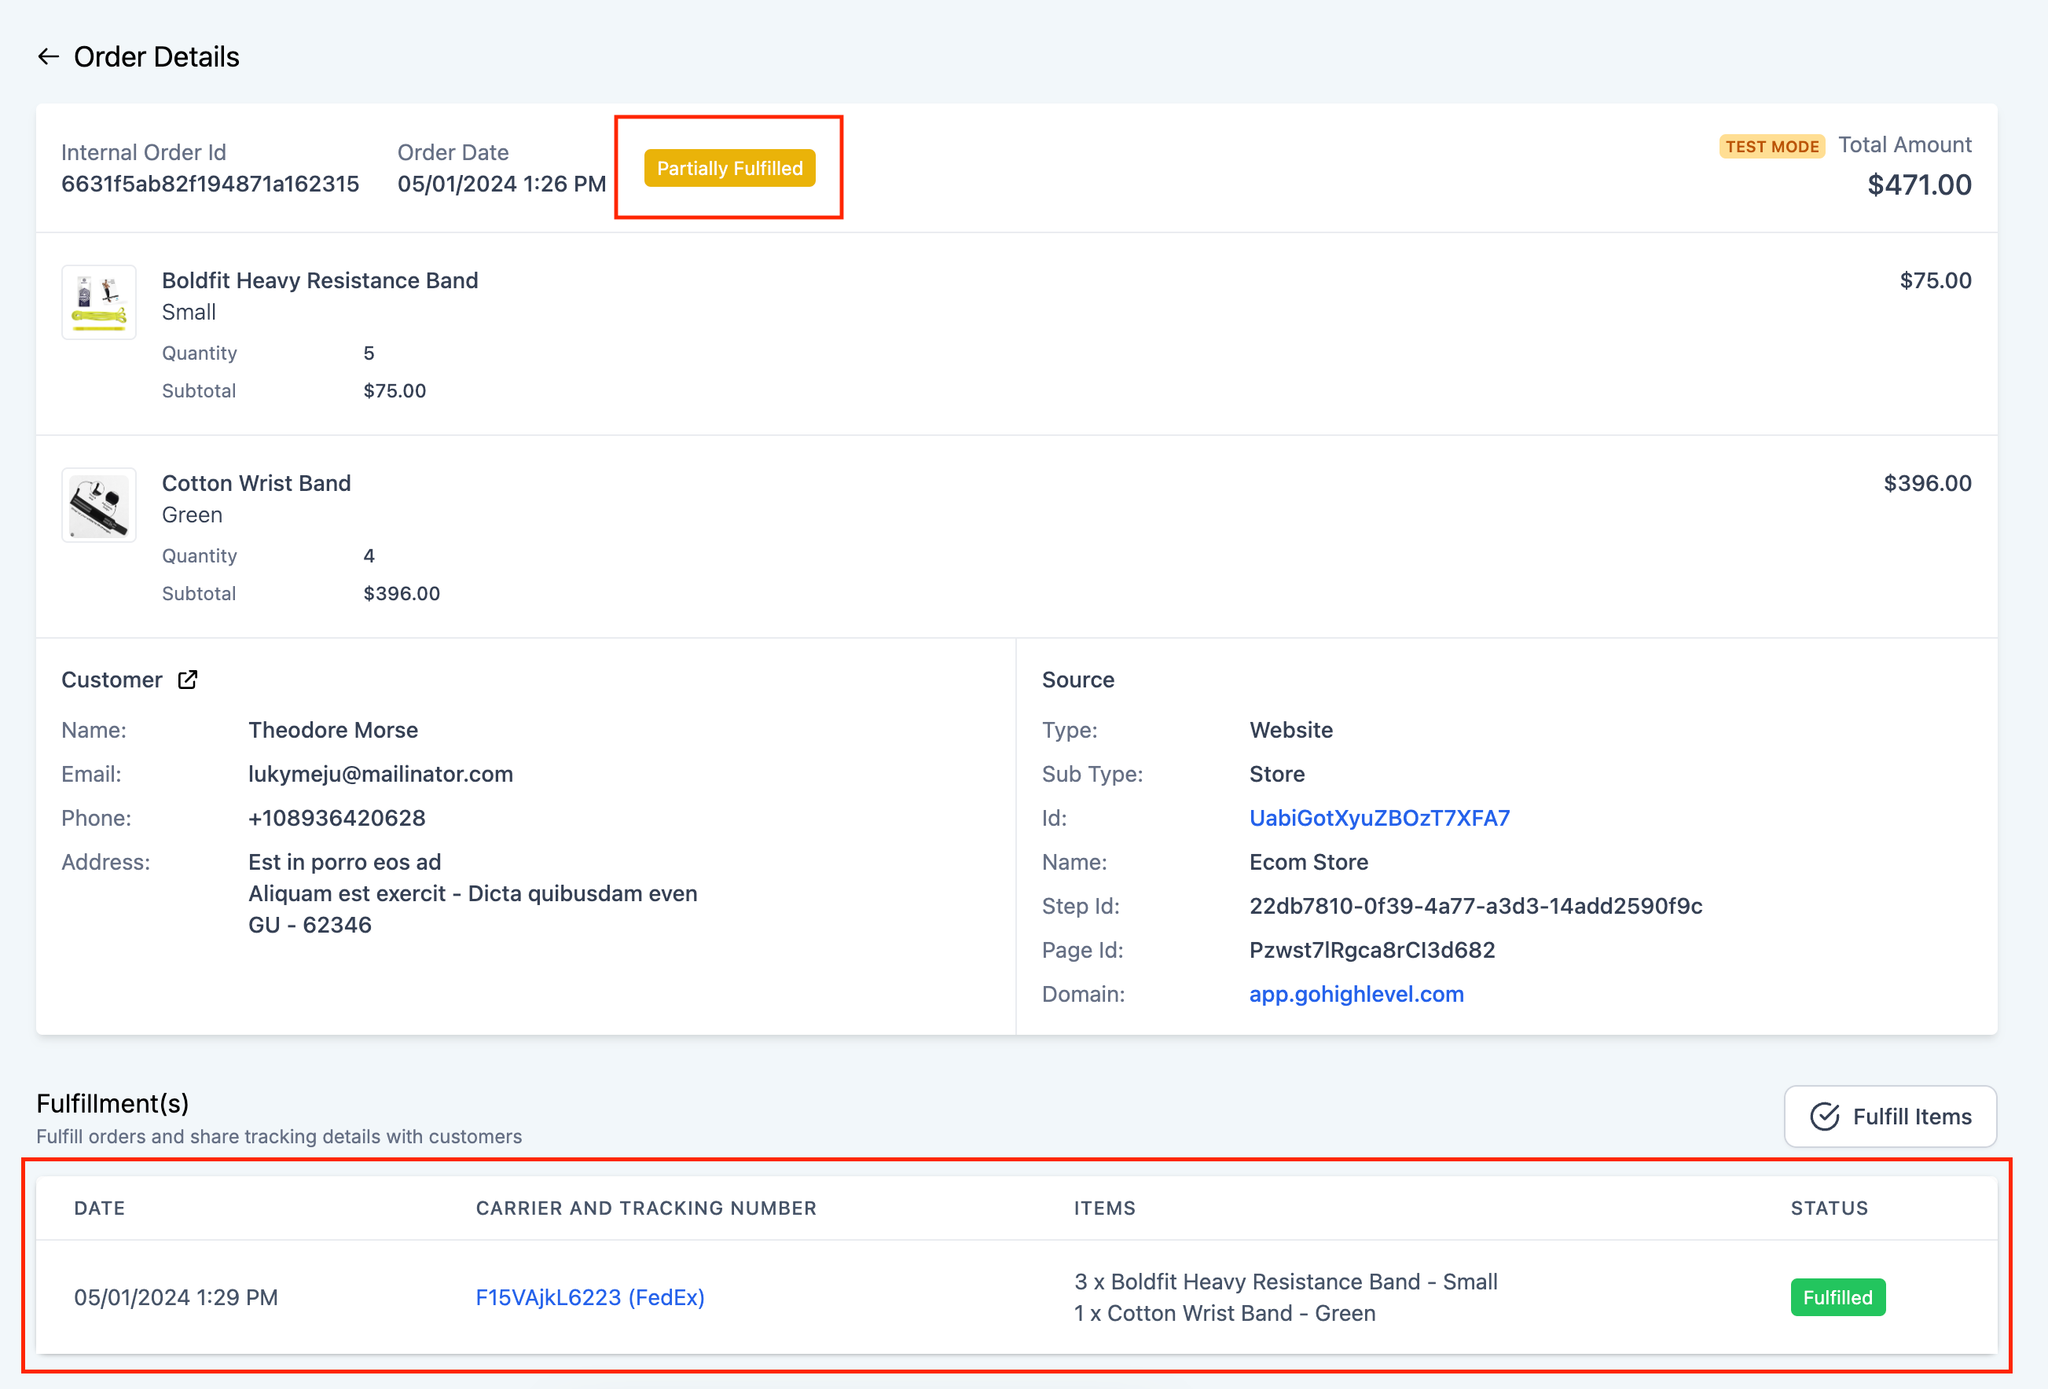
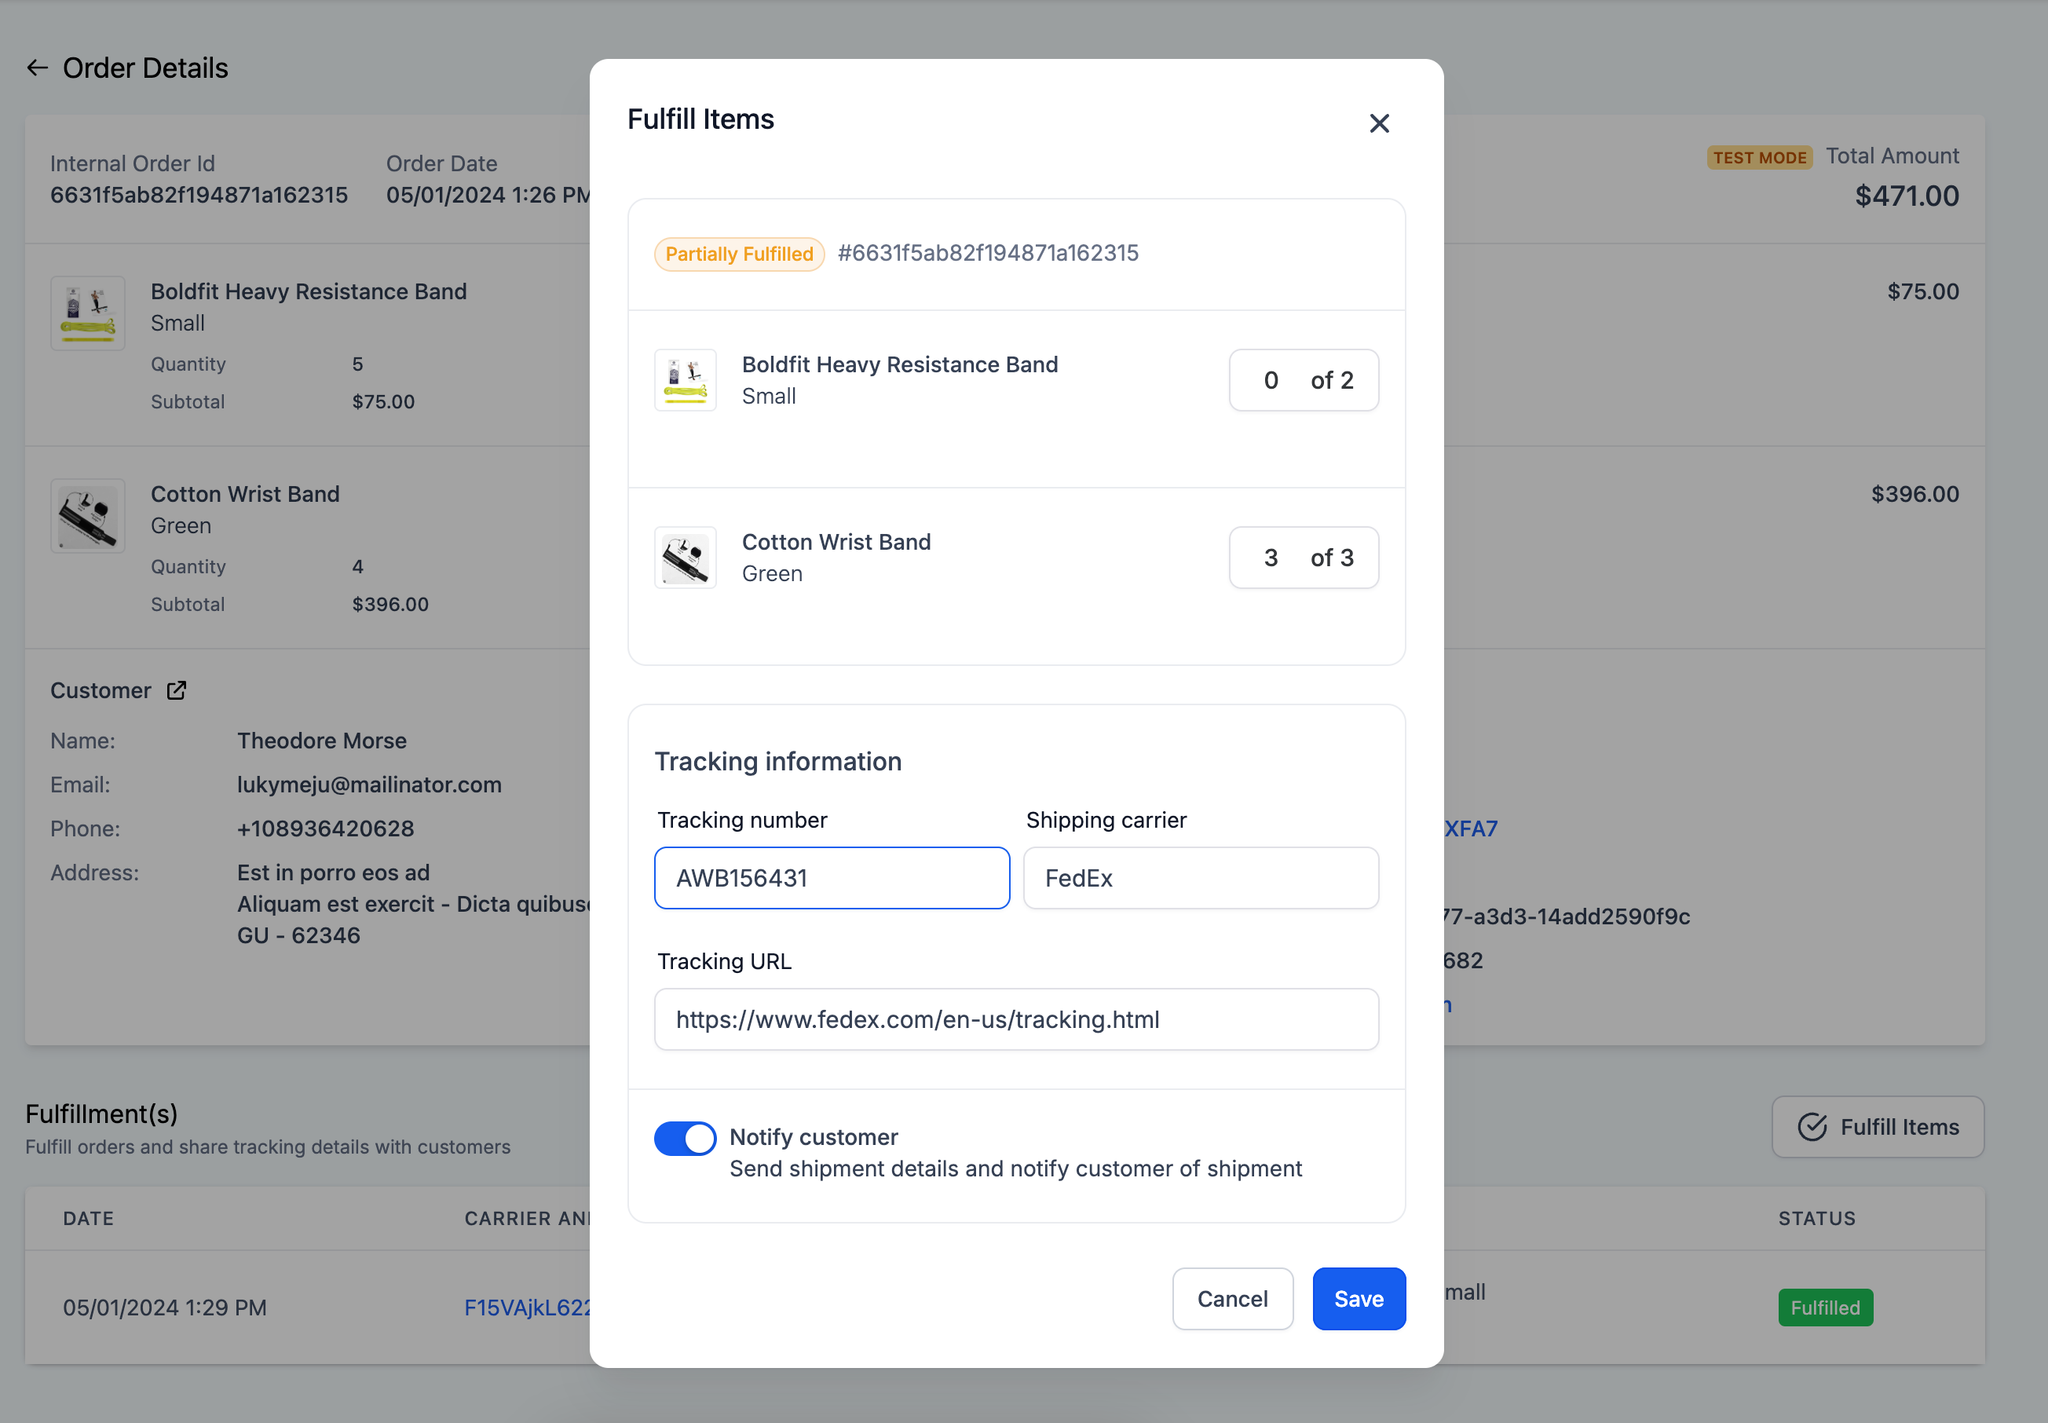
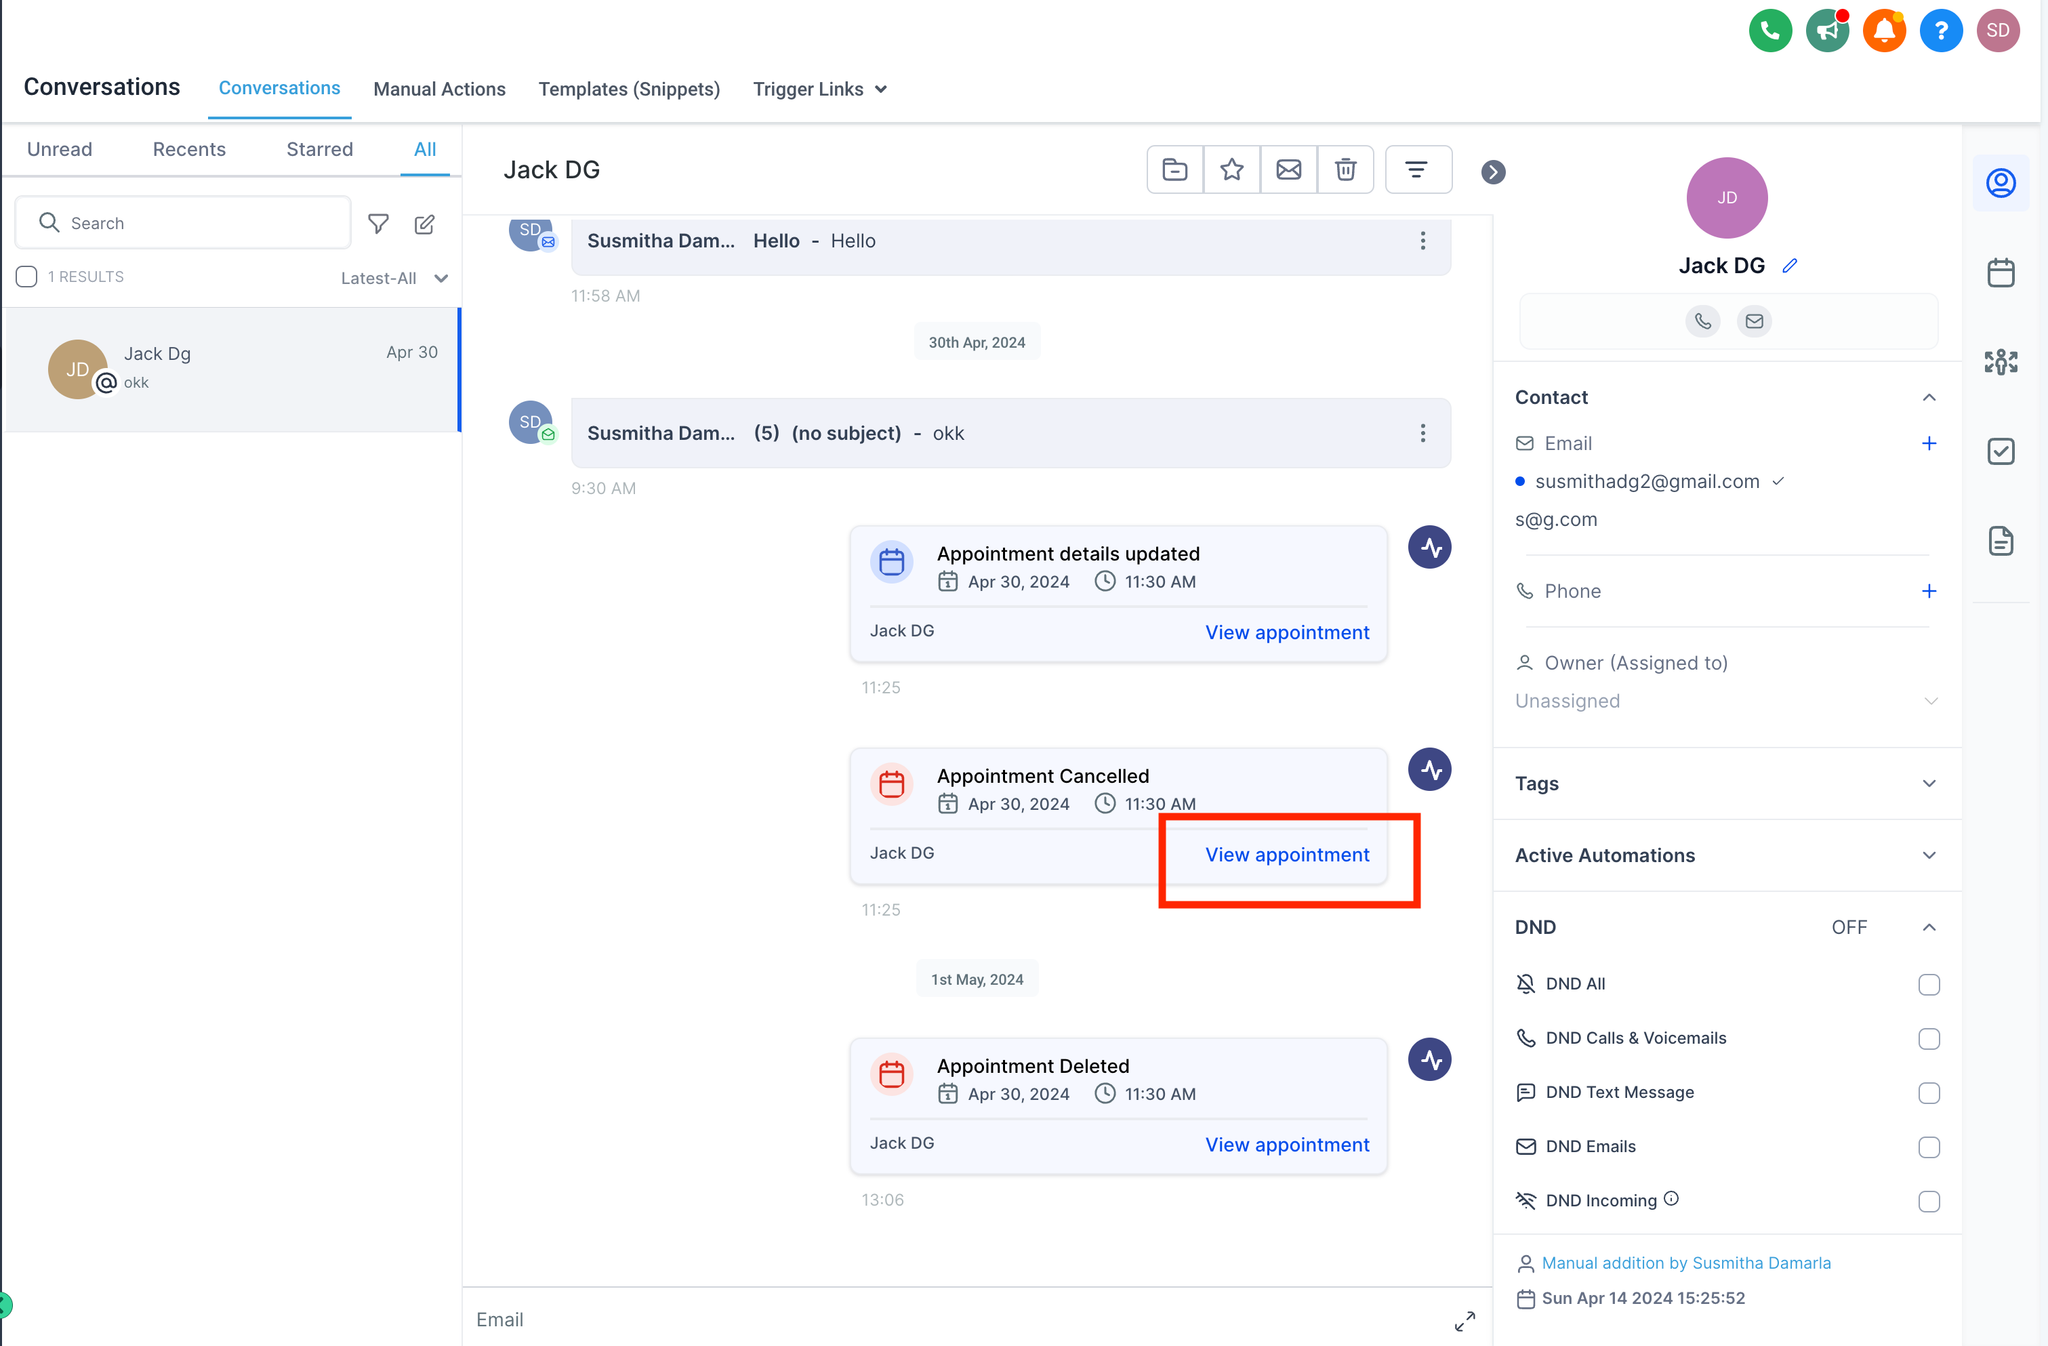
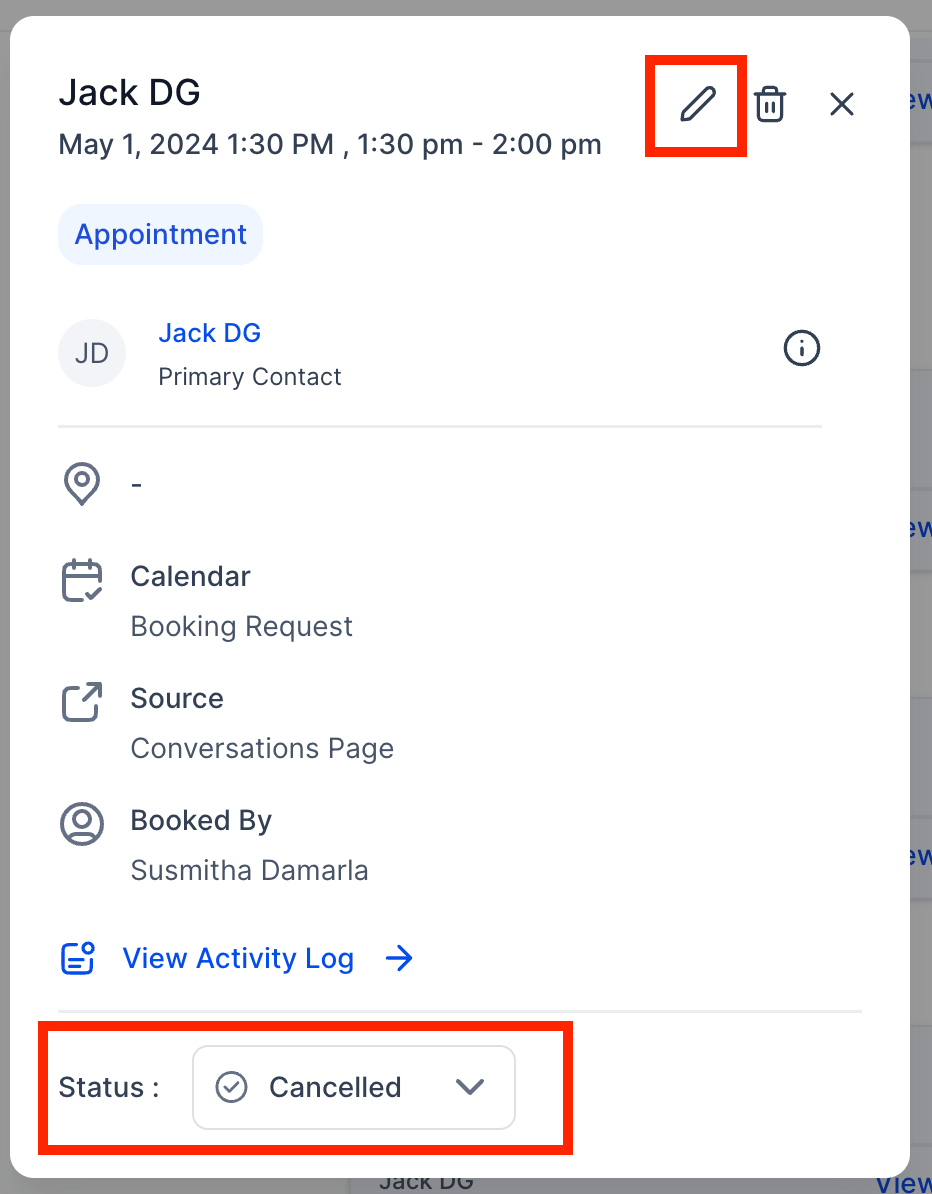
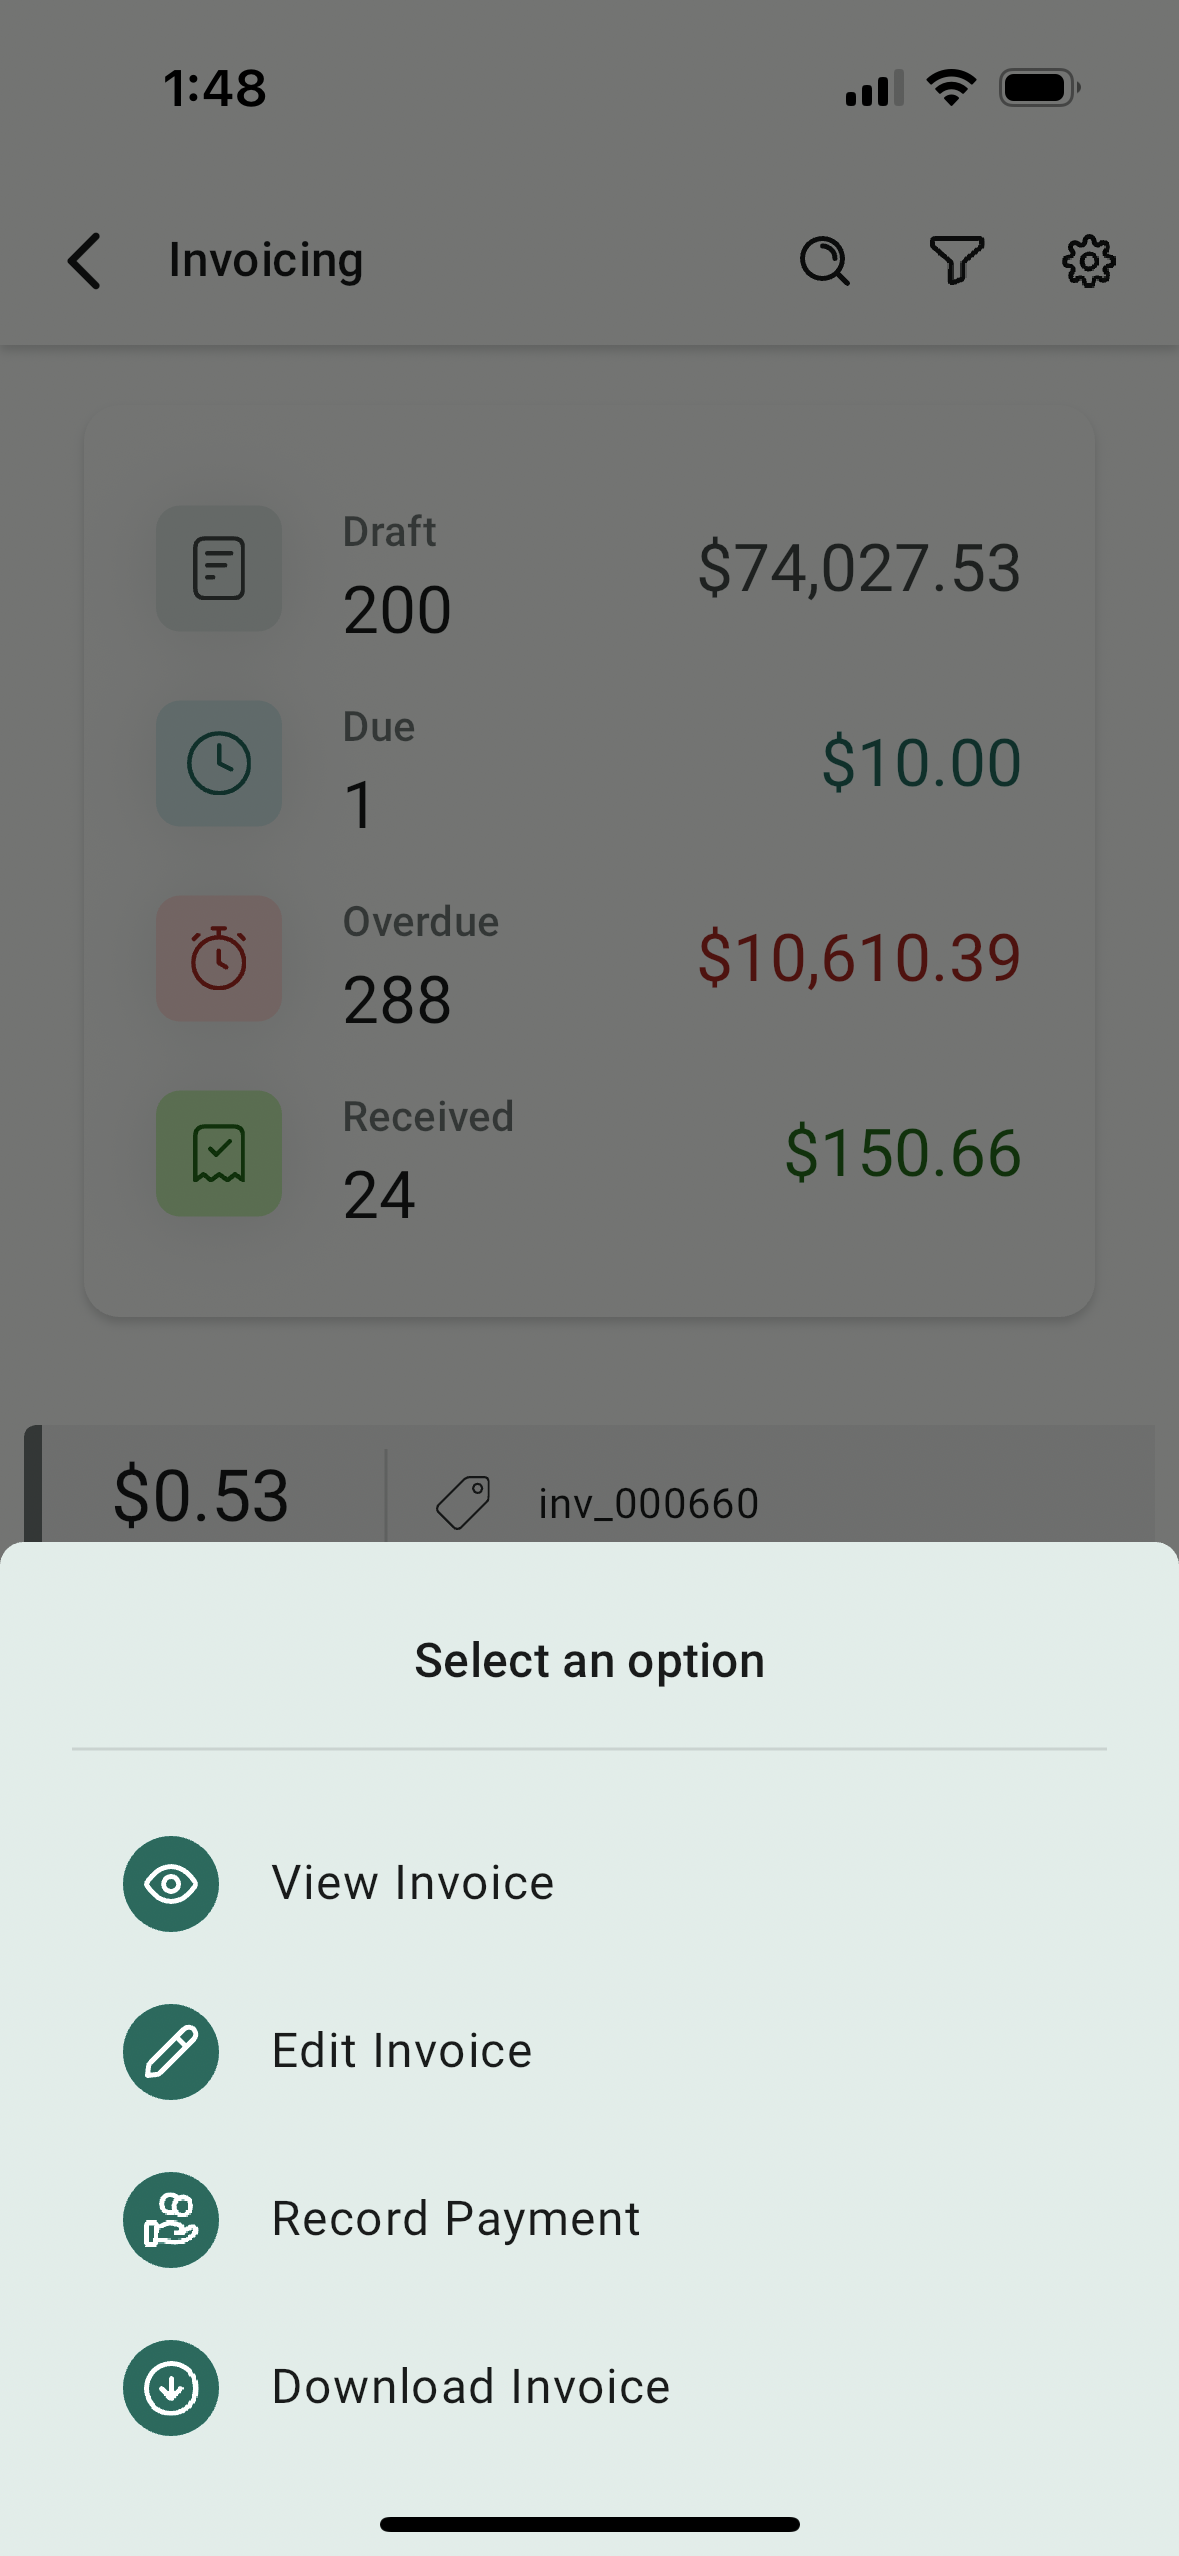
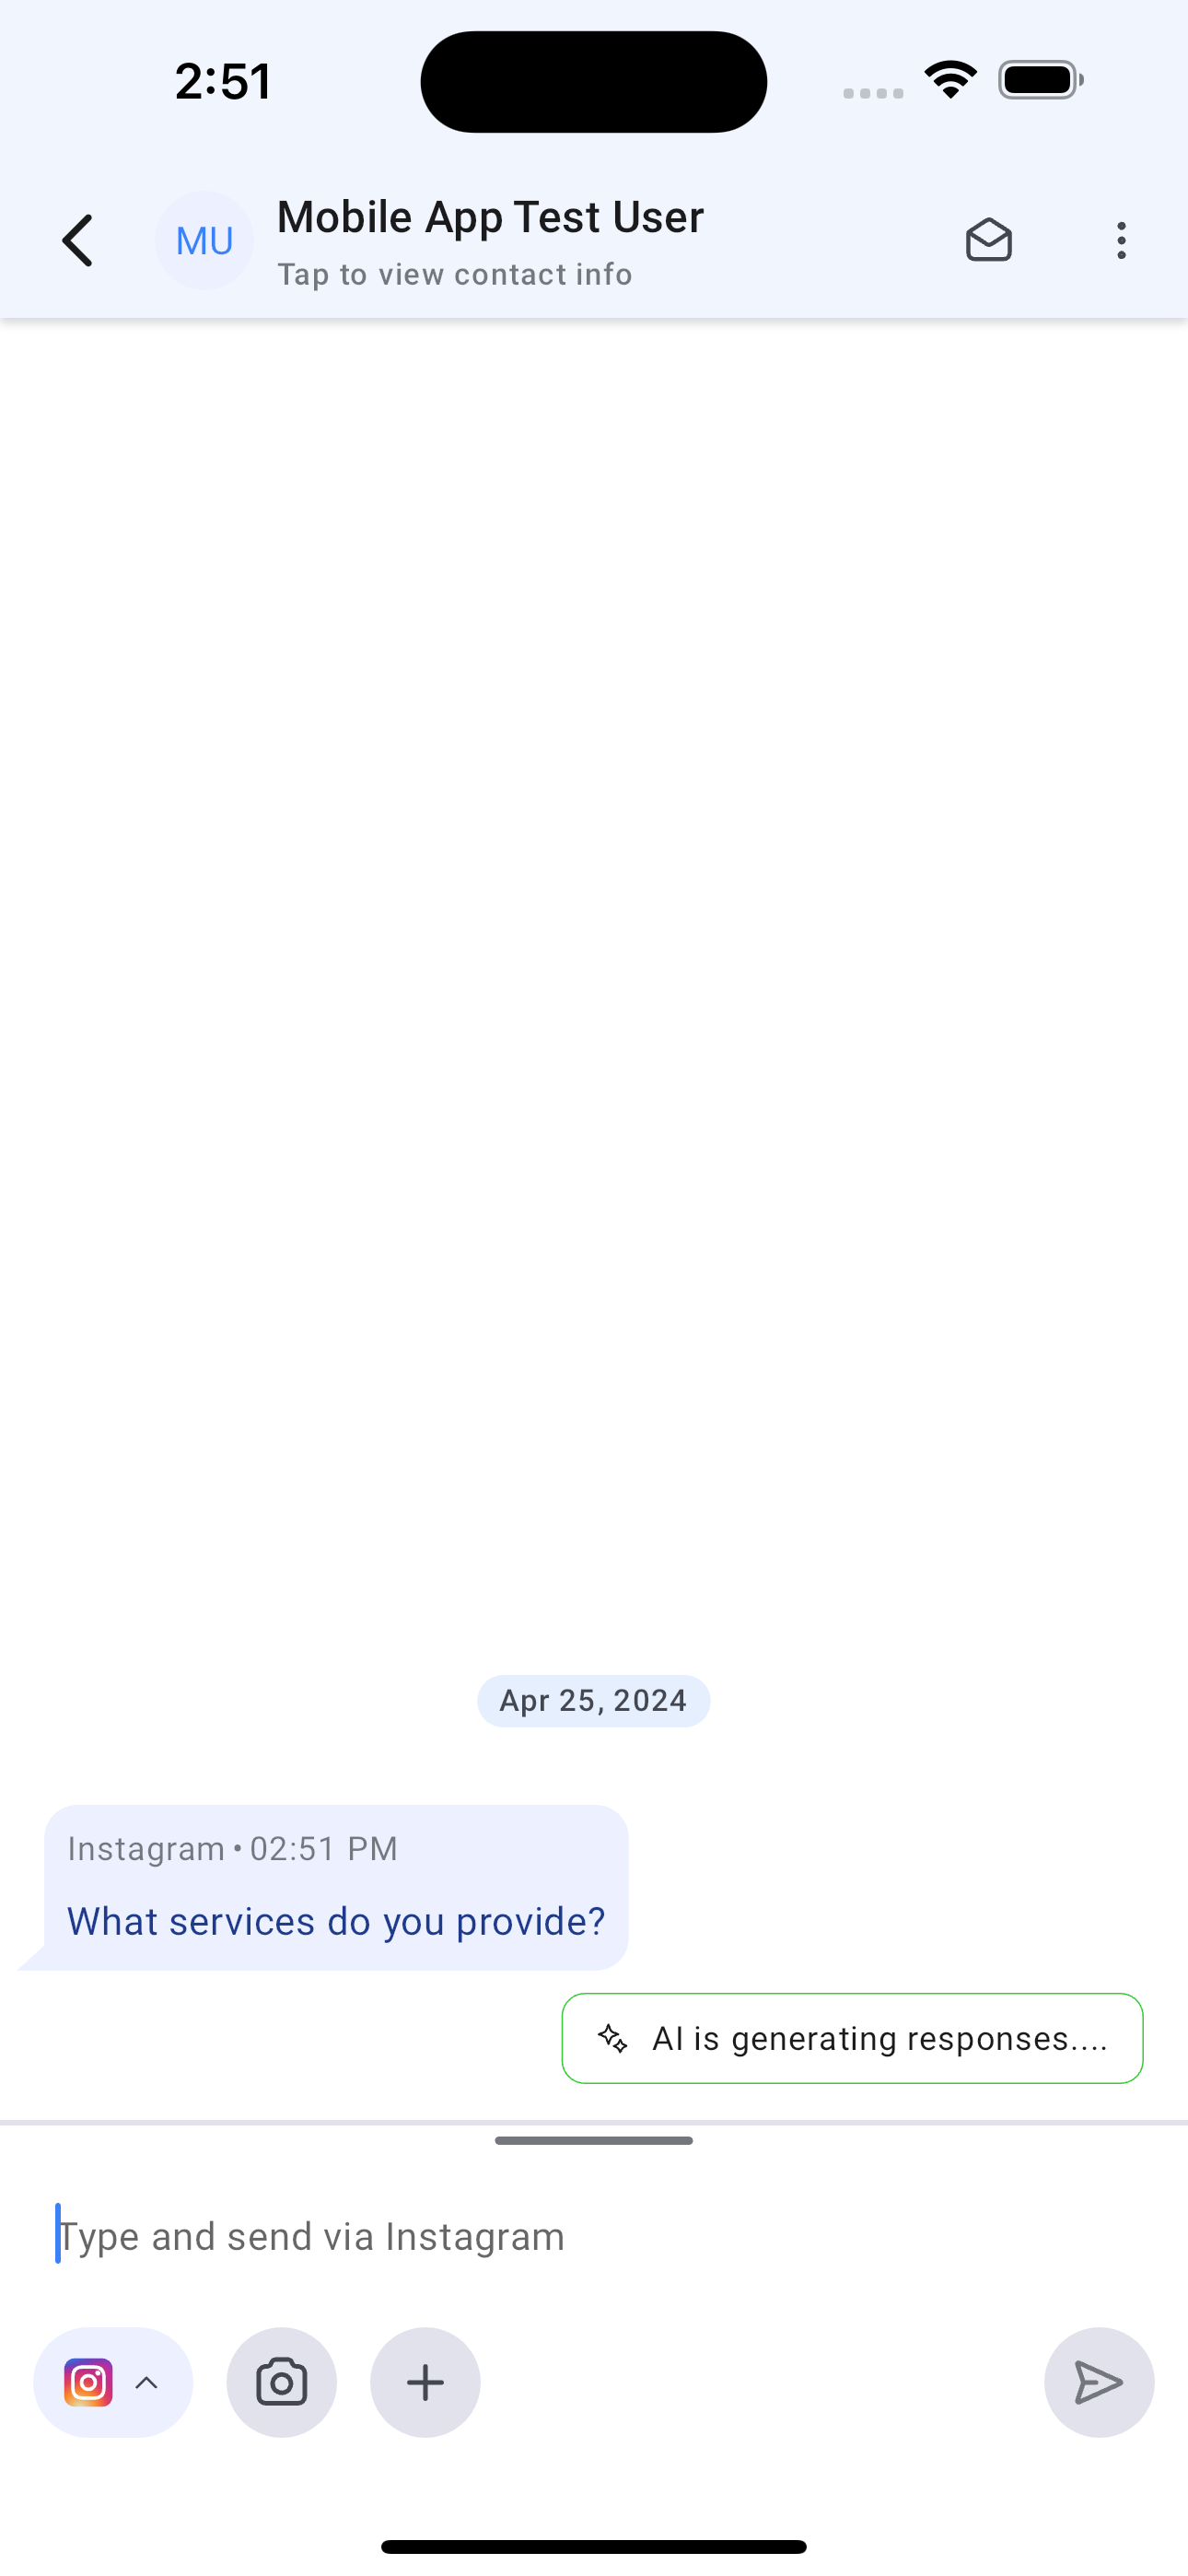
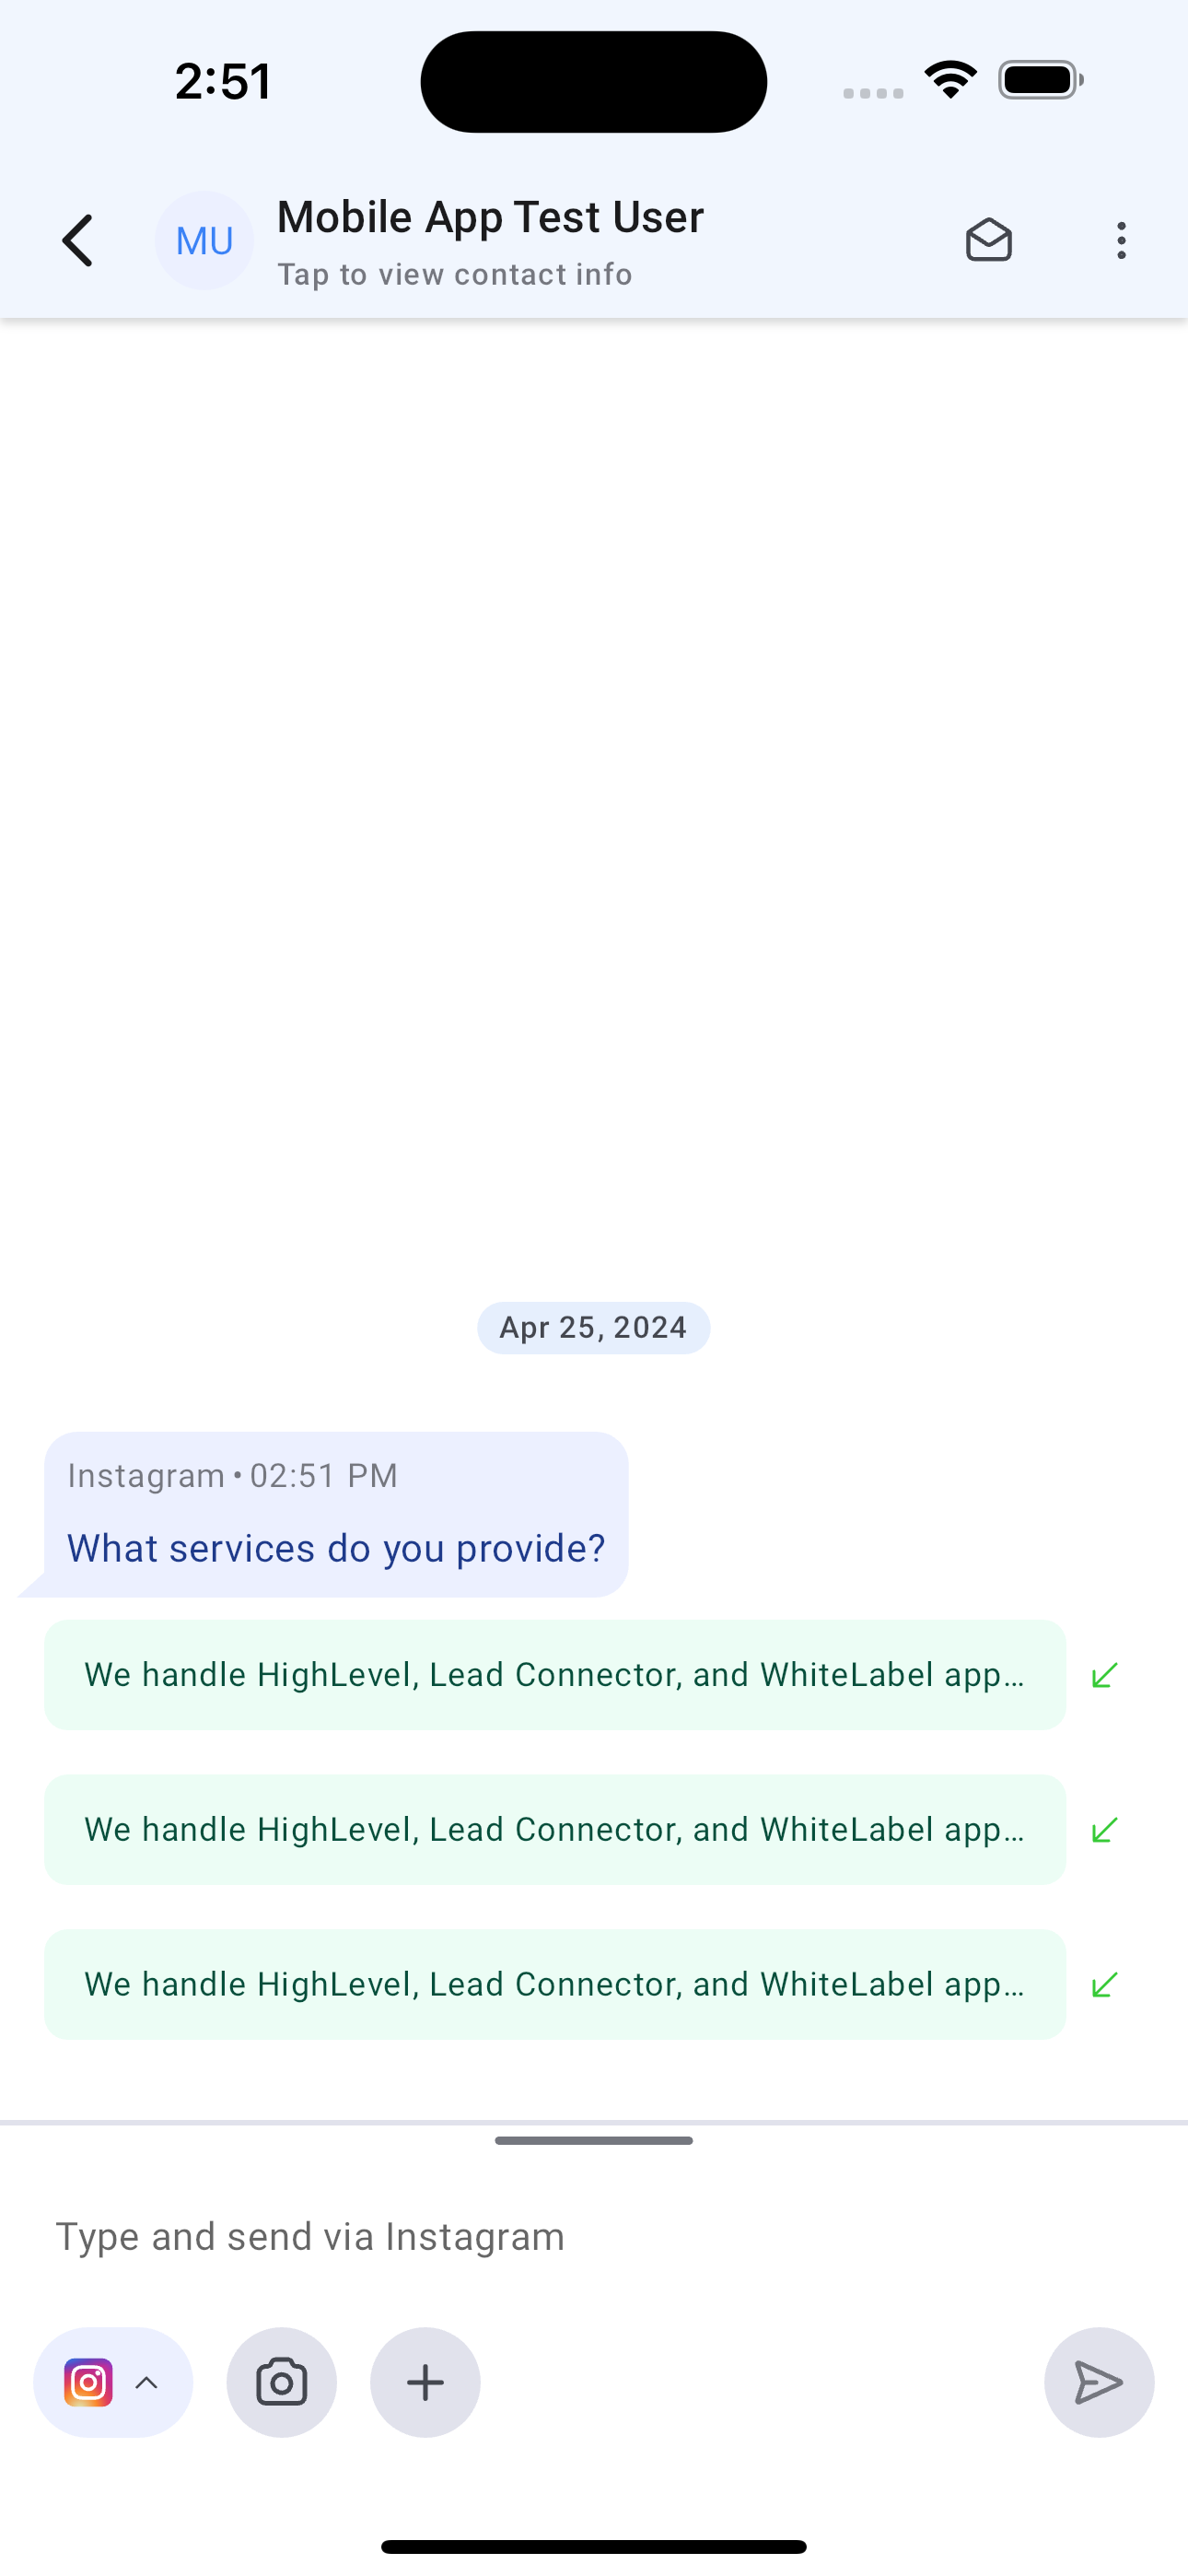
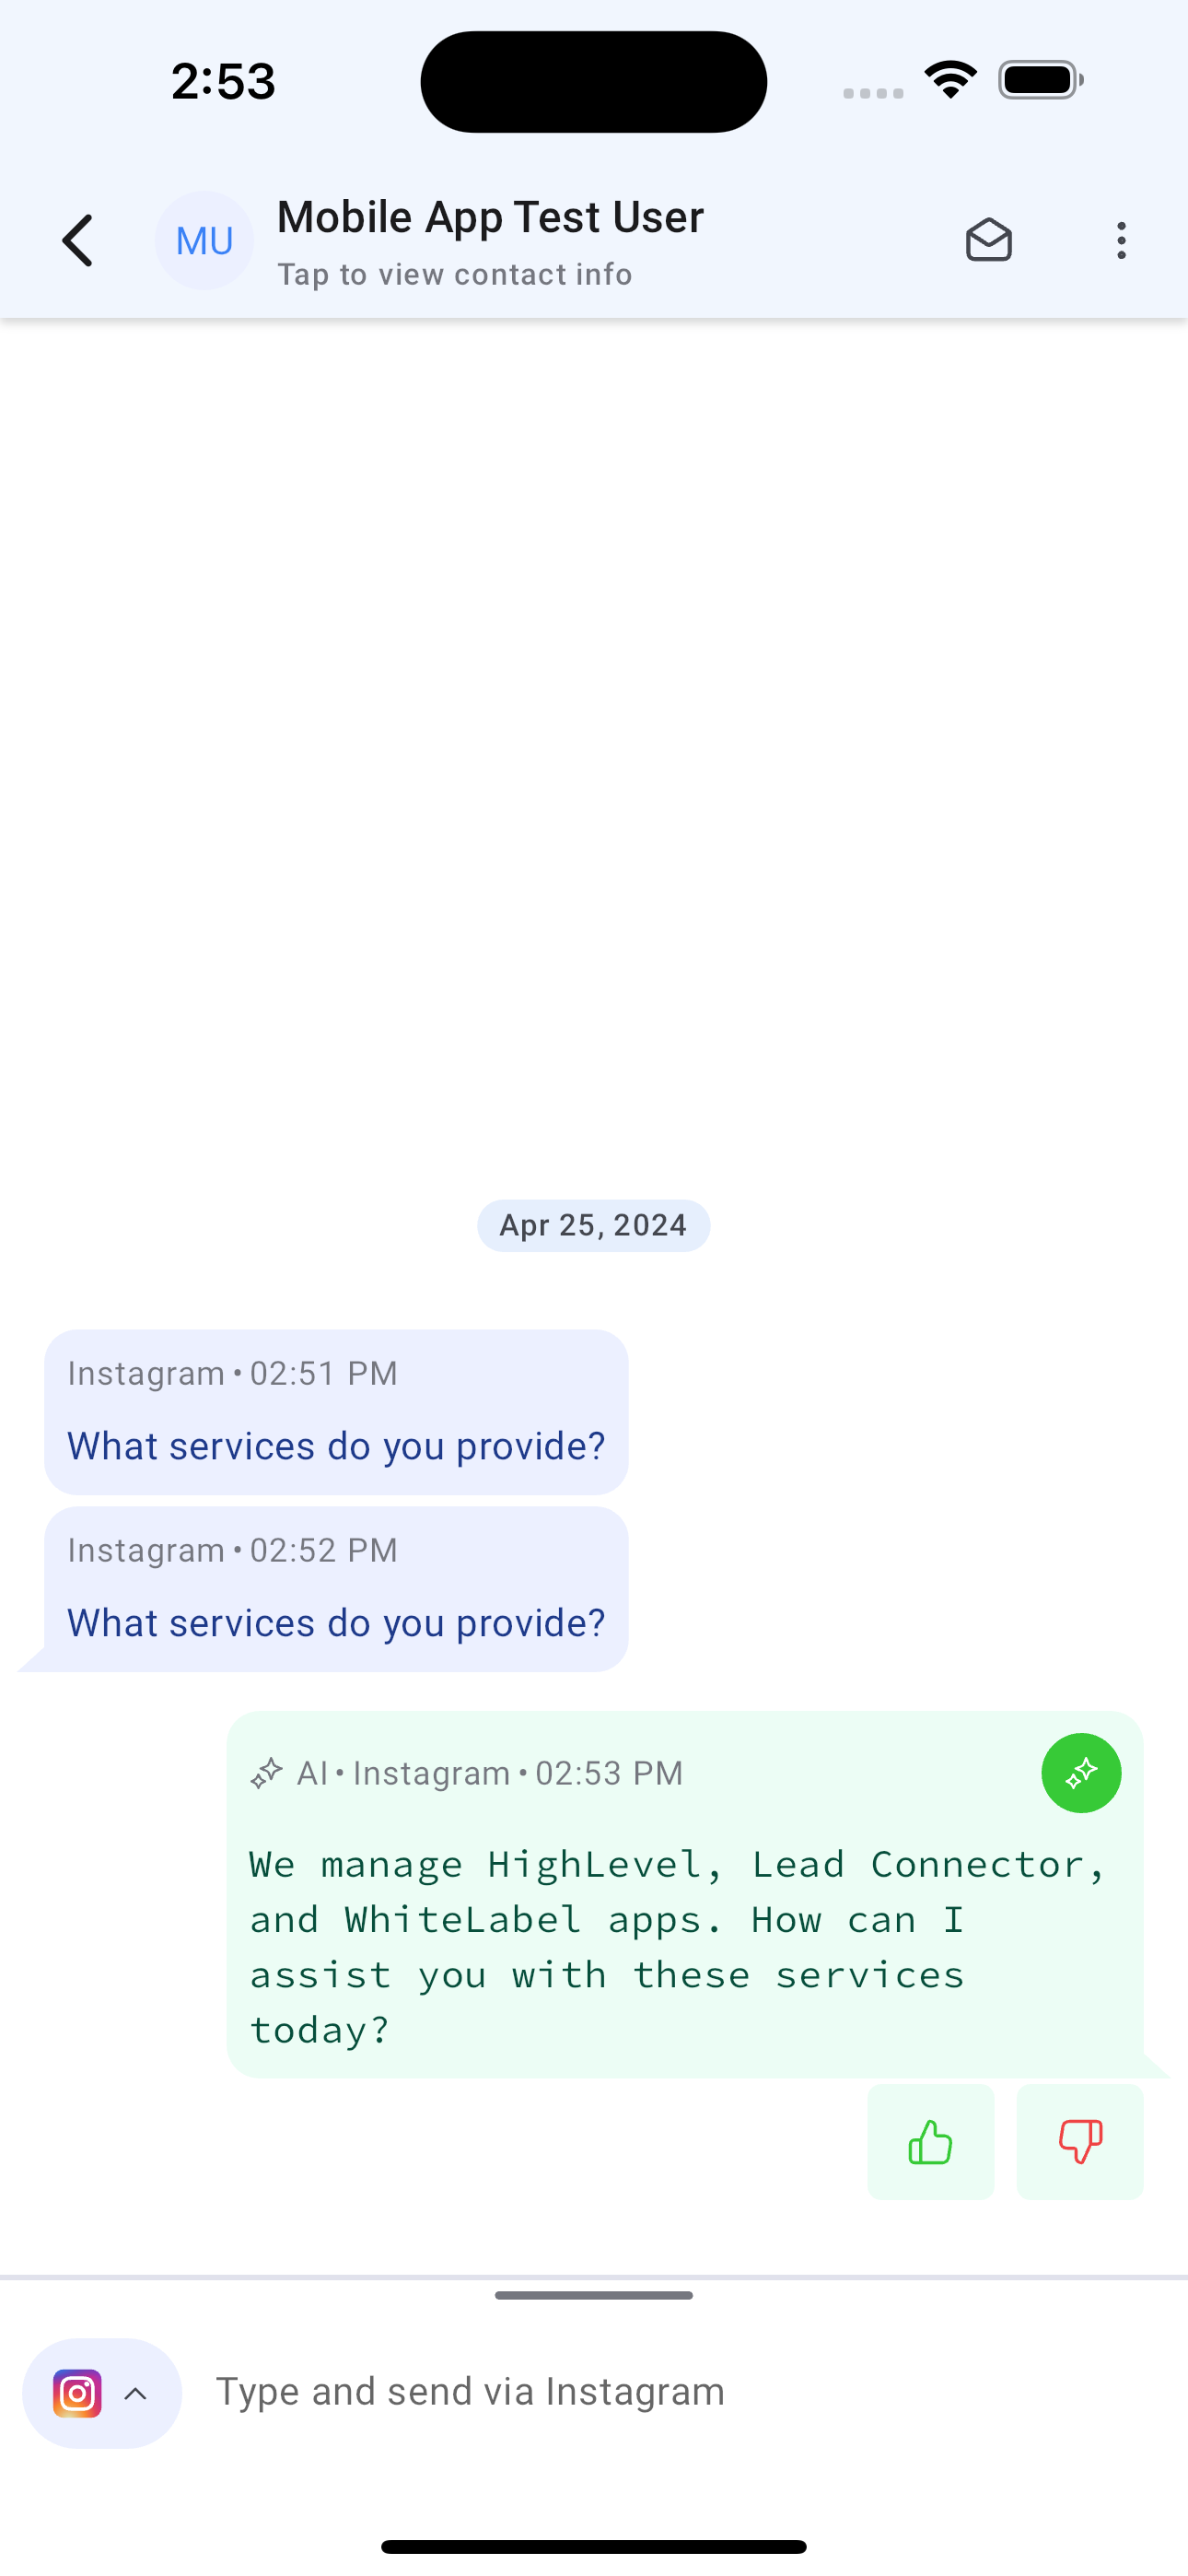
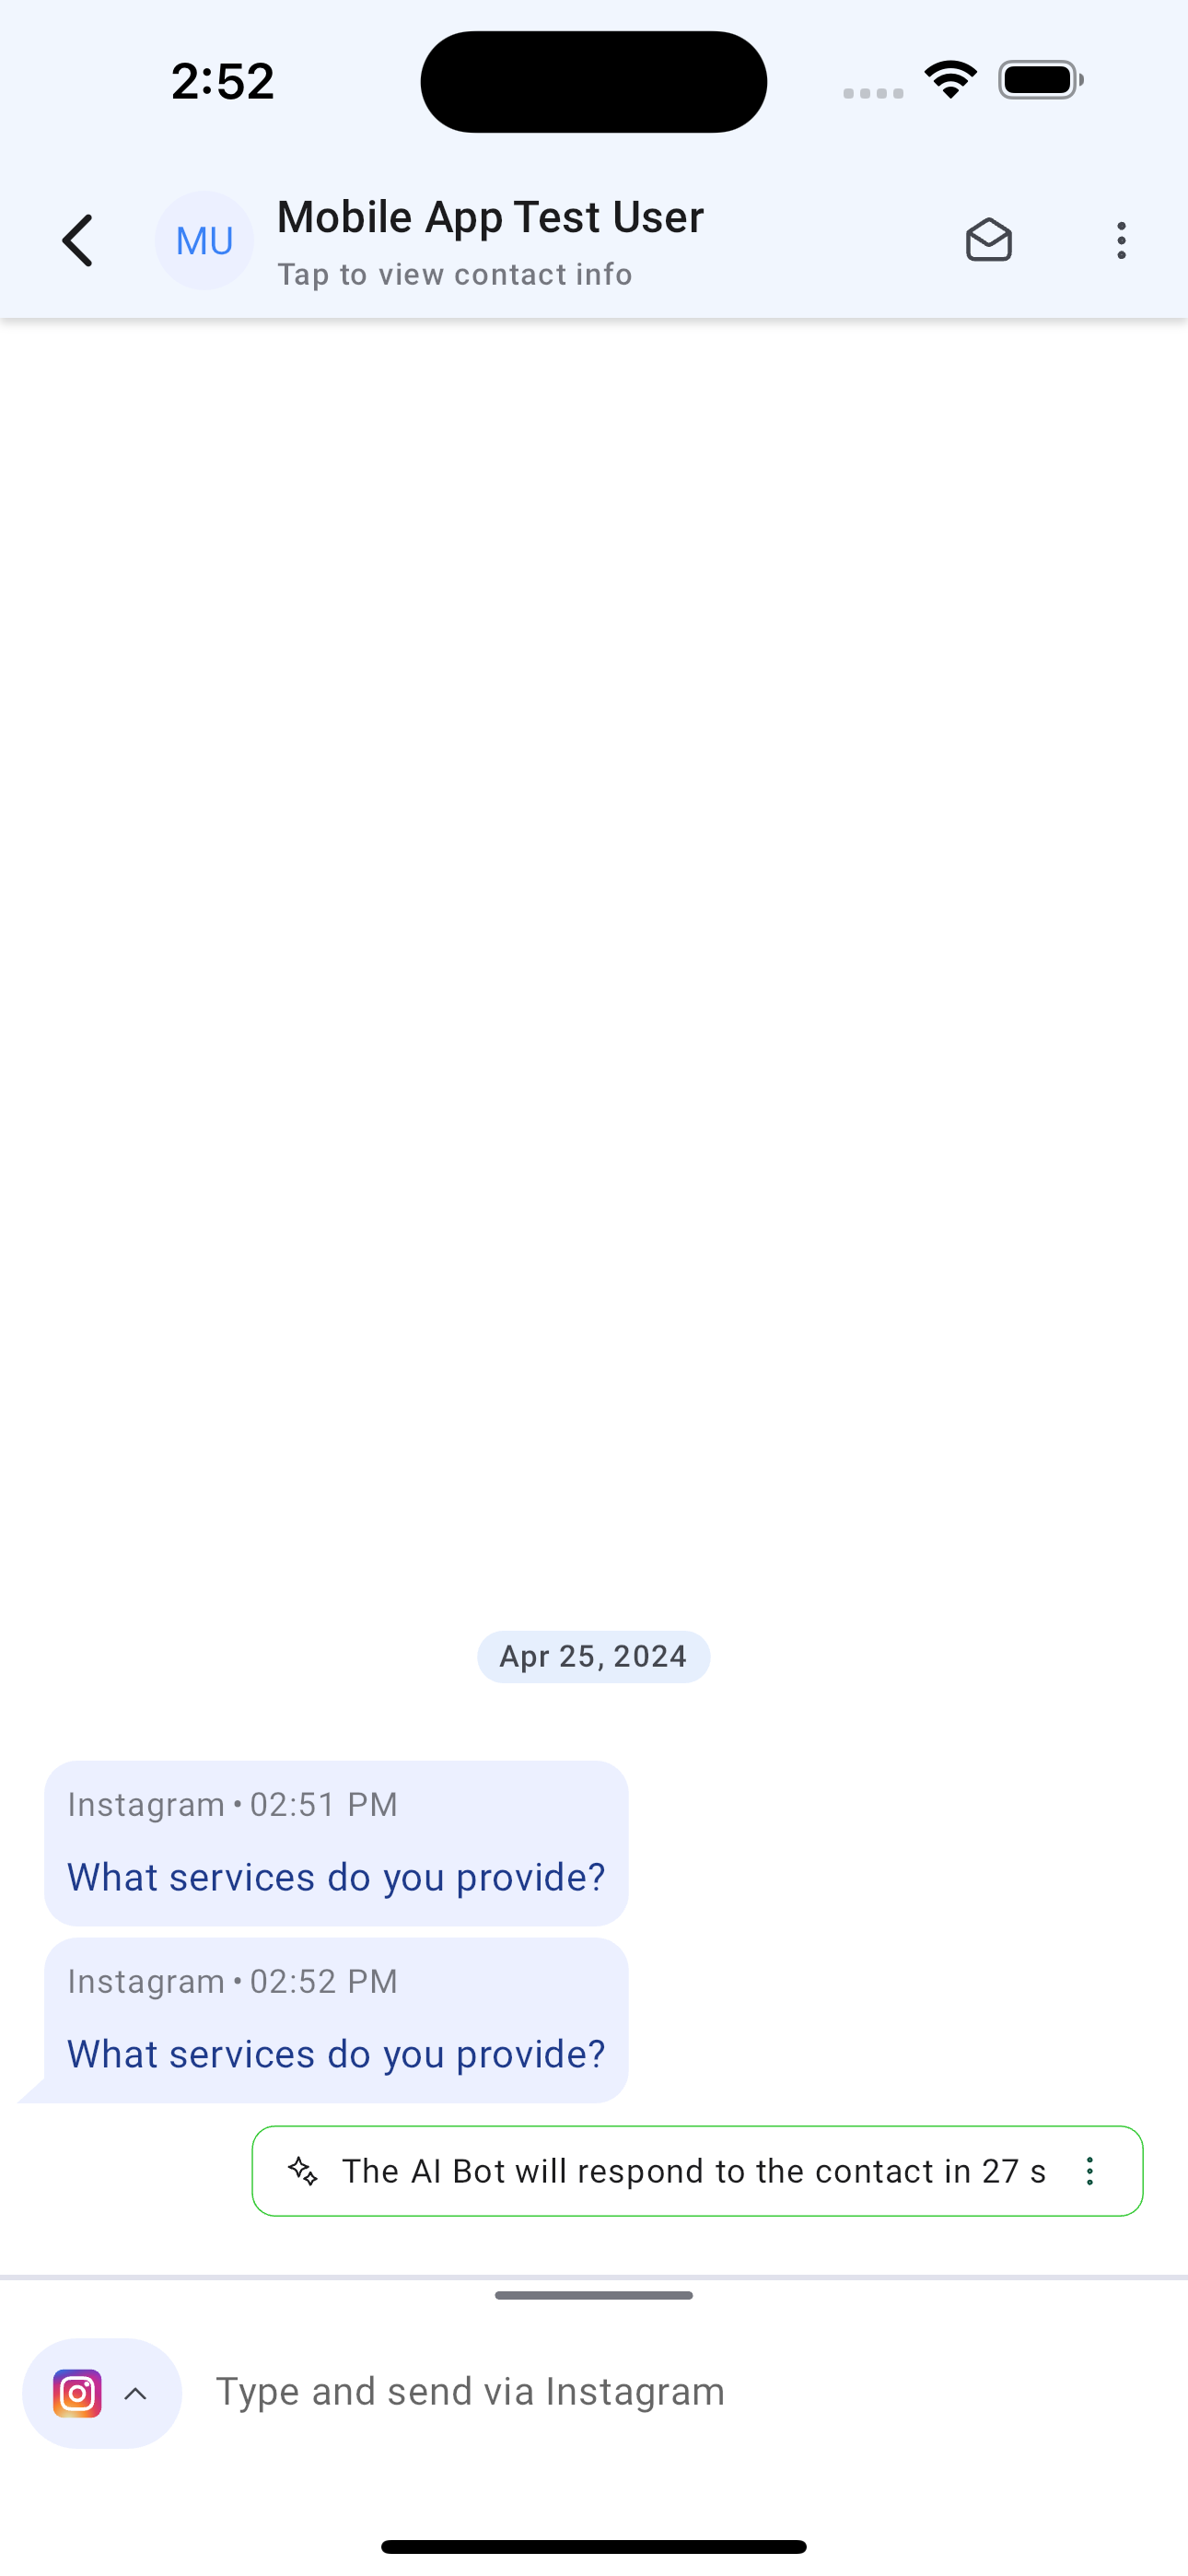
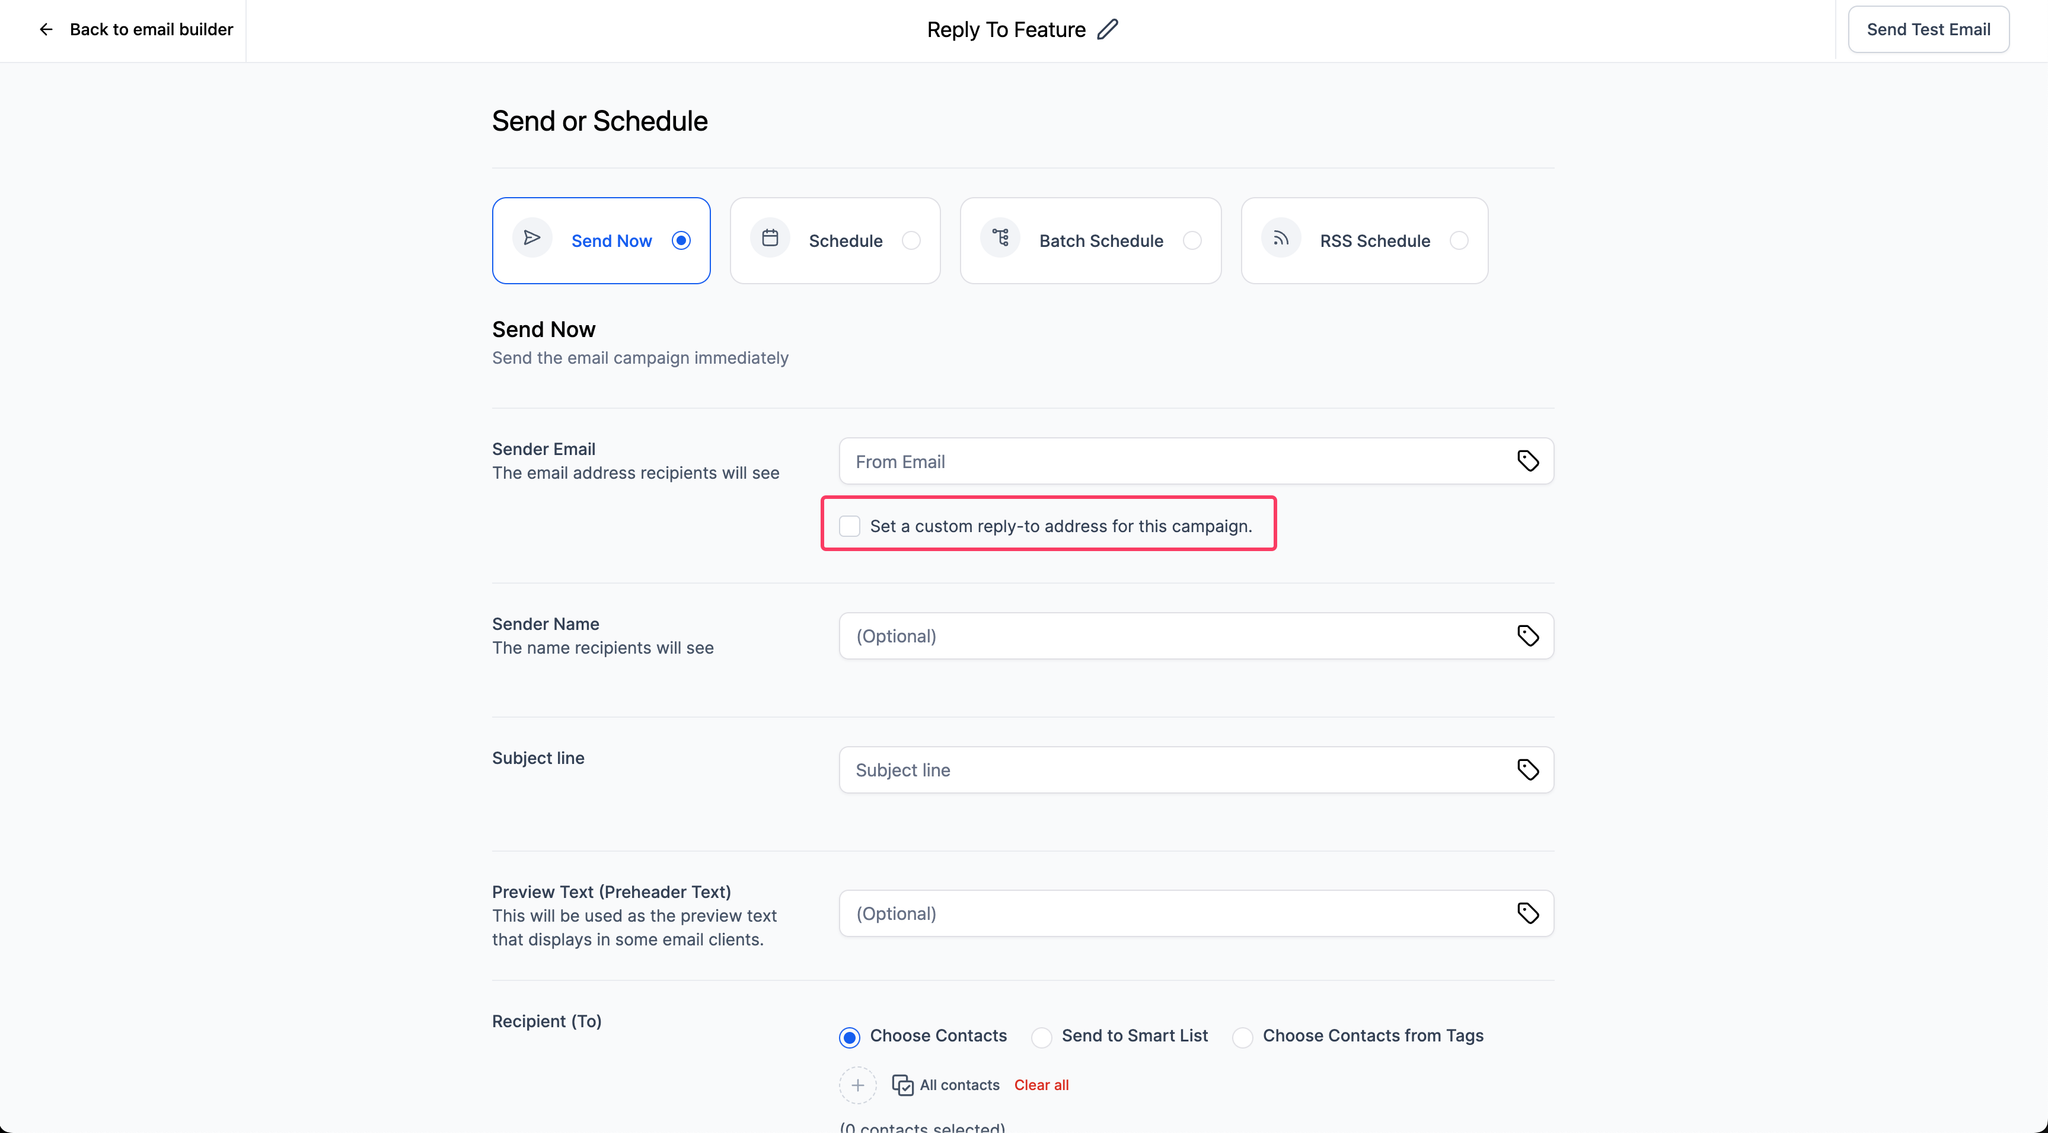
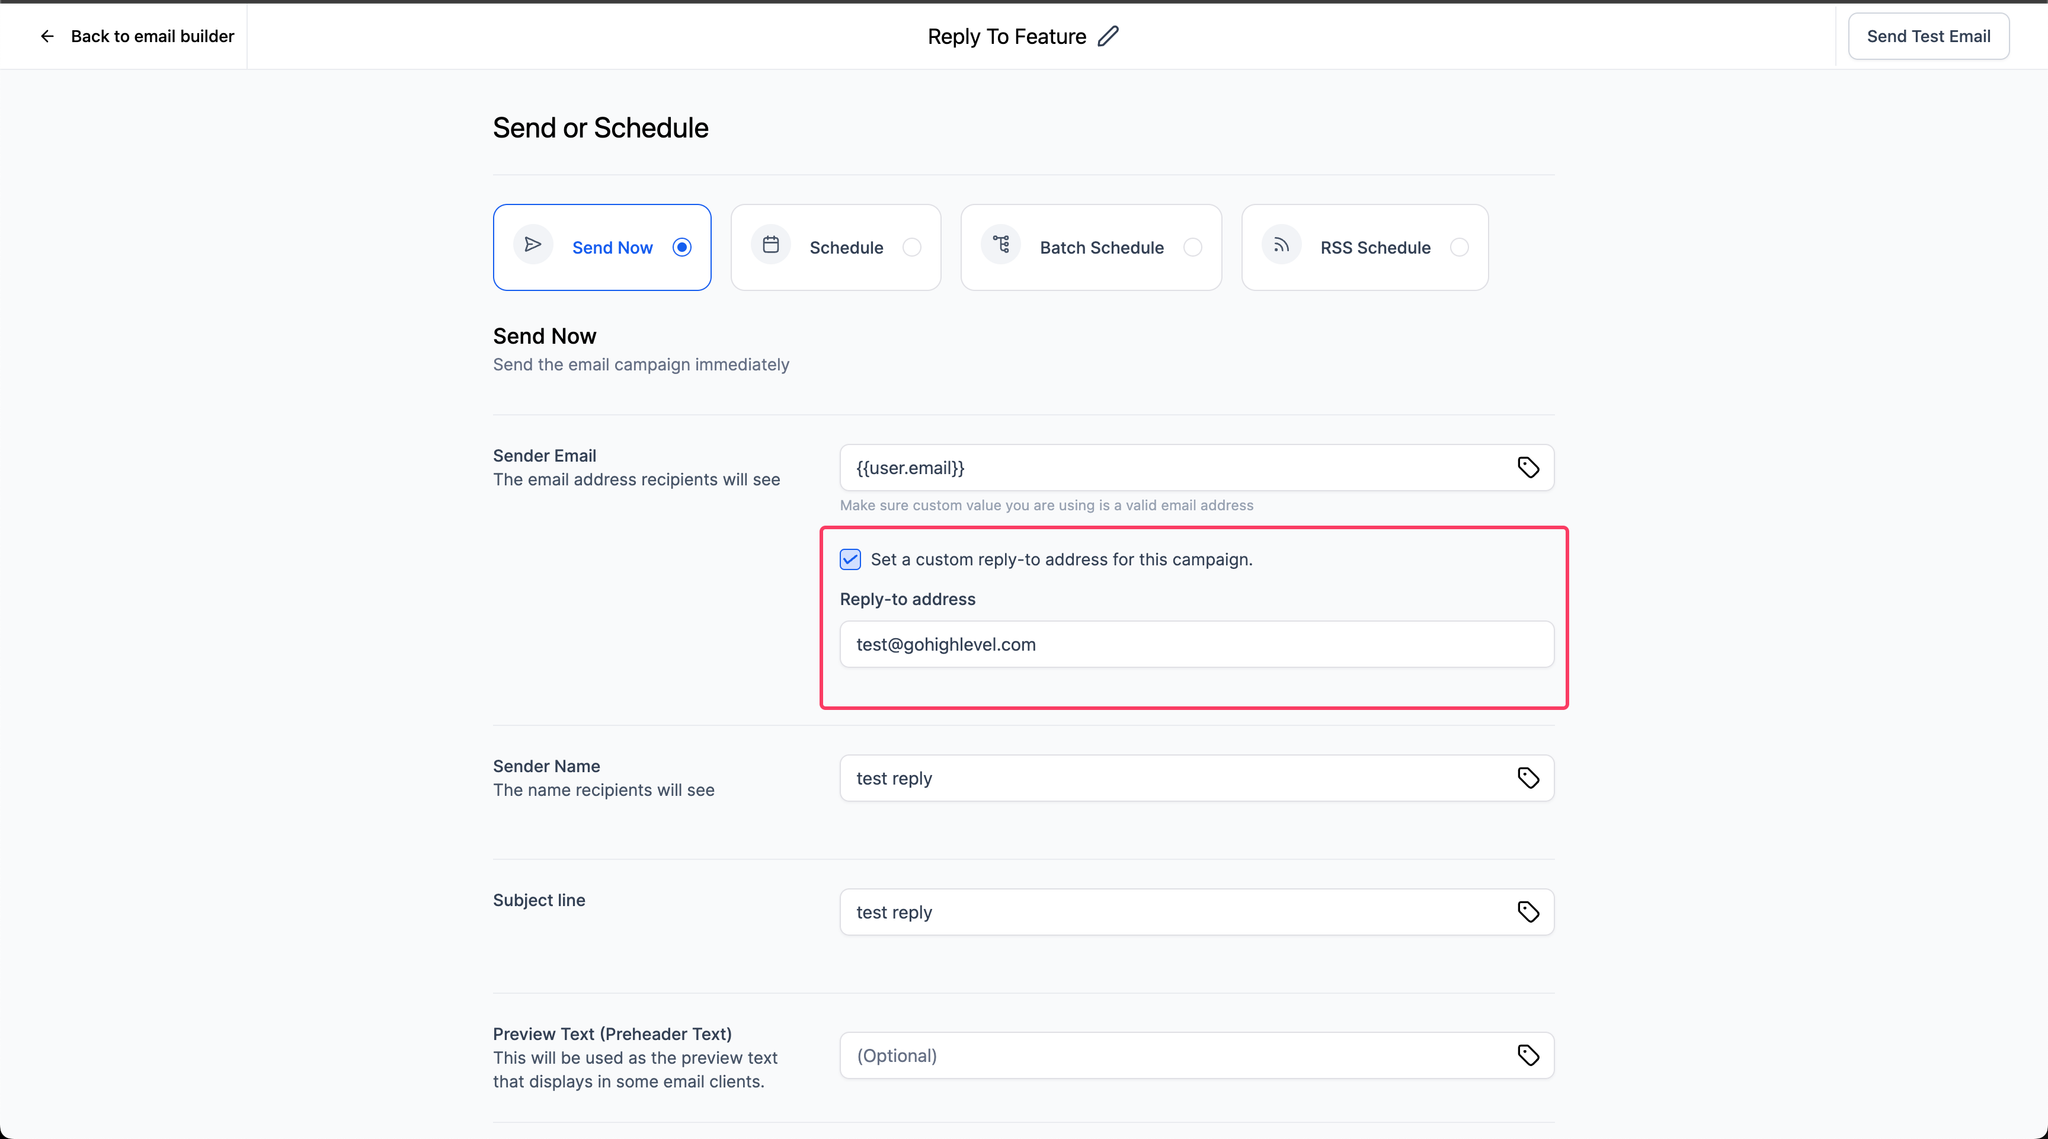
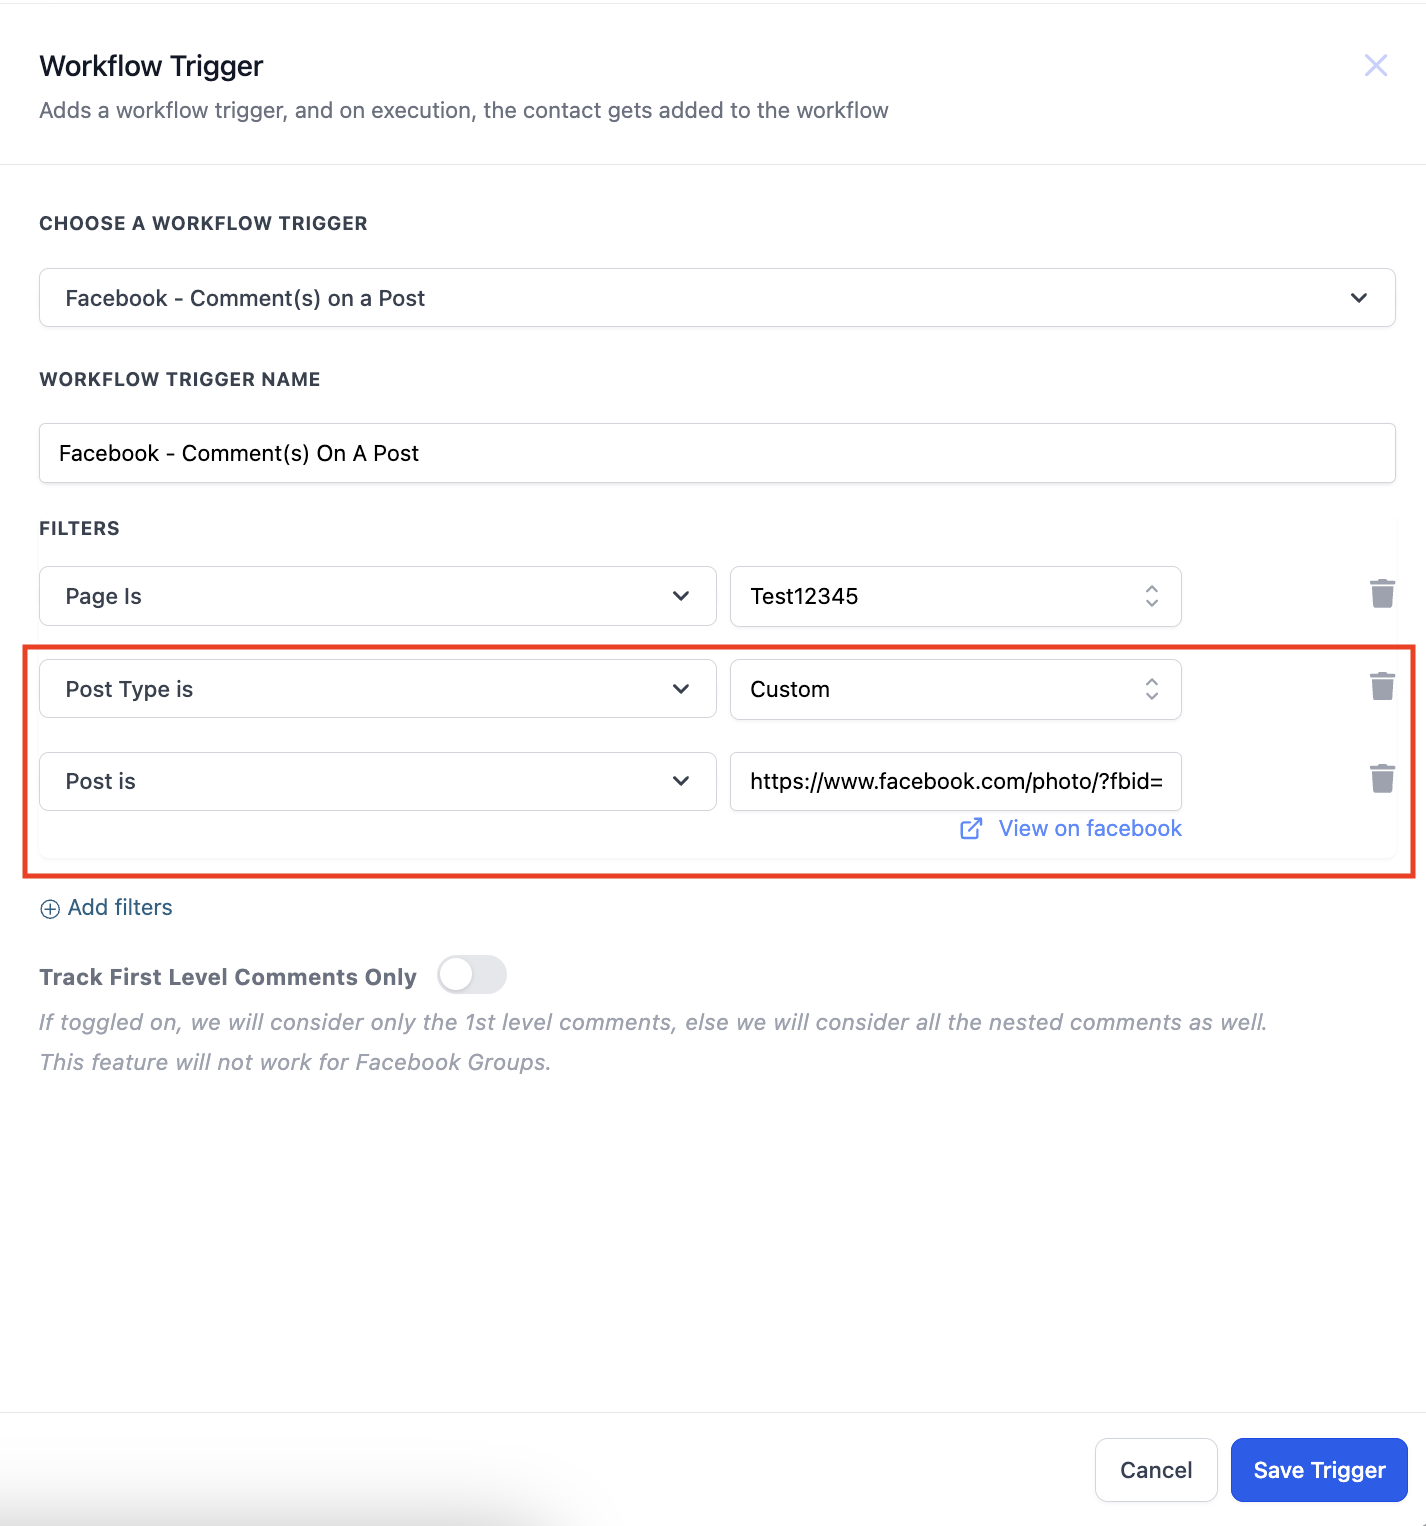
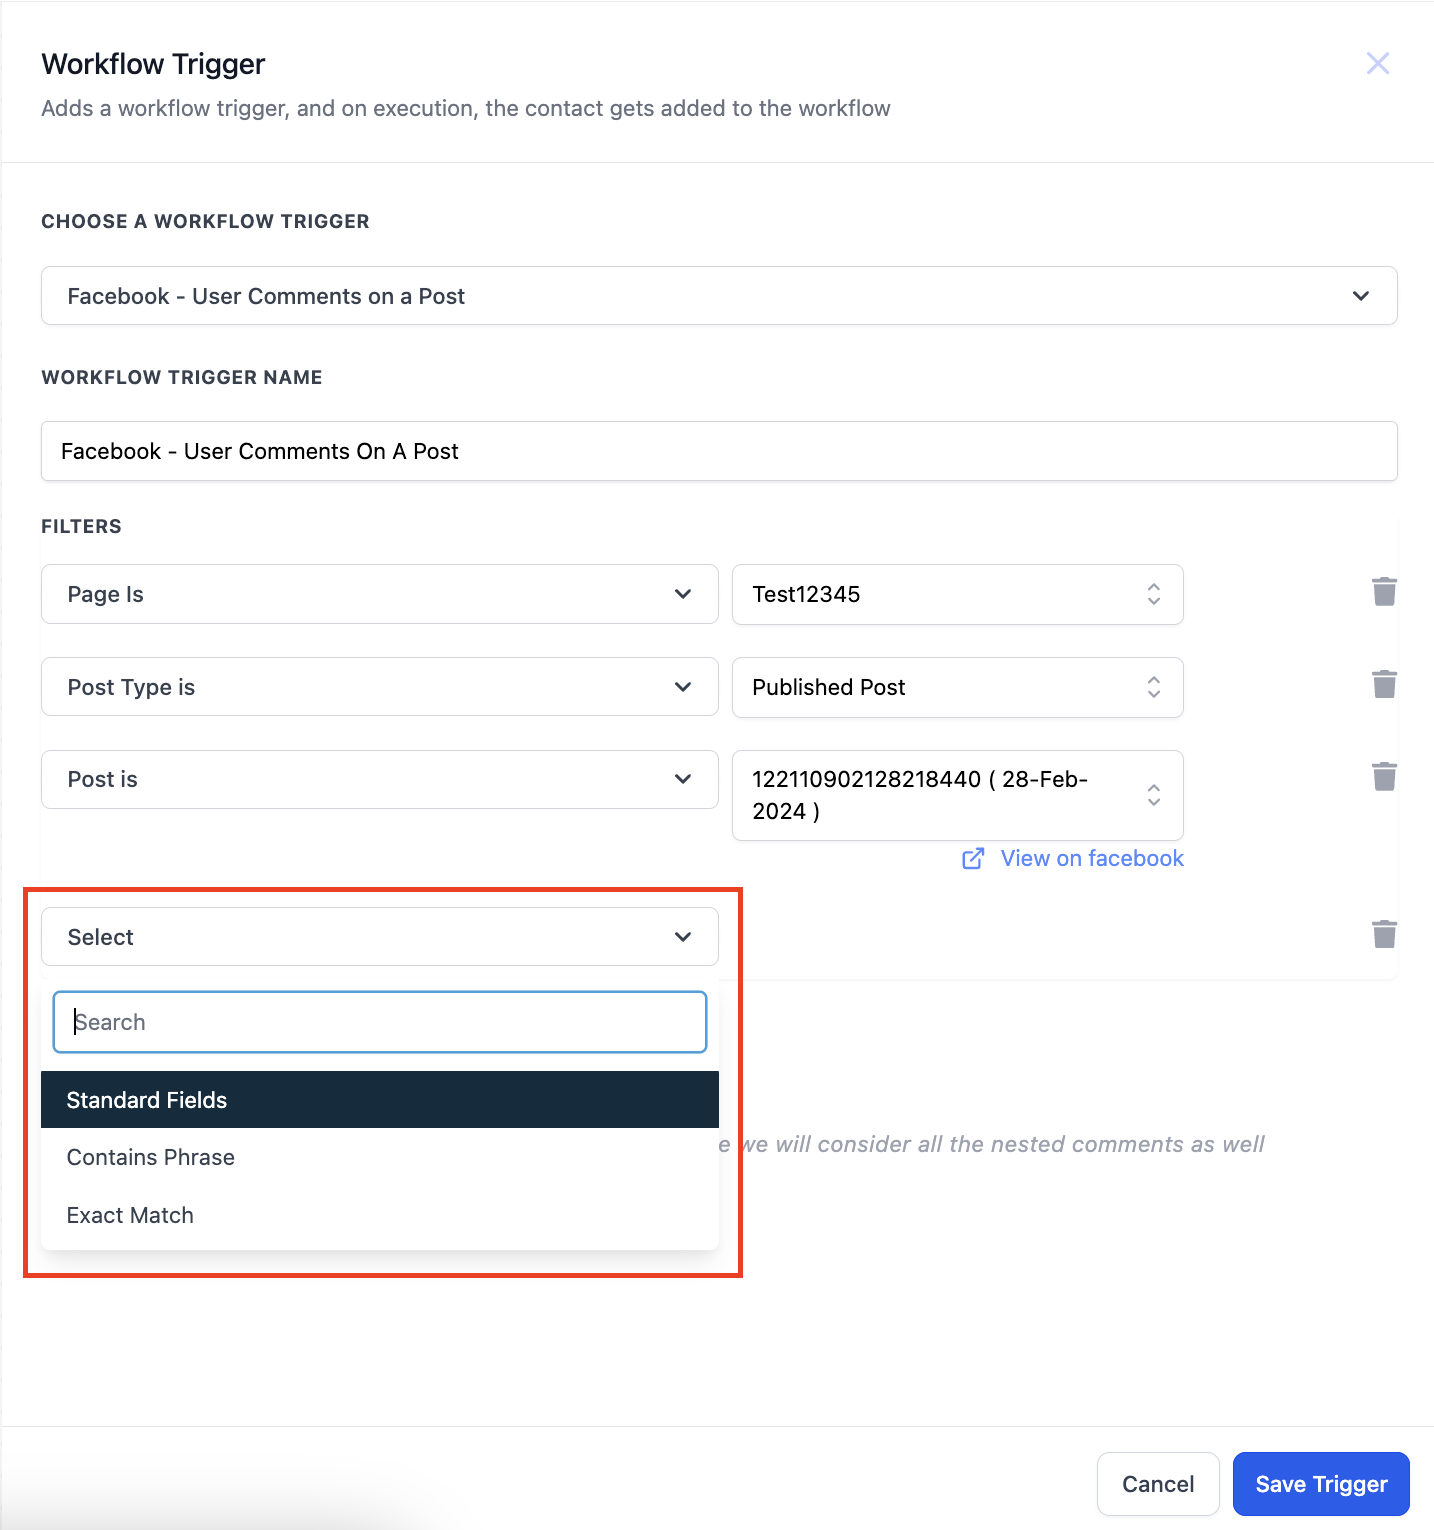
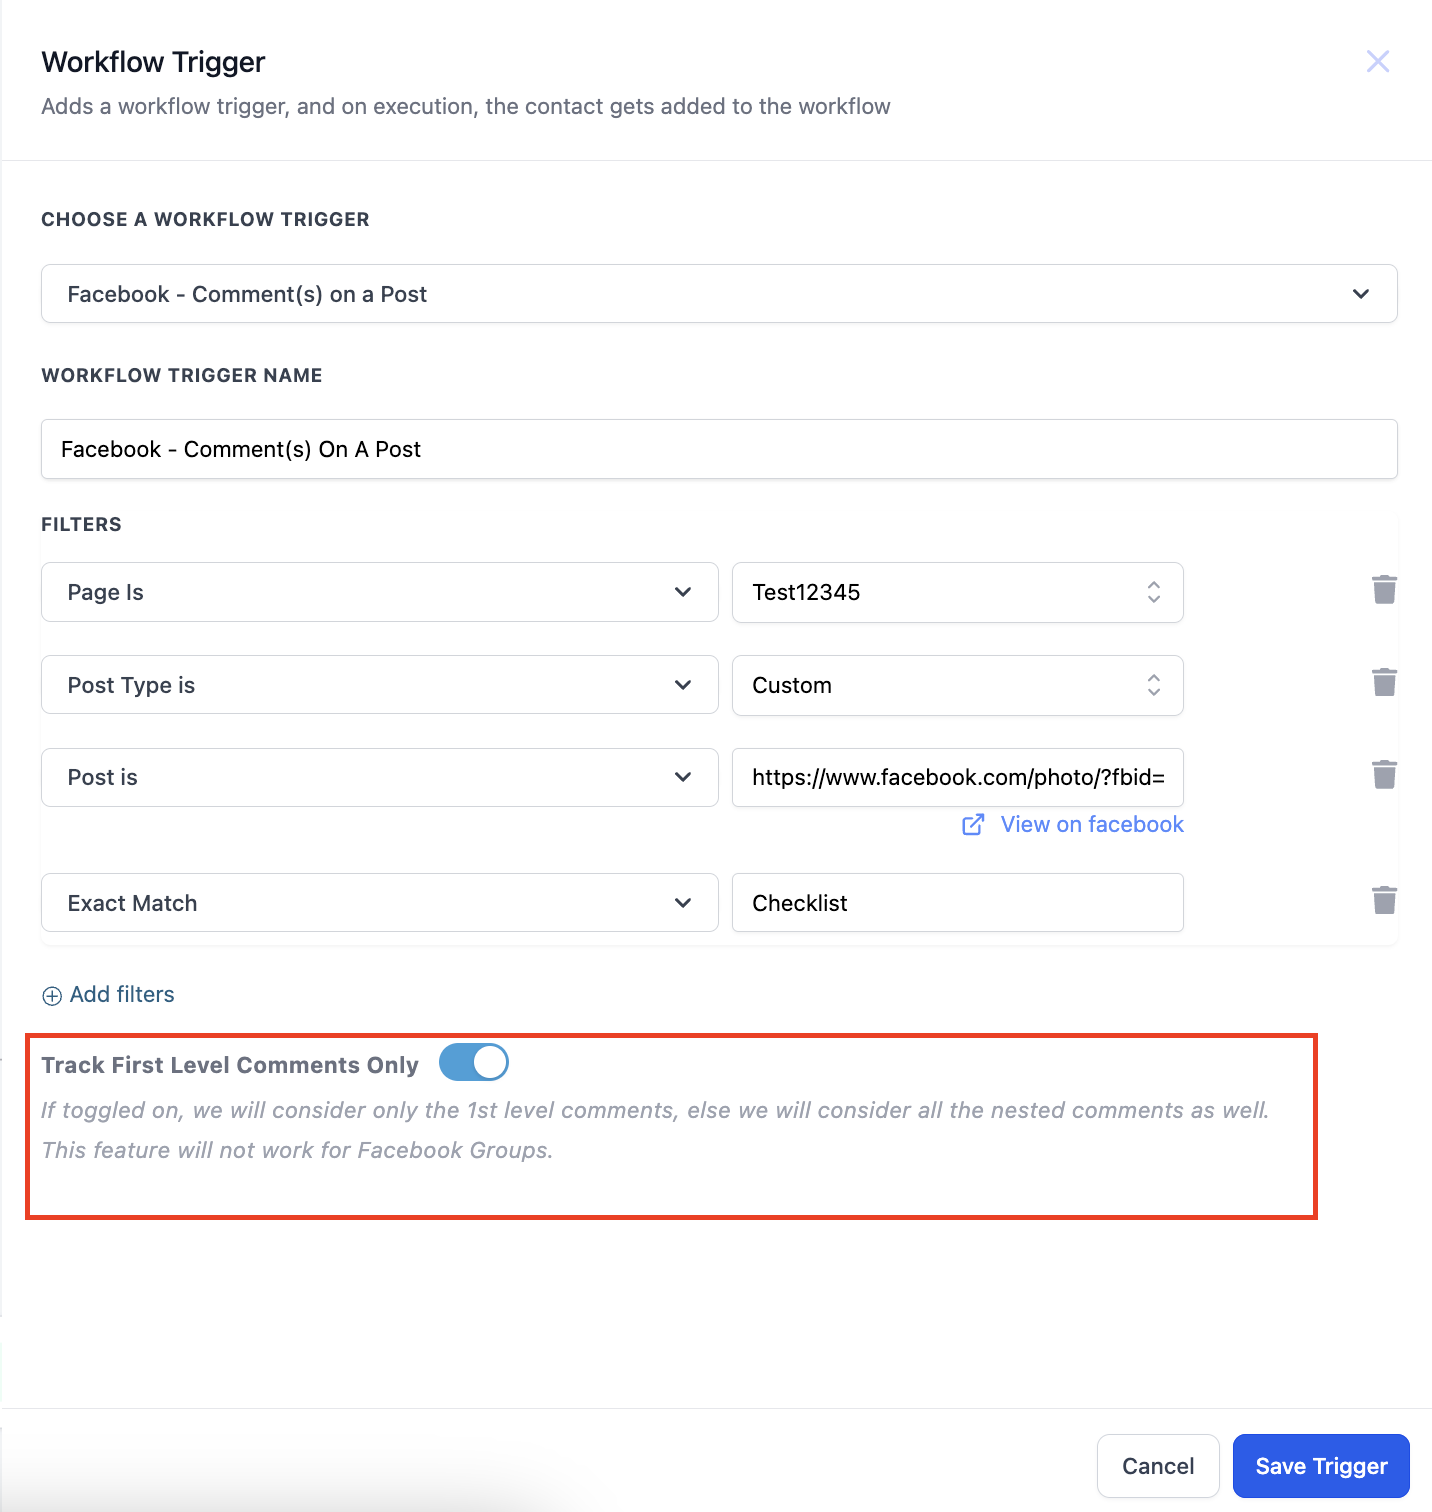
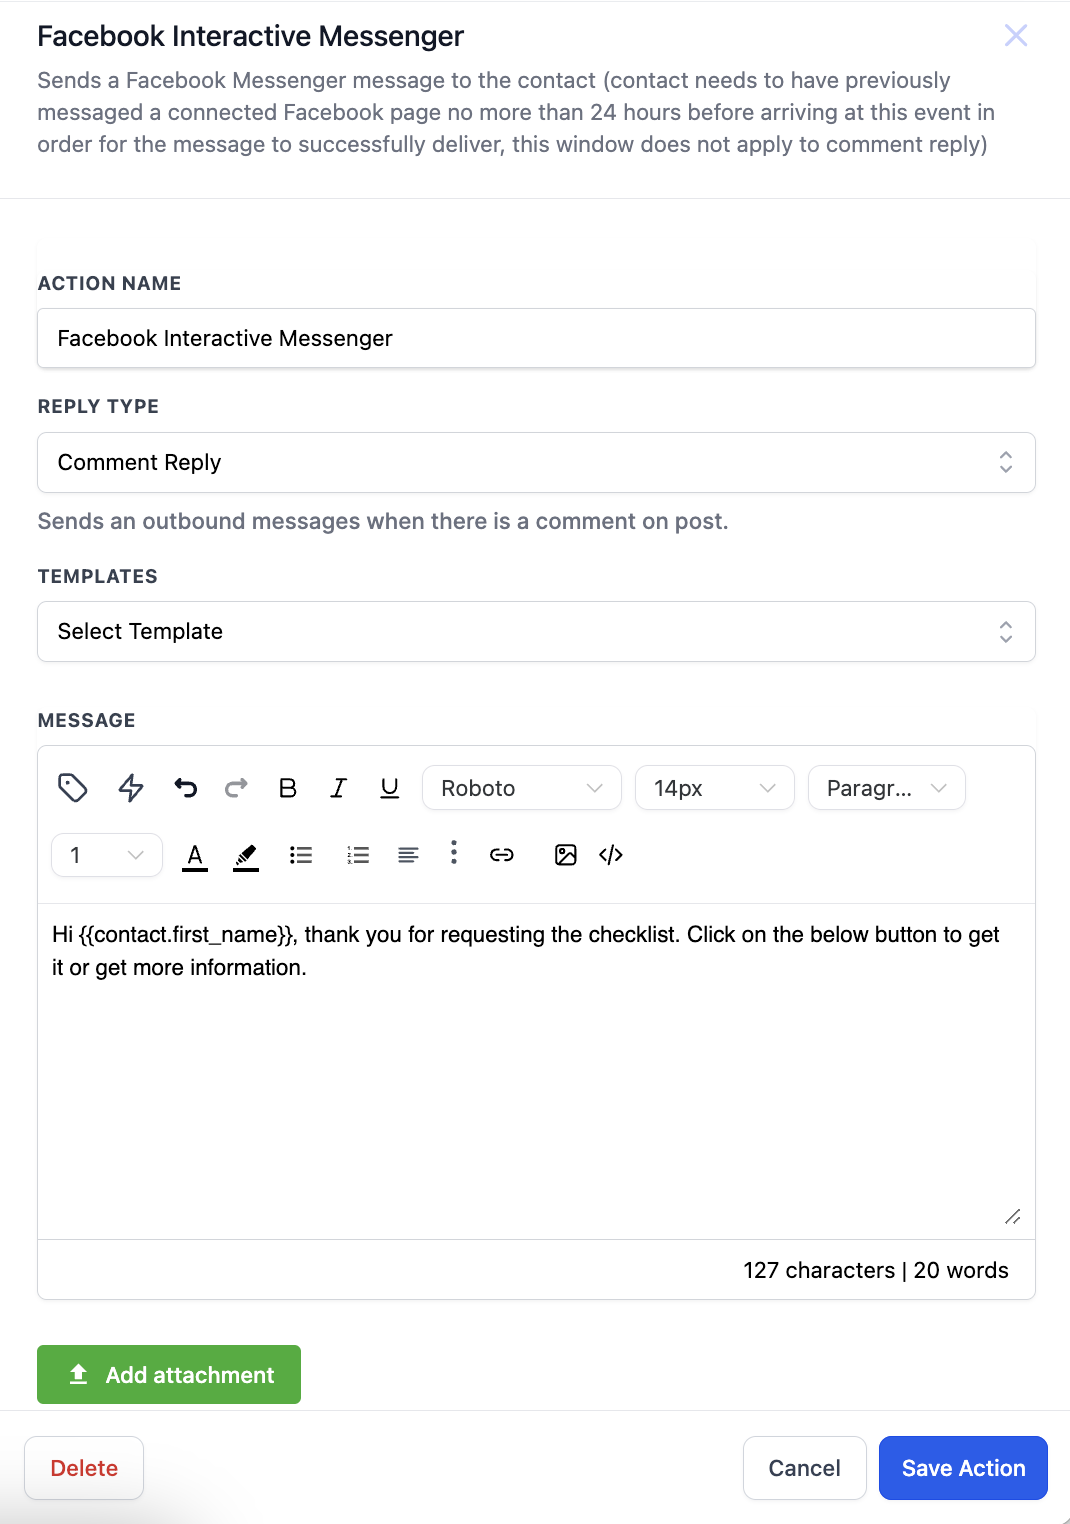
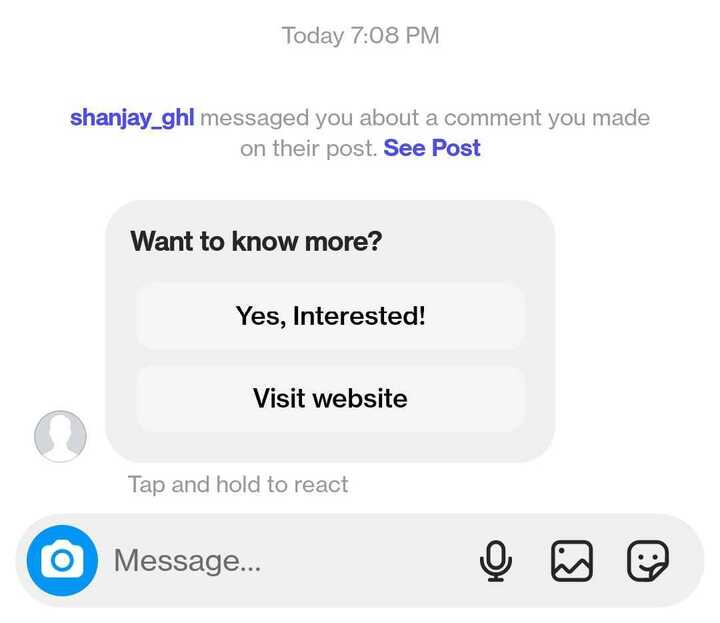
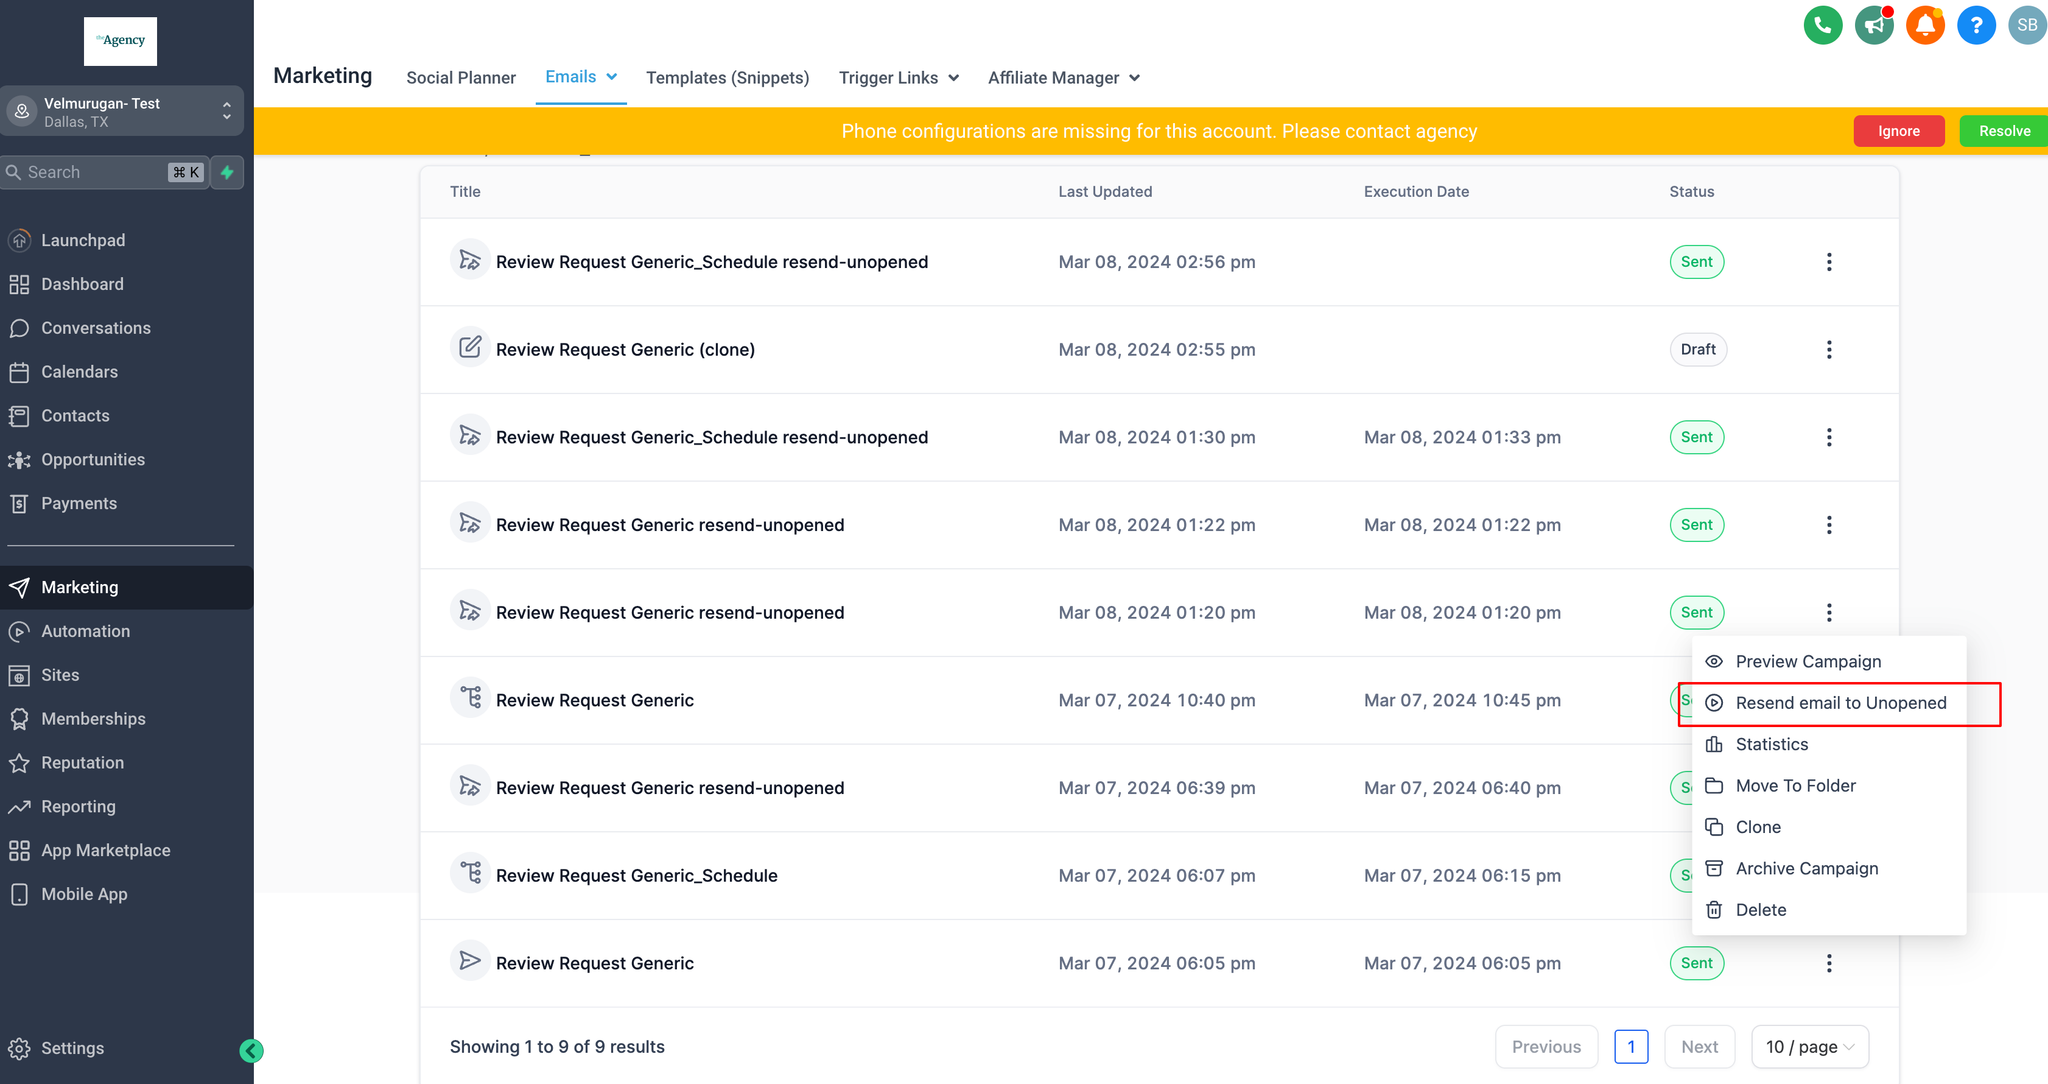
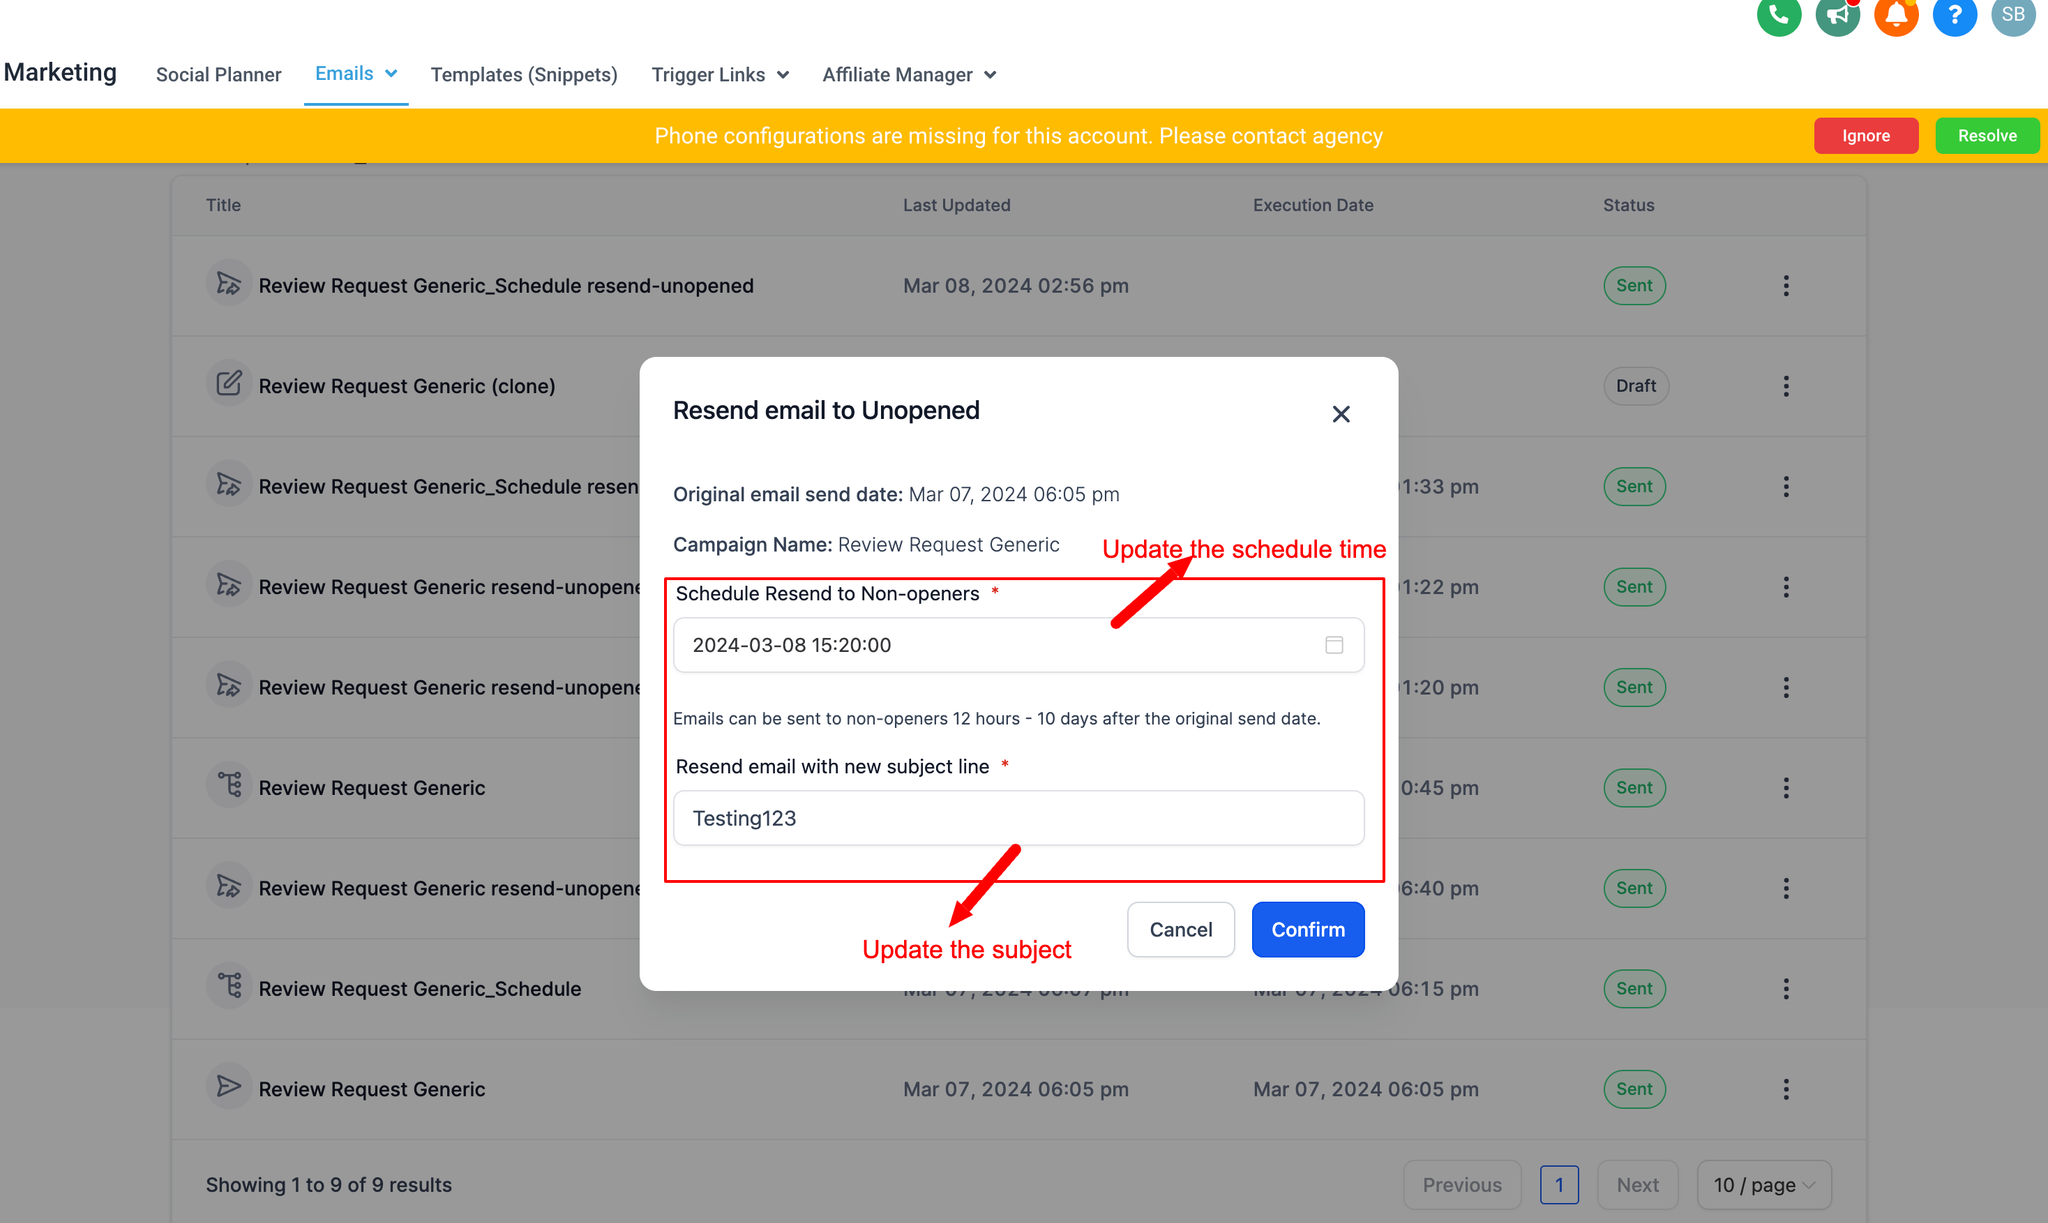
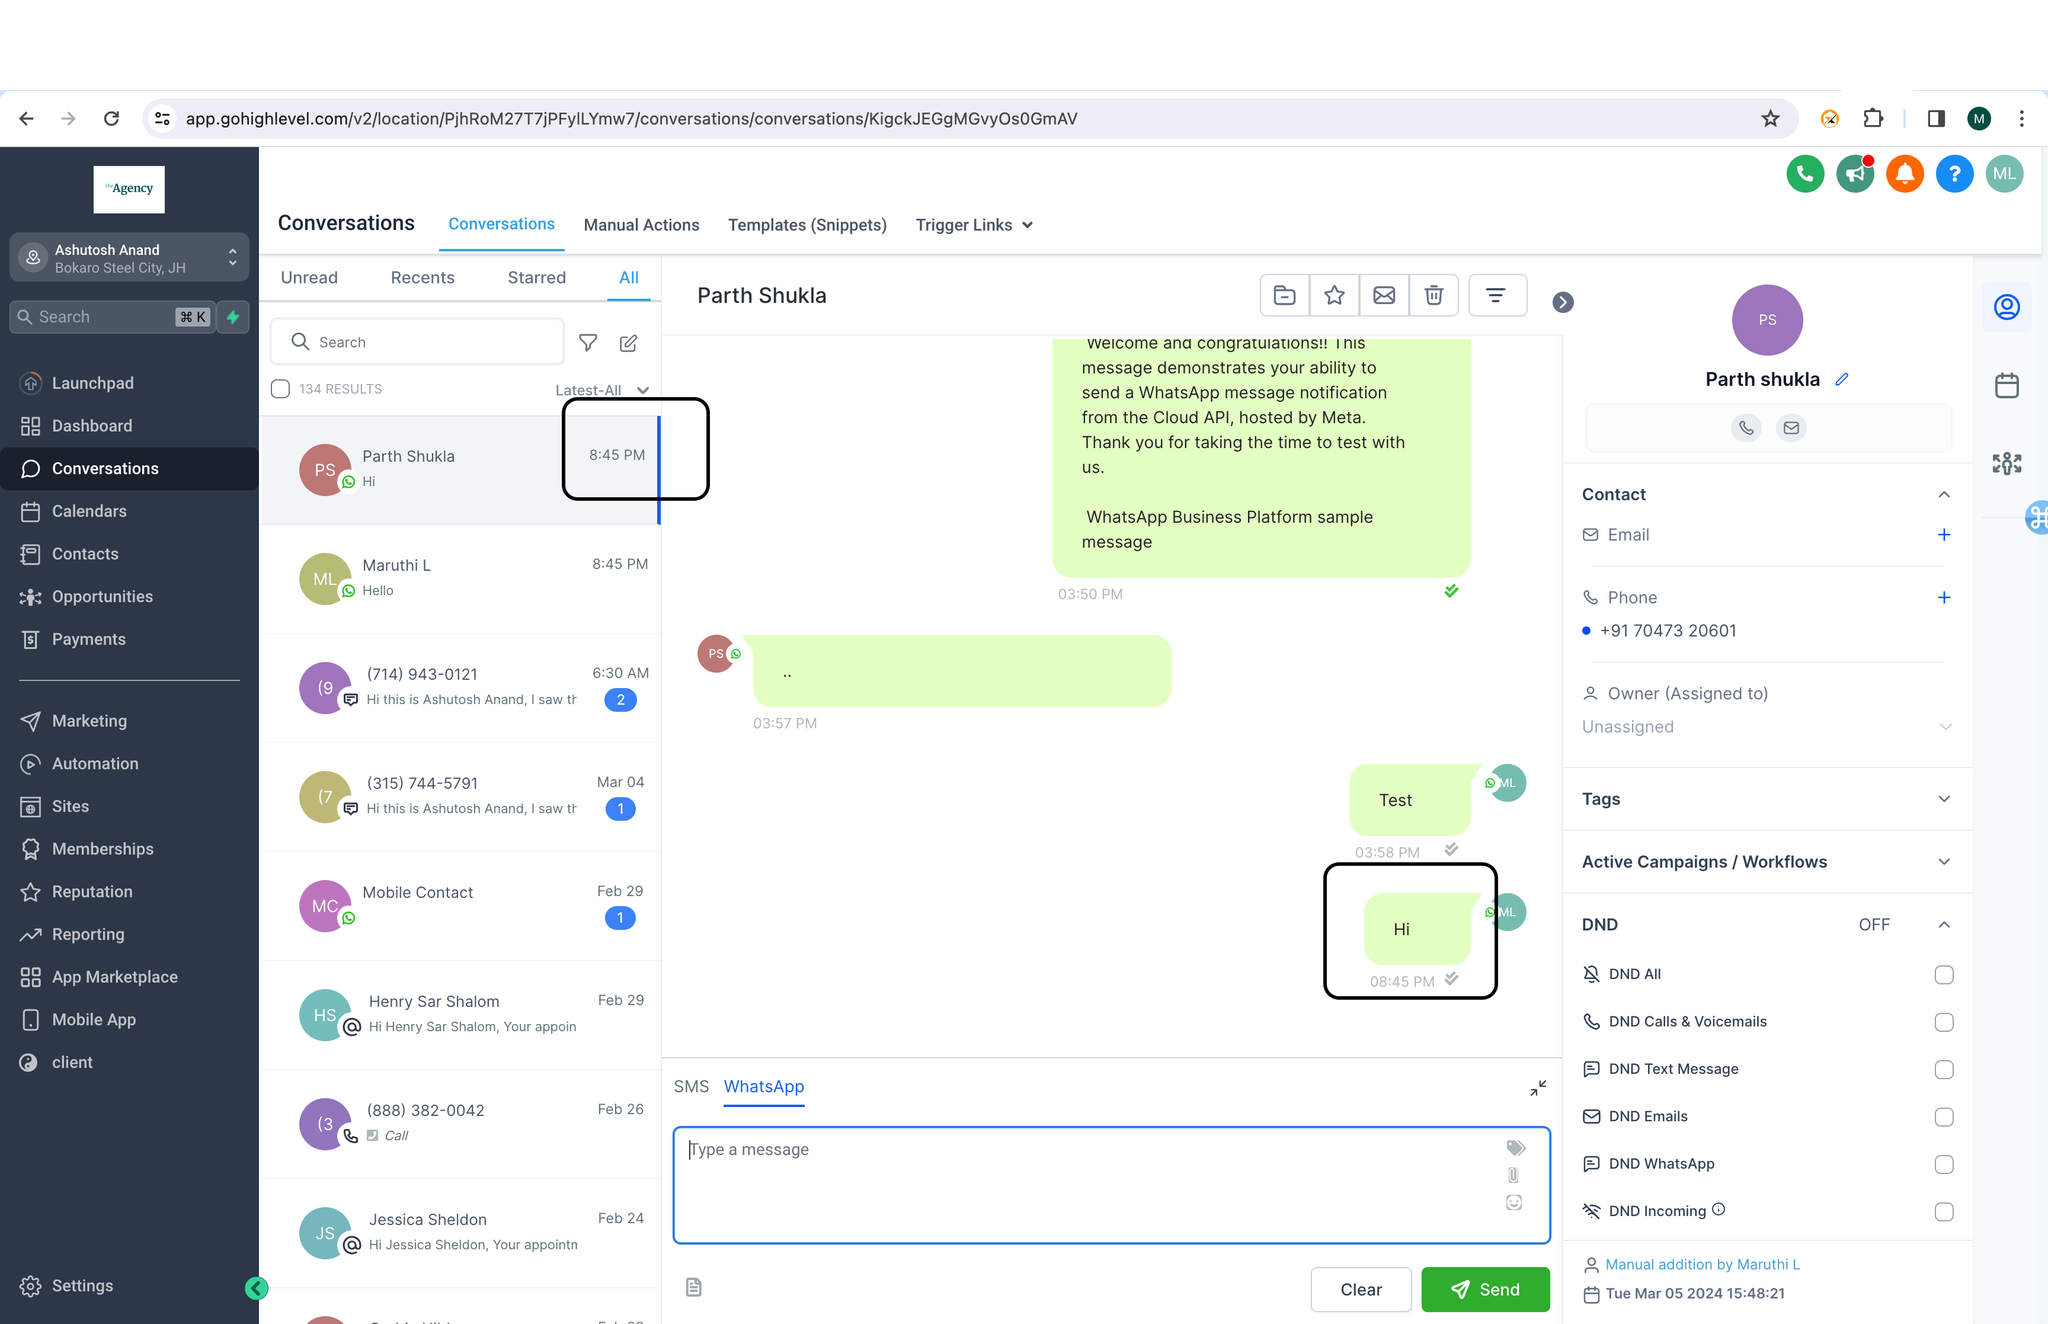
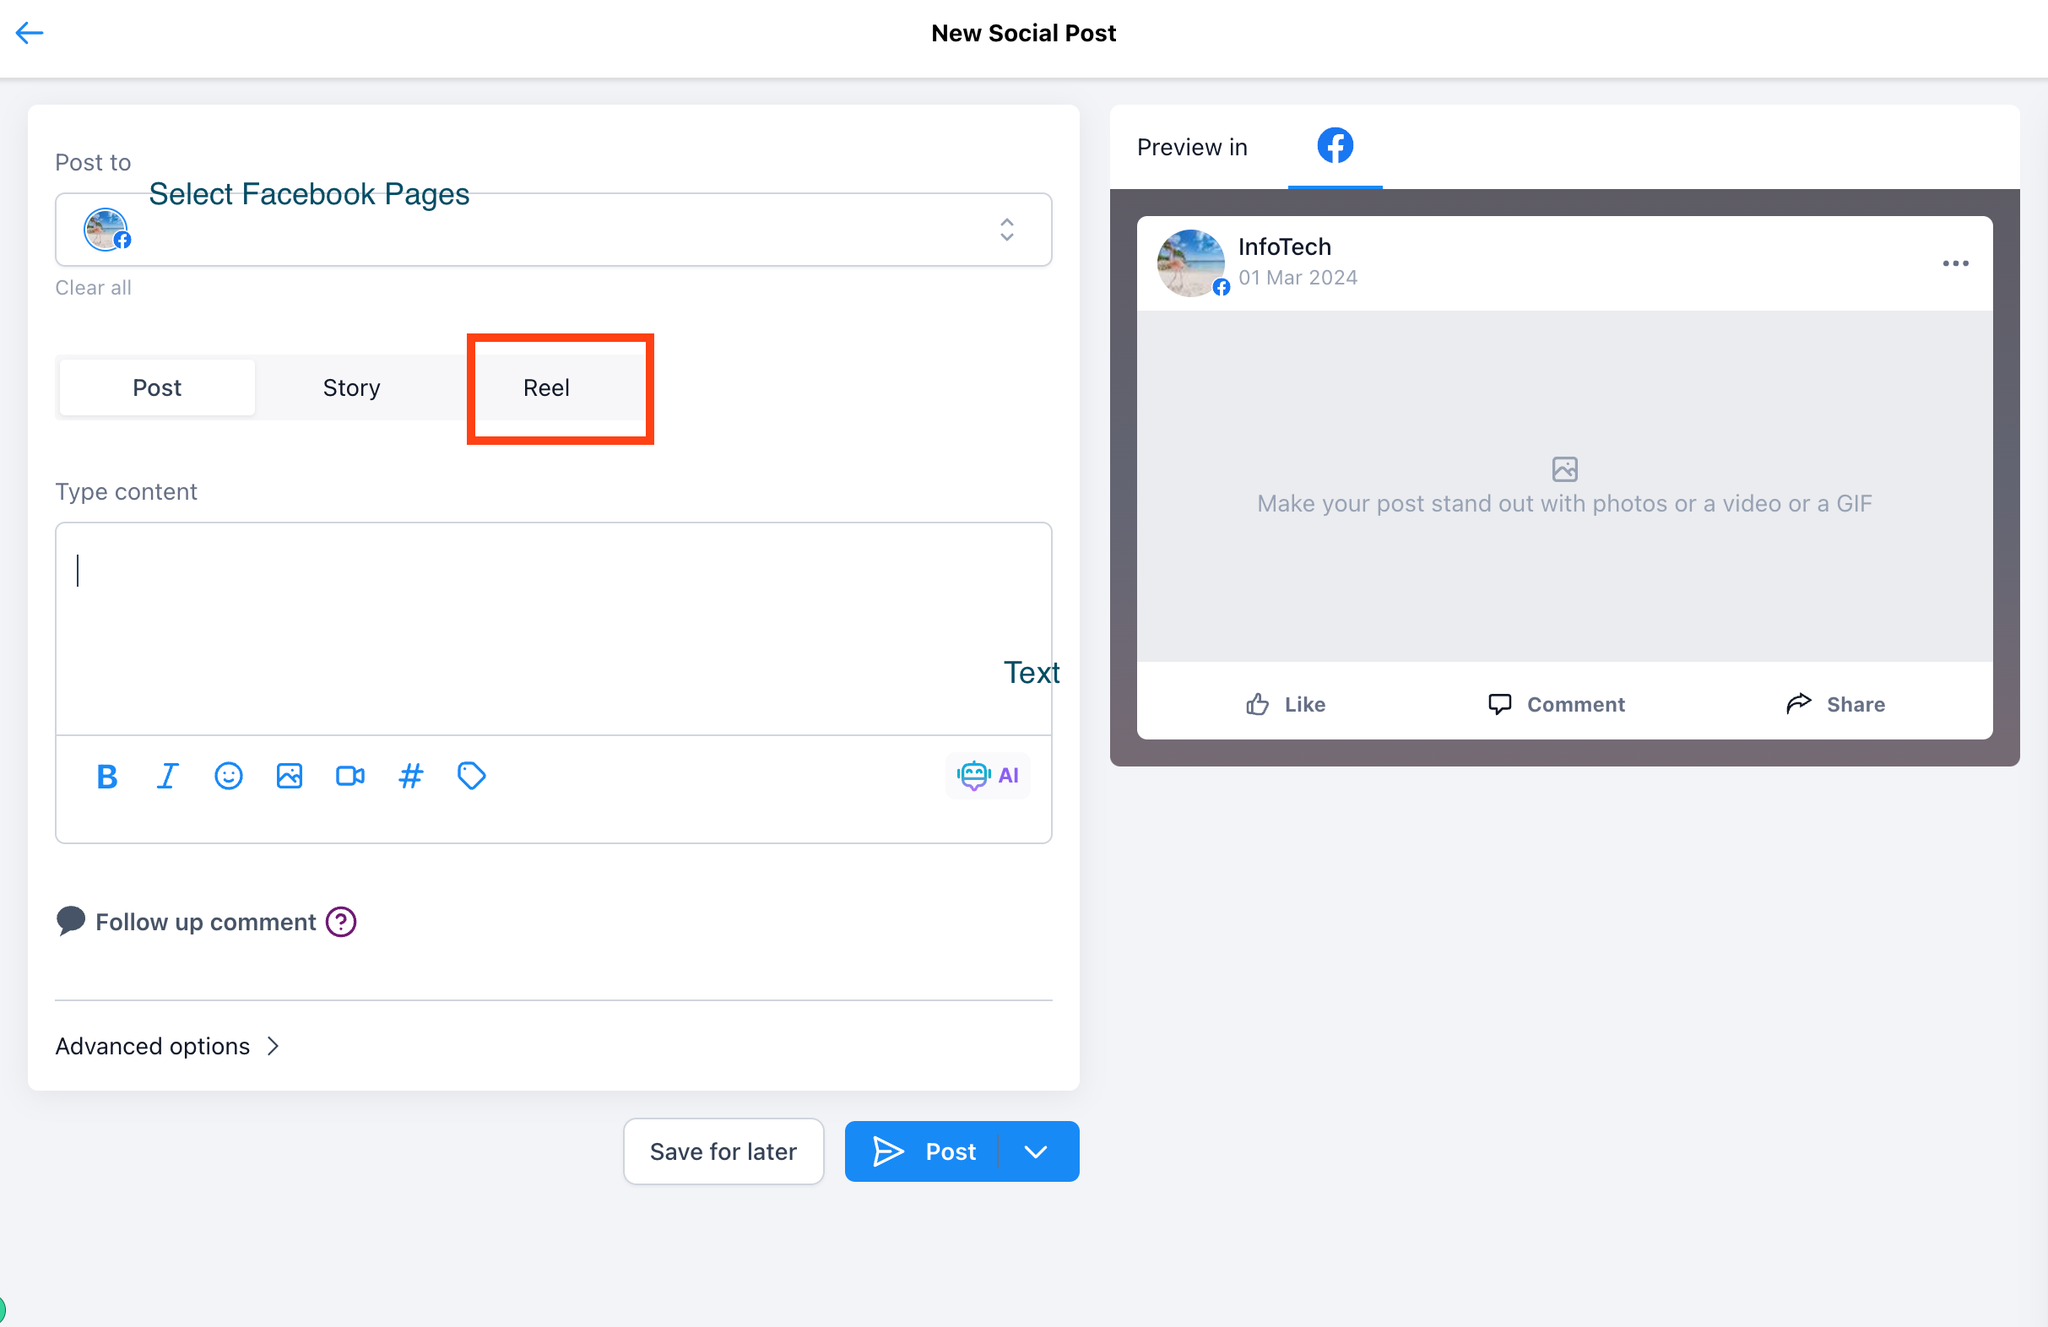
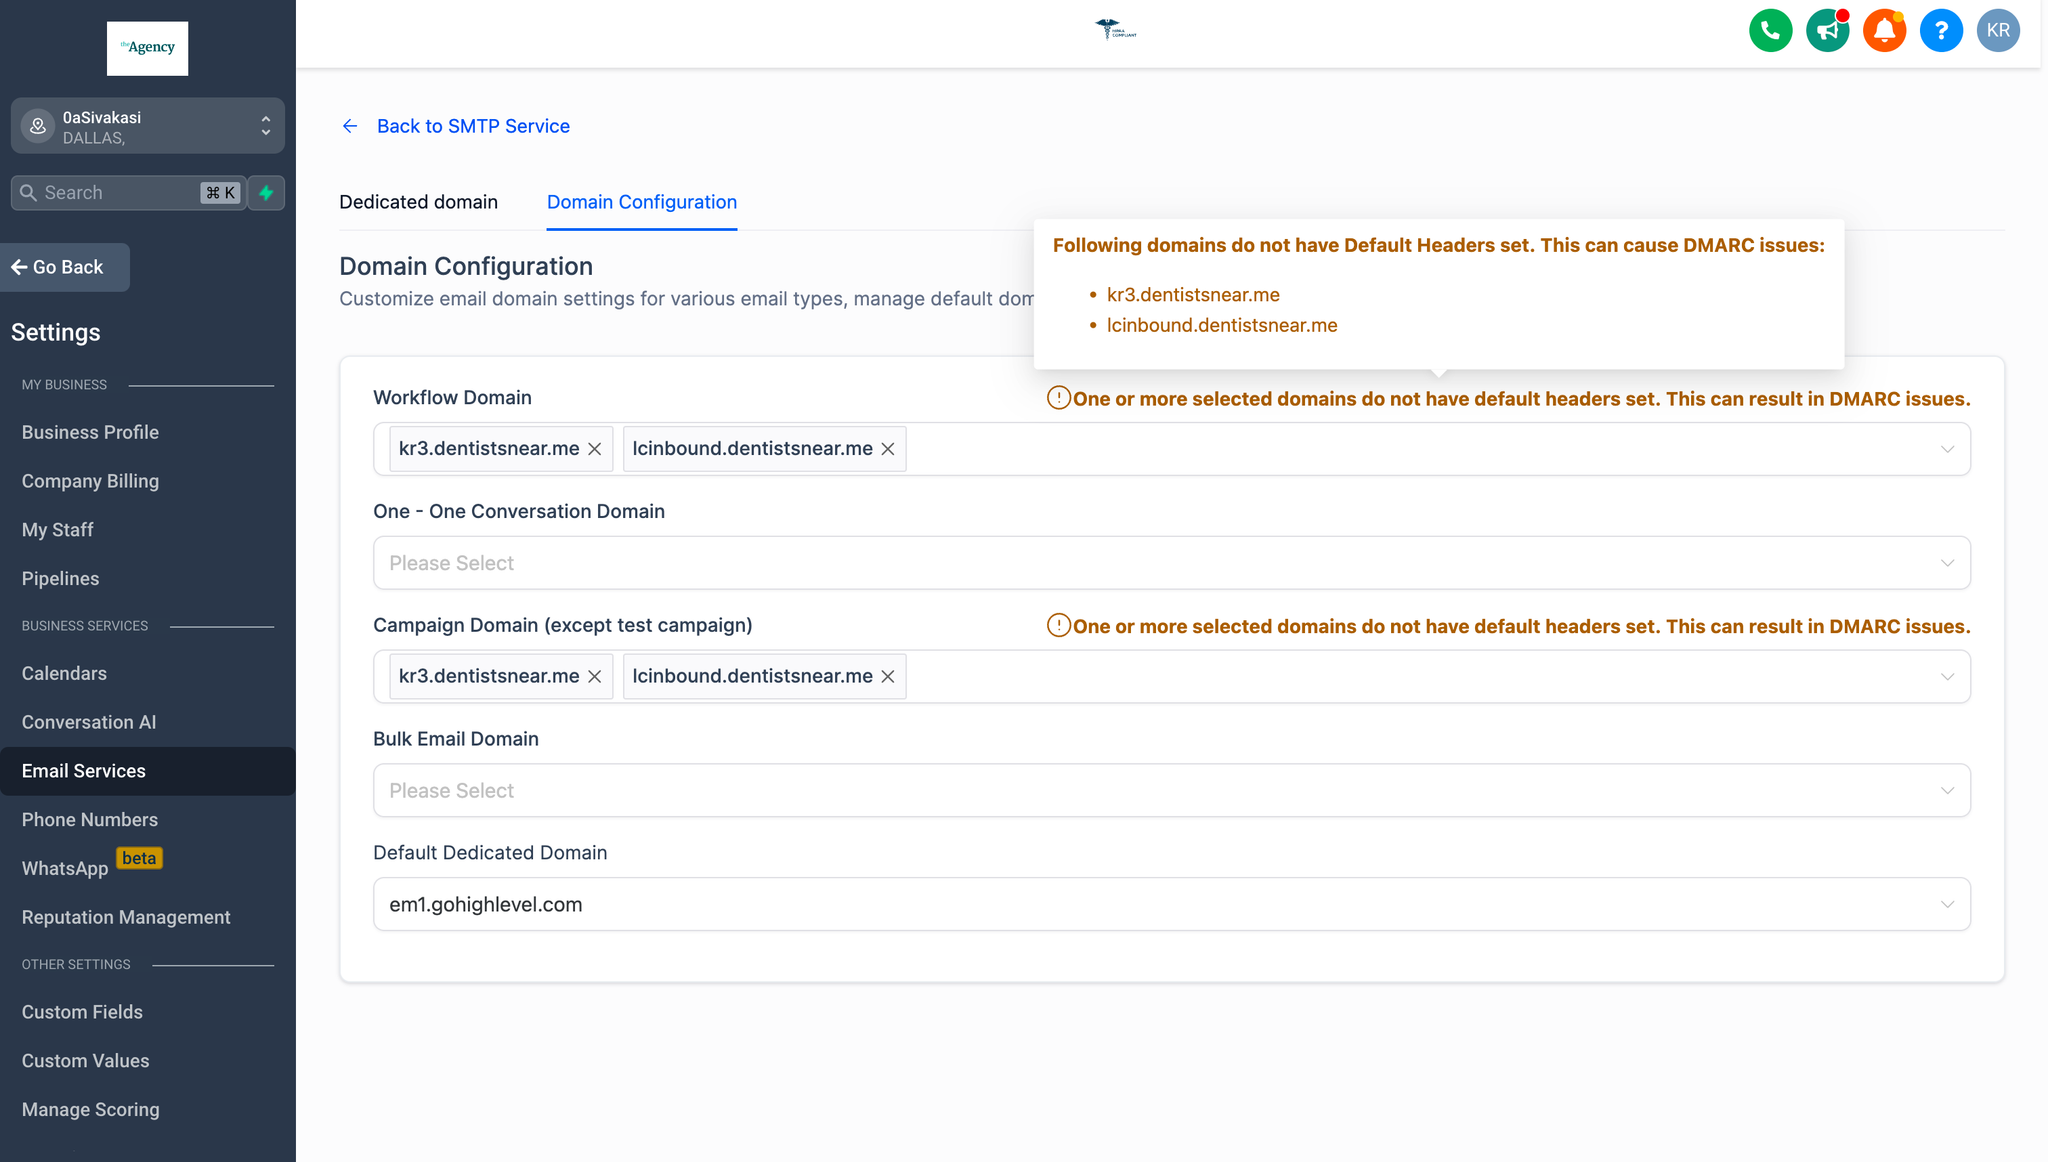
- Conversation AI selection enhanced: Now you can check the complete result generated by the conversation AI before choosing a reply.- Send review request: Easily send a review request to a contact directly from the conversation window.- View external call logs: Access all external calls made to a contact from within the conversation window.
How It Works
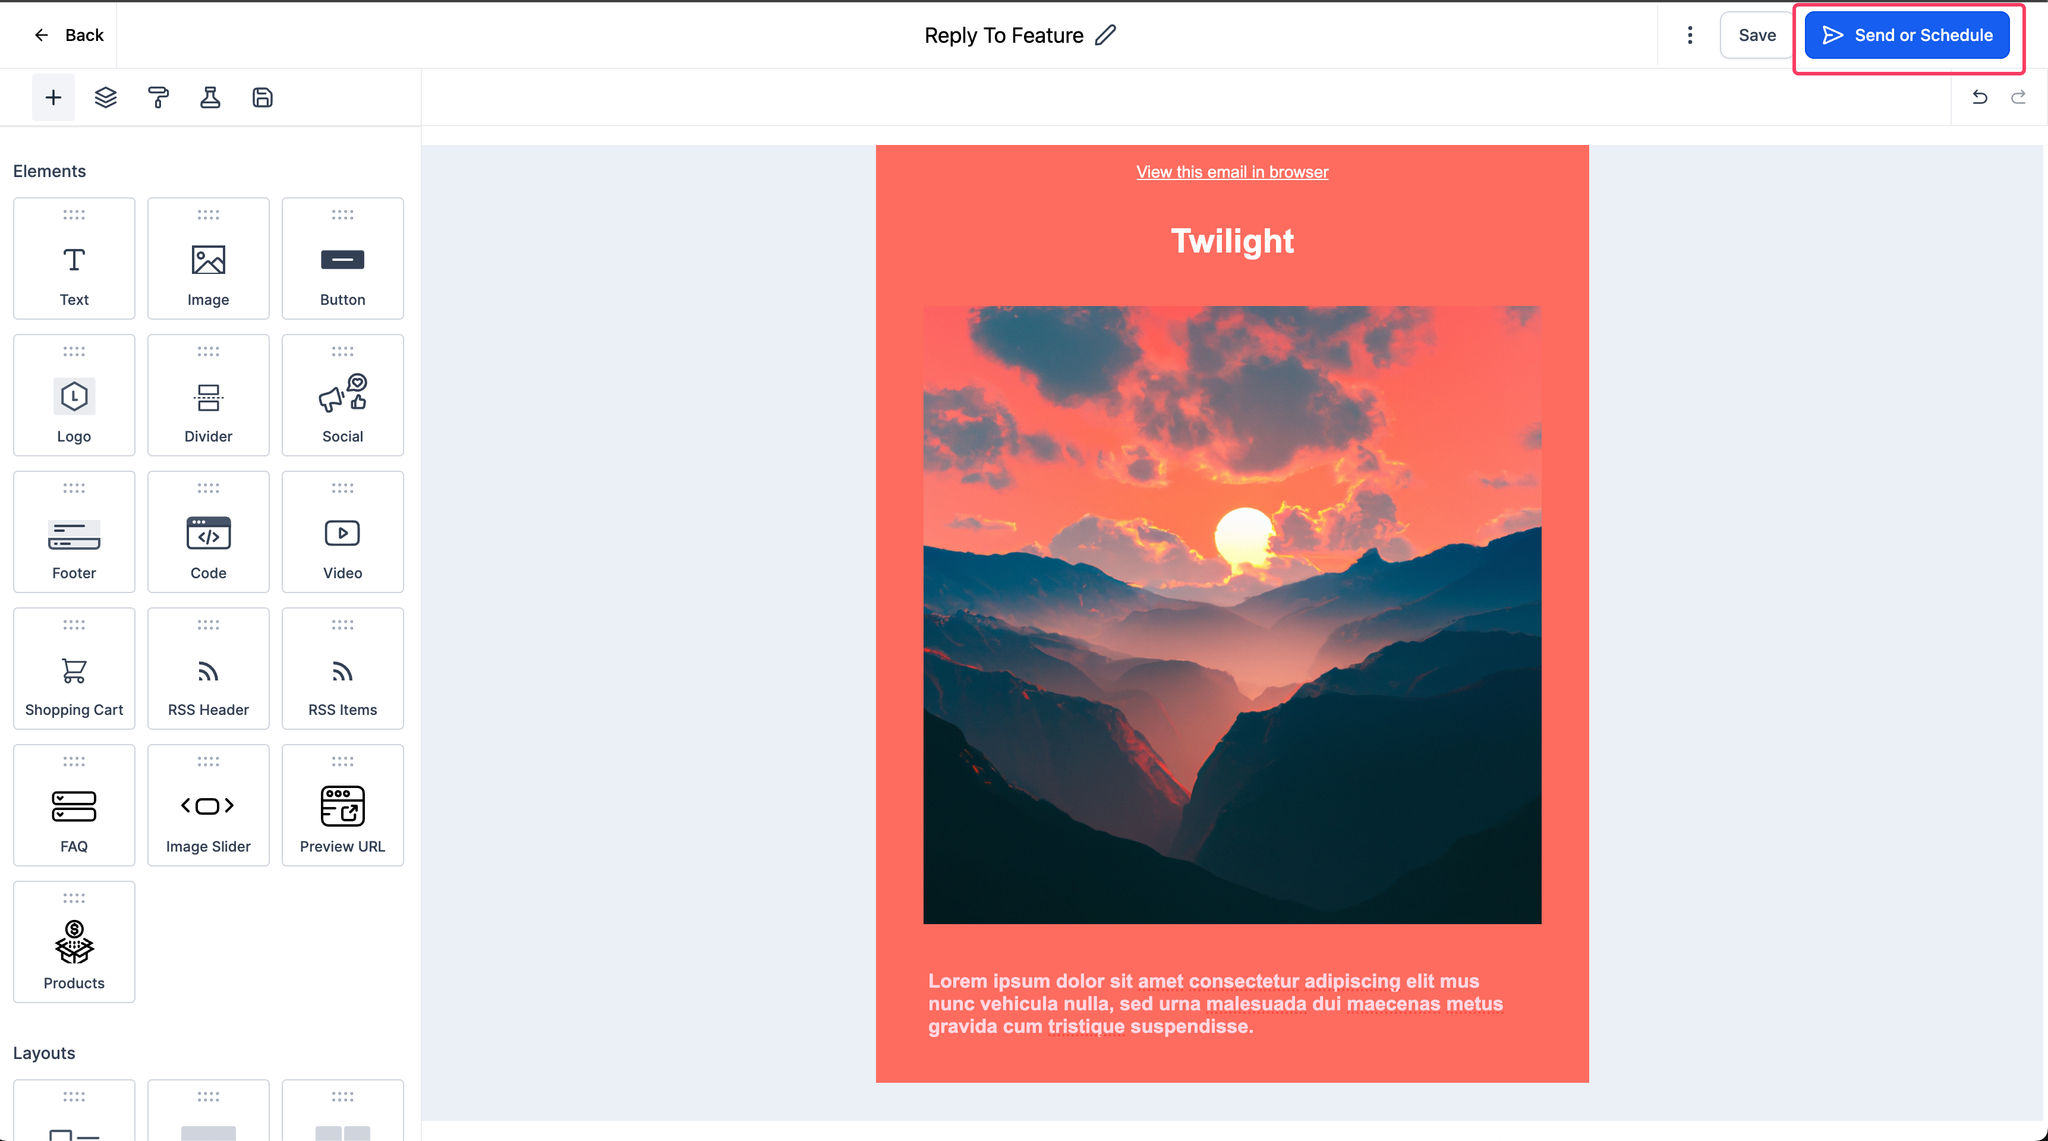
1. Open the conversation window of one of your ongoing conversations in the mobile app.2. When the conversation AI generates replies, you can view the complete text of each reply by opening the bottom sheet.3. Choose the most suitable reply by tapping on it.4. You can also send a review request by tapping on the "+" button at the bottom of the chat screen and selecting "Send review request."
Why it Matters
This update enhances conversations on mobile, improving the overall user experience.
Image without caption

calendar
mobile app
new
improved
3 months ago
We're excited to announce the latest update to calendars on the mobile app! In this version, we have made several improvements to enhance your scheduling experience.
What's New
- Change contact while scheduling an appointment: Now, you have the flexibility to update the contact information while you are scheduling a new appointment.- Custom value support for custom meeting location: We have added support for custom values within the Custom meeting location field, allowing you to input specific details.- Calendar notes improvements: We have made enhancements to the calendar notes feature. Notes will no longer be truncated, and you can easily view the entire text by tapping on "View more".
Why It Matters
This update brings significant improvements to the calendars module, providing a smoother and more refined experience for all users.Please note that the "LvlUp" mobile app supports this update. If you are using HighLevel, LeadConnector, or a White-labelled version, please request the update.
Image without caption

integrations
api
new
3 months ago
## Private Integrations for Sub-accounts::: aside
Note
: The following text is preliminary.:::We are excited to announce a new feature, Private Integrations, that allows sub-accounts to build powerful and secure custom integrations between their LvlUp account and any other third-party app.Private Integrations is now available in Labs for Sub-accounts.### What's New?Private Integrations, to put it simply, is a feature-rich yet secure alternative to API Keys.
How is Private Integrations better than API Keys?
1.
More Secure
: Sub-account users can restrict the scopes/permissions that a developer can access on their accounts.2.
Feature-rich
: Private Integrations allows sub-accounts to access API v2.0, which offers more API features and Webhooks.3.
Easy to Manage
: Sub-accounts can follow token management - security best practices using the 'Rotate and Expire Now/Later' features.### Why Was This Feature Necessary?The primary objective behind this feature is to enable customers who currently use custom integrations built on top of API v1 to migrate to API v2.### What's Next?1. Private Integrations for Agencies - Coming soon!2. Security Enhancement - Auto-expire Private Integration tokens that haven't been used in the last 90 days.### Preview Images:
Image without caption

documents & contracts
new
3 months ago
Overview
Another feature to streamline your payments via Documents and Contracts.
What's New?
- You can now add recurring products to your product list in Document Builder.- If your product has a setup fee associated, it will show up as a separate row item.- If you add a one-time product and a recurring product together in the list, the one-time product will only be charged to the user in the first invoice.- You can also add a recurring schedule to your Document templates with the capability to assign the start date as the completed date of the document.
How to Use?
- Add a product list to your document.- Add both recurring and one-time products to the product list.- If a recurring product is added, add a schedule from the product list properties and set the invoice sending date as the document completed date or a custom date (enabled in templates as well).- Once the document is completed, an invoice will be sent. Recurring products will be included if at least one recurring product was added, otherwise, only one-time products will be charged.- Setup fees associated with a product are shown separately in the product list.
Why Did We Build It?
- In our effort to streamline acceptance of invoices after Document Signature, recurring products and setup fees were causing challenges for many of you when using contracts. We have addressed this issue.
What's Next on Payments via Documents and Contracts
- 2 In 1 Documents: Showing the invoice directly after the primary signer signs the document.- One-time Deposit: Collecting a percentage of the total product value in the invoice.
Image without caption

conversations
improved
3 months ago
We've enhanced how emails sync with your CRM when you connect your personal Gmail email ID to 2-way sync: 🔄
Why this change?
👀Previously, when users connected their personal Gmail email with 2-way sync, all emails with contacts would automatically sync to the CRM.We noticed that in many accounts, users were often added as contacts, causing all emails sent or received by these users to sync to the CRM. This allowed admins and users with contact access to view personal emails within the CRM.Going forward, emails will sync only if they involve contacts who are not system users.
What's New?
🤩Emails sent or received by system users, who are also CRM contacts, will not sync. 🚫Emails are synced only if they include at least one contact who is not a system user. For example, if an email is sent to three recipients, where two are system users and one is not, the email will sync 👍This ensures that emails involving only system users remain private and won't be synced to CRM, even if they're CRM contacts.

conversations
fixed
3 months ago
# Outlook 2-Way Sync: Bug Fix 🐞
Scenario:
We identified and fixed an issue that affected sub-accounts where multiple users connected the same Outlook email ID with 2-Way Sync.
Previously:
Duplicate emails were created when multiple users within a sub-account connected the same Outlook email ID with 2-Way Sync.For example, if two users connected the same Outlook email ID, any email sent by a contact or by the user from their Outlook inbox resulted in two entries of the same email appearing in the CRM.
Now:
This issue has been resolved. Duplicate emails will no longer appear in the CRM, ensuring an accurate email synchronization experience.

conversations
improved
3 months ago
Enhanced Email Sync for Outlook
We've enhanced how emails sync with your CRM when you connect your personal Outlook email ID to 2-way sync.
Why this change?
Previously, when users connected their personal Outlook email with 2-way sync, all emails with contacts would automatically sync to the CRM. However, we noticed that in many accounts, users were often added as contacts, causing all emails sent or received by these users to sync to the CRM. This allowed admins and users with contact access to view personal emails within the CRM.Going forward, emails will sync only if they involve contacts who are not system users.
What's New?
- Emails sent or received by system users, who are also CRM contacts, will not sync.- Emails are synced only if they include at least one contact who is not a system user. For example, if an email is sent to three recipients, where two are system users and one is not, the email will sync.- This ensures that emails involving only system users remain private and won't be synced to CRM, even if they're CRM contacts.

chat widget
new
improved
3 months ago
🥳
What's New?
We're thrilled to unveil a brand-new revolutionary feature in Chat Widget - You can now customize the chat widget according to your taste with the placement, look and feel, and bring more customizations.😇
How Does It Work?
1. Navigate to Sites > Go to Chat Widget2. Click on New to Create Chat Widget3. Select the option between the SMS/Email Widget, Live Chat, or WhatsApp Chat4. Once that is done, you will be able to go to Widget to customize the look and feel with options of different styles and themes. There are options to:- Add Chat Launcher with or without a prompt- Select the Chat icon- Select the theme or customize it according to your brand- Allow users to add a message for first-time and returning visitors- Add Avatar images- Select where you would like to place the widget- Customize the widget dimensions with width and height5. Next is the Chat Window, where you can configure all the static messages visible to visitors. For each type, the chat widget adds extra fields. In the Chat Window, you can:- Add a Chat Window title- Add an Intro message- Allow users to enable email and change the CTA button- Allow users to add their own branding and legal consent for HIPAA6. The last option is messaging, which allows customization of acknowledgments and language settings. You can:- Add support contact details- Customize the acknowledgment message and greetings- Select the language for the chat widget😊
Few Notes
1. If you were already using the chat widget, it will show in the Widget option of the theme with a light blue color2. The WordPress plugin will work for the default widget. The ability for users to select the widget will be part of upcoming releases.
Image without caption

email builder
improved
3 months ago
Problem Statement:
Users previously faced limitations in providing sender names and preview texts when sending test emails, resulting in an incomplete testing experience.
What We Did:
We have introduced support for sender names and preview texts in test emails. This enhancement allows users to preview emails more accurately before finalizing them for distribution.
Benefits:
-
Time Efficiency:
Enables a quicker and more comprehensive testing of all email details.-
Improved User Experience:
Provides a more realistic preview of how emails will appear to recipients.
How to Use It:
1. Navigate to the Email Marketing section and select Templates.2. Click on the three dots to access the Test Email option.3. Enter the relevant details and send your test email.This update aims to streamline your testing process and enhance user satisfaction by offering a more robust preview functionality.
Image without caption

communities
new
3 months ago
New Features:Enhanced GIF Support:
Get ready for a whole new level of interaction! GIFs are now more accessible and seamlessly integrated within communities, moving from simple attachments to vibrant inline content for both posts and comments. This exciting upgrade, available on both web and mobile, allows you to add a fun and dynamic touch to conversations by including GIFs directly in your posts and comments.
Enhancements/Fixes:
- Groups Pagination: Groups are now paginated on the communities-builder site, reducing latency of the get groups API and resolving the issue where some groups were not visible when the total number of active and inactive groups exceeded 50.

blogs
funnels and websites
new
improved
3 months ago
# Add Blog Post Element with New Blog In Funnels/Website 🤩We're thrilled to unveil a brand-new feature in Blog: the ability to add a Blog Post element to any funnel step or website page, giving you the option to add a new blog with different sorting options.😎 Prerequisite - To use this feature, you need to have a new blog created with its domain and blog posts. Check out our Help Article on
for detailed instructions.😇
How Does It Work?
1. Go to Sites and navigate to the desired Funnels step or Website Page.2. Add the Blog Post element to the page by dragging and dropping it.3. Once the Blog Post element is added, select the blog name.- Note: If you are using the old blog flow, use the default blog site option.4. Filter the blog posts based on your preferences:- Recent Post: Displays the most recent blog posts.- Recent Post by Category: Filters blog posts based on the selected category.- Recent Post by Author: Filters blog posts based on the selected author.- Note: Filtering will be based on the updated date, which is the date when the blog post is published.For more detailed instructions, please refer to our Help Article on
.
Image without caption

invoicing
new
3 months ago
Overview
Business users can now accept Tips on their Invoices from the customers.
What’s New?
- Business users now have the capability to configure and accept tips on invoices from the system.- End users can choose to pay a percentage of the total amount (configured by the business user) or enter a custom tip amount.- This feature covers all types of invoices, including one-time invoices, recurring invoices, and invoices from workflows, documents, and contracts.- Users can configure tips on a global level or per invoice level.- Users also have the ability to refund the entire invoice amount, including tips.
How to Use it?
1. Go to Settings within Invoices and click on Payments Settings.2. Navigate to Invoice Tips and enable the feature, then save.3. Go to the Invoices tab.4. Click on "Create New Invoice" or "Create New Recurring Invoice".5. Click on the three dots at the top and select "Manage Tips".6. Choose the desired percentage for tips and start sending and accepting tips.
Why this feature?
This feature enables service businesses to collect tips on top of their invoice amounts and distribute them to their top performers.
What's next for tips?
- CSV view of tip amounts in transactions- Option to tag a tip to a specific user

certificates
new
improved
3 months ago
What's New?
• Introducing expiring certificates in the certificate builder.• Admin can now set an expiry for certificates issued to users.• Expiry can be set at either the template level or the issued certificate level.• On expiry, certificates will no longer be available for preview for the particular user.• Reminder emails will be sent on T-2 and T-7 days before expiry.• Issued certificates take priority over template-level expiry.
Download Certificates
• The certificate download flow has been significantly enhanced and optimized.• It is now fully compatible with all major browsers, addressing the previous issue where users faced difficulties downloading certificates on certain browsers.
Image without caption

e-commerce stores
new
3 months ago
# About:This feature enables store owners to showcase products distinctly on product list and product details pages by allowing them to add customizable product labels or ribbons. Store owners can also set a timer for the product labels, after which the label will be removed.# How to use:Store owners can set up product labels/ribbons for products in their e-commerce stores by navigating to
Payment > Products > Enable Product label
. They can add product labels for each product uniquely and specify the duration for which the label will be displayed.# Notes:- The starting and ending date and time will be set based on the time zone of the sub-account's location.- The end date and time should be later than the start date and time. Additionally, the end date and time should be later than the current date and time for the label to appear.# Images:Setting up the product label:[Image]Preview on website:[Image]
Image without caption

payments
new
3 months ago
- Business users can now offer additional payment methods across different channels like order forms, forms, invoices, payment links, and online stores to customers.- This feature is available only for businesses using Stripe as their payment provider.- It helps increase conversions by offering payment flexibility to customers in different geographical locations.-
IDeal
is a popular payment method in the Netherlands.-
Bancontact
is a common payment method in Belgium.-
SEPA Direct Debit
is a common payment method in the European Union.- All order and transaction details will be registered under the Payments menu, similar to credit card payments. This includes the functioning of the existing Order Submitted and Payment Received triggers.- This is a migratory change from Stripe's end and requires changes to propagate to all accounts over a few days. Some accounts may already have access to this feature, while others are still in the process of receiving it.
Image without caption

communities
new
improved
3 months ago
We've got some exciting updates in this release to make user engagement even better:
What's new?
- Weekly subscription is now available for courses.
Enhancements/Fixes:
- Added support for non-English languages in member search.- Fixed video playback issues.- Thumbnails are now generated for uploaded videos without any issues.- Added support for picture-in-picture mode for video attachments.- Improved landscape mode functionality on Android devices.- Optimized post and comment image attachments by compressing them to the
webp
format. This reduces image size by 30-50% without sacrificing quality, resulting in quicker loading times and a better overall viewing experience.- Implemented pagination for the groups list in the sidebar.- Resolved the issue of attachments getting replaced due to the same name.This release focuses on stability and optimizations to enhance the overall user experience and ensure smooth engagement.
Image without caption

calendar
new
improved
3 months ago
The Cancellation & Reschedule Policy setting allows you to define the time frame during which bookers can access the cancellation or reschedule link on the booking widget.
What's New?
Previously, bookers could cancel or reschedule appointments at any time through the booking widget. Now, businesses can set specific time frames after which the cancellation or reschedule links are disabled, requiring bookers to contact the business directly for any changes.
How to Use?
1. Go to calendar settings and select the desired calendar.2. Head to the Notifications and Additional Options section.3. Turn on "Allow Cancellation" and "Allow Rescheduling".4. Specify the time range after which the links should be disabled. (Note: Keeping the value blank means the link will never expire and the booker can access it anytime.)
When the above setting is enabled:
A cancellation and a rescheduling link will be added to the additional notes section and included in the calendar invite. These links will expire as configured, preventing the booker from canceling or rescheduling the meeting.
Image without caption

automations
fixed
3 months ago
What's New?
Going forward, the message body will no longer be trimmed to 100 characters.
Previous Behavior
When a wait step was added and afterward the user added
{{message.body}}
in an action, the message was automatically trimmed to only 100 characters.
Current Behavior
The
{{message.body}}
variable will now always return the entire message body.

e-commerce stores
new
4 months ago
# About: Store owners who were selling products in a specific states/ provinces only within a country, due to which there was a challenge in setting up Shipping & Delivery charges. With this feature, store owners can now define shipping & delivery charges for selected states/ province within a country. # How to use: Store owners can setup Shipping & Delivery charges for their Ecommerce stores at: *Payment > Settings > Shipping & Delivery > Add Zones*. While choosing zones, user can choose specific states/ province in a country. Store owners can also set a conditional pricing based on amount for the specific zones. # Notes: - Store owners can create differential pricing for multiple shipping zones based on states/ province. - Once a states/ province is added in a zone, it can't be added to another zone. - While defining rates, delivery rates can be defined for specific zones according to the total amount in the cart. For eg- Free Shipping, if the order amount is above $500 or else, charge $10 if it's below $500. # Images:
Image without caption

new
4 months ago
# What's New? This update introduces a new module federated app within CRM-frontend called contact-restore, replacing the existing contact restore component. The user interface has been redesigned for a better user experience. # Restoring a Single Contact: 1. Click on Contacts. 2. Click on Restore in the tabs on the top. 3. Click on Restore on the right of any of these contacts on the top right, and this modal will appear. 4. Click on Confirm. This will restore the contact(s): - Opportunities - Notes - Tasks - Appointments - Conversations - Campaigns/Workflows # Restoring Multiple Contacts: 3. Select multiple contacts and restore all of them in one go. 4. Click on **Confirm** to restore all of these contacts and their related Opportunities, Conversations, Notes, Tasks, Appointments, and Manual Actions.
Image without caption

saas mode
new
4 months ago
**🪄 New Feature** **✅ Agencies can enable or disable features and rebilling for locations in bulk** As an agency admin, you can now manage feature availability and rebilling for multiple sub-accounts at the same time using bulk actions. This bulk operation capability is available for the following features: 1. Workflow AI 2. Reviews AI 3. Content AI 4. LC - Premium Triggers & Actions Under **Agency view > Settings > LC - Premium Triggers & Actions**, you can see a checkbox associated with every location on the left of each row. You can select one or more of these and change feature availability using the **Actions** button on the top left. Similarly, you can enable and set up rebilling. You can also disable rebilling in bulk. Similarly, these actions can be performed for other products/features using the steps mentioned above.
Image without caption

memberships
improved
fixed
4 months ago
Quizzes and Assignment Edit Page Revamp What’s New? - Seamless Design: The revamped Edit page boasts a sleek and intuitive design, enhancing user experience with a clean, modern interface that simplifies assessment creation and editing. - In-House Editor Integration: By transitioning from TinyMCE to our in-house editor, we’ve streamlined the editing process, providing a more cohesive and efficient toolset tailored specifically to our platform’s needs. Comments Pages Revamp What’s New? - Introducing the new and improved comments management pages (Manage Comments and Product Comments) - Managing comments at both location and product level is more engaging and smooth now. - Seamlessly manage user feedback across courses and products with enhanced features. - Tip-Tap Editor integration across all our text editors to make it more consistent with GHL-UI. Bug Fixes - Support for iframe, embed, and object tag in Text Editor: Add and edit iframes, embedded content, and object tags directly in the text editor. - Support for Inline Images: Insert images directly within text, enhancing document visuals. - Offer Thumbnail Issues: Resolved display issues with offer thumbnails for better consistency. - Video Transcoding fixes Offer Checkout Flow fixes - Enhancements - Multiple File Support in Lesson Attachments: Attach multiple files to lesson posts, making it easier to share comprehensive materials. (.svg+xml, .png, .webp, .jpg, .jpeg, .mp4, .webm, .mov, .quicktime, .pdf, .doc, .docx, .ppt, .pptx, .xlsx, .zip, .mp3, .csv, .gif, .txt, font files, audio files, other image types are supported.)

lc phone system
new
4 months ago
**🪄 New Feature** **➡️ Forward calls to business phone number** You can choose to enable or disable call forwarding to your business phone number under **Settings > Phone Numbers > Advanced Settings > Voice Calls.** **🔔 Ring User Assigned to Called Number** For an incoming call from a known contact, you can choose to route the call to the agent assigned to the contact by enabling the checkbox. Alternatively, you can disable the checkbox to route the call to the agent linked to the called number. This option resides under **Settings > Phone Numbers > Advanced Settings > Voice Calls.**
Image without caption

automations
new
fixed
5 months ago
What’s New? **Error handling in deleted workflows** - Now if you try to load a deleted workflow using a URL an error message will pop up stating that "Workflow was not found".
Image without caption

email builder
new
5 months ago
We have brought some exciting updates to the email builder to ensure an enhanced user experience and optimize the process of creating symmetric and impressive designs. # **New Feature** **Search in Saved Elements** **What’s New: **Users can now quickly access their saved items inside the email builder using our recent release of the search bar. **Benefits:** - **Efficiency:** Save time by reusing popular components without the need to recreate them from scratch. - **Better Organization:** Easily locate and manage saved elements, improving workflow and design consistency. Check out the [help article](https://help.gohighlevel.com/support/solutions/articles/155000002467-how-to-save-items-in-email-builder-for-quick-access-/preview) for saving, renaming, accessing and searching your saved elements. **Enhancements** **1. TikTok and Yelp Icons in Social Media Element** **What’s New**: We've added TikTok and Yelp icons to our social media element. Previously, users had to manually insert custom URLs and icon images, which often led to inconsistencies in appearance. **Benefits:** - **Consistency**: Ensure visual uniformity with the rest of your social media icons. - **Ease of Use:** Simplify the process of adding and maintaining social media links in your emails. **2. GIF Support in Image Elements and Video Thumbnails** **What’s New:** You can now add GIFs, up to 10MB, to your email builder. Additionally, GIFs can be used as video thumbnails, enhancing the overall user experience. **Benefits:** - **Dynamic Content:** Create more engaging and dynamic emails with animated GIFs. - **Enhanced Visual Appeal: **Use GIFs as video thumbnails for a more interactive visual presentation. Check the[ help article](https://help.gohighlevel.com/a/solutions/articles/155000002473?portalId=48000045315) to learn detailed steps. We hope these updates will significantly enhance your email building experience, making it more efficient and visually appealing. Happy emailing!
Image without caption

invoicing
improved
5 months ago
**What's new?** - We have started supporting invoices which will have 0 net payable amount. How to generate them? 1. 100% Discounts 2. Negative Priced Items - Zero amount invoices will get generated directly in paid state & Receipts will be generated for them **Why do we need them?** - **Compliance & Record Keeping** - They help in tracking and documenting all transactions, which is essential for internal audits and financial transparency. In some jurisdictions, businesses might be required to document all transactions, including those where no payments are made - **Marketing & Promotions** - Issuing a zero amount invoice for complimentary services or goods provided at no charge can serve as a professional way to acknowledge the transaction, reinforcing customer relationships and ensuring clear communication - **Dispute Resolutions **- If a dispute arises regarding the delivery of goods or services, a zero amount invoice serves as proof that the transaction occurred, even though no payment was involved
Image without caption

new
5 months ago
We're excited to announce a significant enhancement to our platform: the introduction of the List View for Opportunities, now available via Labs. # What is List View? The new tabular View transforms how you can interact with your opportunities by providing a detailed, streamlined, and customizable view. Here’s what you can do with it: **Opportunities in a Listed View: **See all your opportunities organized in a clear, tablular format. **Sorting Across Fields:** Easily sort your opportunities by multiple fields - Opportunity Name, Value or Date Created. **Customizable Fields: **Choose which fields you want to display in your list view. You can also resize and reorder these fields. **Full Feature Parity with Board View: **All the features like the Advanced filters and Search functionality in the board view are available in the list view too. # How to Access: To start using the List View for Opportunities: 1. Go to Labs in your subaccount settings. 2. Enable the "Opportunities List View" feature. 3. Navigate to your Opportunities section and switch to the List View from the top right toggle. # Benefits of the List View: The List View offers several key advantages that can enhance your productivity and streamline your workflow: **Enhanced Visibility: **Check out more opportunities displayed in the same view **Increased Customization: **Tailor your columns to display or export the information that matters most to you. * Note: This feature is currently in Labs and can disrupt custom CSS/JS changes across all your Opportunity views. Request you to please get all your major changes done before the Live Date (tentatively 20th July 2025) to avoid any possible disruptions *
Image without caption

conversations
improved
5 months ago
# What's New? 🤩 ↗️ **Contact Avatar Interaction:** Users now have the flexibility to choose between opening contact details in a new tab or the same tab directly from conversations. This update empowers users by allowing them to customize their experience according to their preferences. **Open in Same Tab:** Click on the contact avatar. **Open in New Tab:** Click on the "Open in new tab" icon beside the contact name. ✉️ **Email Conversations** - Tooltips Added: Tooltips for "Reply" and "Reply All" options in email conversations to enhance user understanding. - Significantly enhanced the loading speed 🚀 of emails.Users can now enjoy faster access to their email content for a more efficient experience. - Implemented fixes for intermittent issues with loading user signatures.
Image without caption

lc phone system
new
5 months ago
We're implementing a change aimed at optimizing your wallet experience by reducing unnecessary recharges. Starting soon, you'll notice adjustments to our auto-recharge feature. **What's Changing?** - Recharge Optimization: To streamline your wallet management, we're introducing a modification that reduces the frequency of auto-recharges. Specifically, after triggering three auto-recharges in a single day, your recharge amount will increase automatically. **What You Need to Know** - Notification Process: If you reach the three-recharge threshold, you'll receive an email notification informing you of this change. - Managing Your Settings: You retain full control over your recharge preferences. Should you wish to adjust your recharge amount, you can easily do so from the billing page. - Next Recharge Amount: If your current recharge amount is in one of the specified tiers, the next recharge amount will be the next tier amount in the sequence. For example: **(I)** If your current recharge amount is $10 and it triggers the three recharges on the same day, your next recharge amount will be $25. **(II)** If your current recharge amount is $100 and it triggers the three recharges on the same day, your next recharge amount will be $500. - Disabling Auto Upgrade: Currently, we do not have a feature to disable the auto-upgrade functionality. However, we're continuously working to improve our services and may consider adding this option in the future. **Why It Matters** We understand the importance of balance management and strive to provide solutions that best meet your needs. This adjustment ensures a more balanced approach to wallet recharges, offering greater control and flexibility.

lc phone system
new
fixed
5 months ago

🪄 New Feature

📈 Messaging Analytics

We're excited to introduce Messaging Analytics for LC phone clients, now accessible under the Phone Number page. Gain insights into and track the effectiveness of your SMS campaigns.

Key Features:

Comprehensive Metrics: Monitor sent, delivered, undelivered, and error rates.
Advanced Filtering: Utilize filters like campaign, workflow, and bulk request along with date filters to drill down into your data.
Detailed Reports: Access detailed message reports for each status, with the ability to navigate directly to the conversation page for full context.

How It Works:

Navigate to the Settings > Labs. Select Messaging Analytics > Enable.

⚙️ Advanced Settings Enhancements

Enhance your control with two new additions to the Advanced Settings tab under the Phone Number page.

🎛️ SMS Limit

Set and monitor SMS sending limits for subaccounts. View current limits and track how often these limits are reached.

How It Works:

Navigate to the Settings > Labs. Select SMS Limit > Enable.

📱 Voicemail & Missed Call Textback Settings

Upload custom voicemail greetings and set up incoming call timeouts to better manage caller experiences.

How It Works:

Navigate to the Settings > Labs. Select Voicemail & Missed Call Textback > Enable.

🐞 Bug Fixes

  1. Phone Number Relinking/Delinking: We've fixed an issue affecting the relinking and delinking of phone numbers to the A2P messaging service across multiple accounts.
  1. A2P Submission Error: The "Invalid status transition for bundle" error, which occurred in A2P submissions when the customer profile was in draft, has been successfully resolved.
Image without caption

memberships
communities
client portal
new
5 months ago
We’re super excited to share that Kollab is now rocking it on the iOS App Store! It’s time to elevate your client portal experience to epic new heights! Getting started is easy! - Simply visit the App Store, search for Kollab by LeadConnector , and tap "Download." - Within minutes, you'll be ready to use Kollab! **How to sign-in:** - Make sure you are signed up with a Community group, Course or Client Portal. - Use the same credentials to sign-in i.e. same email ID and password. - If you have forgotten your password (just like me!), Sign in with OTP - If you are a part of multiple domains, you'll receive the option to choose which domain to enter into. Choose the relevant one to sign-in. - Once you are signed-in, enjoy your courses, groups all on the go!

New
Improved
Calendar
5 months ago
We're thrilled to announce the launch of our very first calendar webhooks! This is a significant milestone for our developer community, as it provides them with seamless integration and real-time updates.
What's New?
Now, you can effortlessly stay in the loop with three key triggers:
  • AppointmentCreate: Receive notifications when a new appointment is made.
  • AppointmentUpdate: Stay informed when an appointment is modified.
  • AppointmentDelete: Get alerts when an appointment is removed.
This feature enhances the developer experience by providing real-time updates, making appointment management easier and more efficient.

New
E-Commerce Stores
5 months ago
Background:
Browsing through the list of products in an Ecommerce store can be a challenging task, leading to complex user experience as many products may go unexplored. To tackle this, we are introducing a brand new element to our Ecommerce stores - the Search bar! Store owners can now add the Search bar element in two ways:
  • Within the navigation menu
  • As a dedicated element on the website
How to use?
Navigate to the page builder of your store and add the 'Search bar Element' which can be found under the 'Store' section in 'Add elements'. If you would like to enable the Search bar in your navigation menu, you can use the 'Show Search bar' toggle present in the navigation menu settings.
  1. Configure properties for the Search bar. Some of the properties that can be configured include:
  • Search button color
  • Search input box text and background color
  • Search dropdown text and background color
  • Border color for input field and dropdown
  • Font size and weights
  1. Click on 'Save/Publish' to view your changes on your site!
Note:
  • Only websites with stores can add this element to any page (Store, non-store).
  • Navigation menu customization for the search bar is limited. All customization options are available only in the standalone element.
  • The search suggestions (Dropdown) will have search results based on the title/name of the product.
  • Upon clicking on search, the user is navigated to the product list page, showing search results, which would be based on both the title and description.
Image without caption

memberships
improved
fixed
5 months ago
# Post details revamp **What’s New?** - Introducing the new and improved Lesson Details Page – your go-to guide for getting the most out of your learning journey! Explore each lesson with updated features, making learning easier and more enjoyable than ever. - Presenting our new video player, designed for an upgraded viewing experience. - Enjoy effortless file management with our improved upload and download features. - Explore our upgraded text editor for a smoother writing process. **Deleted offers in revenue analytics** - What’s New? - Previously, when offers were deleted, they were not included in the revenue analytics data, leading to inconsistent information. - Now, deleted offers will be included in the revenue analytics dashboard, providing more accurate insights into one-time purchase revenue. - In the charts, deleted offers will be represented by different shades of red, making it easier to distinguish them from active offers. - Additionally, deleted offers will be displayed in a table format, with a column indicating the date of deletion, enhancing visibility and understanding of the data. **Bug Fixes** - Upsell Deleted Offer Fixes
Image without caption

new
5 months ago
What's New?
  • Until now, we were only exposing the Message Subject and Message Body in workflows. This was limiting for users with media attachments in the messages.
  • Moving forward, you'll also be able to use Message Attachments from the custom value picker.
How to Use?
  • Select the 'Message' option in the Custom Value Picker.
  • Then select 'Message Attachment'.
Image without caption

New
Automations
5 months ago
What's the Update?
  • Our aim is to keep customers informed about our new and incredible features and to increase their adoption by enhancing feature visibility.
How to Use?
  • Users will find a chip on the top bar labeled 'What's New - Automation Updates'. By clicking on this, they can view a catalogue of our newly released features, and select any to read a summary.
  • Upon opening a feature summary, users have two options: Click 'Let's Get Started' to immediately go to that feature (which also removes it from the catalogue), or click 'Don't Show Again' to simply remove it from the catalogue.
  • If available, a 'Learn More' button will direct the user to a support document related to the feature.
What's the Benefit?
  • Users receive immediate updates on our fantastic new features as soon as they go live.
  • Enhances feature visibility.
  • Boosts feature adoption.

Improved
Funnels And Websites
5 months ago
What's New?
  • We've introduced a new edit button for the form and survey elements in the funnel builder.
  • Users can now directly open the form or survey builder from the funnel builder to make changes on the fly.
  • When you click the edit button, the respective builder will open in a new tab.
  • Once you make changes in your forms and surveys, they will automatically be visible in the funnel preview.
  • Refreshing the funnel builder will also reflect the changes in the builder.
Bug Fix
  • We've fixed a bug where changing the form or survey name didn't correctly reflect in the funnel builder. Now, when a user changes the name, the correct name will appear in the form or survey select dropdown in the funnel builder.
Image without caption

New
Social Planner
5 months ago
We're thrilled to unveil the brand-new Email Notification Settings for Social Planner! This feature will save you from the hassles caused by failed posts, rejected scheduled posts, or account expiry.😎
🤩 What’s New?
We have a total of six notifications:
  • Account Expired - For social accounts whose tokens have expired.
  • Account PreExpiry - For social accounts like Facebook pages that have an expiry of 90 days. Around the 80th day, users get notified to refresh the token.
  • Request for Approval - For social posts that are scheduled for approval, requesting the user to approve the scheduled post.
  • Post Approved update to Creator - This notifies the creator of the post if the scheduled post was approved.
  • Post Rejected update to Creator - This notifies the creator of the post if the scheduled post was rejected.
  • Post Failed - Notifies selected users when the scheduled post has failed. To change the template, users can click on settings to edit the template, or they can edit the template from Emails > Template > New > Template Library. In the template library, on the side navigation, there is an option to change the system templates.
How It Works:
To set up the notification, navigate to Marketing > Social Planner. There is an option for Settings beside the 'Create New Post' option. Users can enable or disable the email notifications.😊 Why it Matters:
For Social Planner, these updates are a game-changer. We've seen a good number of agencies experience issues with their social scheduled content not publishing due to the social account expiry, unapproved posts, or failures due to several different reasons.
🥇 Help Article - Notification for Failed Post, Account Expired, and Post Approval
Image without caption

New
Improved
Social Planner
5 months ago
We're thrilled to unveil the brand new user interface (UI) for Social Planner!
What's New?
We are introducing an improved UI to enhance user experience. The updates include changes to Social Planner settings such as Integrations, Notifications, Watermark, and Categories.
As Social Planner grows with an increasing number of social accounts, the screen requires a lot of scrolling to find expired accounts and to connect new ones.
With the option of creating new categories, improved tags, and pagination, we are also now able to render the watermark image in the list view. These changes will bring better organization and improved UI to Social Planner.
These updates are a game-changer for Social Planner. We have seen a significant number of agencies experience issues with their social content not publishing due to social account expiry, unapproved posts, or failures due to various other reasons.
Image without caption

New
Invoicing
5 months ago
**What's new?** - New payment method for invoices: - BNPL Payment methods : Klarna, Affirm, Afterpay/Clearpay **How can i take advantage of these new payment methods?** - These payment methods will be available when paying via stripe - These methods are available for one time invoice and recurring invoice without auto-payment - The payment methods you might be able to avail will depend on region and currency in which payment is made Note: Customers have the option to turn BNPL off from their stripe dashboard inside payment configuration "Invoice"
Image without caption

Improved
Invoicing
5 months ago
We're excited to unveil a couple of enhancements we've added to invoices! **Whats New ?** **Improved Product Description Import:** - Users will now be able to add product descriptions to their invoices and edit them before it goes on to the invoice. If anyone prefers to not import these, they can easily disable it from the invoice settings. **Improved Autofilling** - We've enhanced autofilling of card and contact information on Payment Links and Invoices. Now, any autofilling extensions and browsers can automatically fill in user and card information if configured. This functionality even extends to LastPass users. **Making the Invoice Name More Prominent!** - Currently, configuring the invoice name is possible from the invoice editor toolbar. However, we've noticed that many invoices in the system are being saved with the default name. To address this, we've introduced an invoice name text box on the Send Invoice popup. If users want to update the name, they can do so directly from this popup, ensuring they're always aware of the invoice name being sent.
Image without caption

Improved
New
Automations
5 months ago
Thrilled to announce that we have launched a new action type to the Google Sheets action. **What’s New?** Ability to look up multiple rows in Google Sheets. The action type will go through the sheet and respond as output all the rows that are satisfying the lookup conditions. **How to use?** - Go to Workflows and select google Sheets Action. - Select the account, drive, spreadsheet and the worksheet. - User will have an option to start the search from the bottom or top - Select the column you want to search and the value that you want to search - User can also select how many rows should be extracted in the output. - The option to have case sensitive lookup and to create a new spreadsheet if the value is not found. **Use Cases** - Extract data based on categories. - Find leads matching a certain criteria. - Work on data with specific values.
Image without caption

Improved
Conversations
5 months ago
🔗 **Automatic Link Formatting:** - All links and URLs included in emails will now be automatically displayed as clickable links. - Please note that for a link to be automatically formatted as clickable, it must include a scheme (such as https:// or http://), a domain name, and a top-level domain name. - Clicking on the link will open the respective page in a new tab. ↗️ **Improved Contact Avatar Interaction:** - Clicking on contact avatar will now automatically open the contact details page in a new tab. - This allows for uninterrupted conversations and ongoing calls while accessing contact information.
Image without caption

New
Certificates
5 months ago
Key Features - Introducing certificates triggers and actions in workflow. - Users can trigger a workflow actions based on certificate issued trigger. - They can also add filters based on certificate templates and different conditional operators. - Users can also choose certificate templates for actions, and as a result the particular template will be issued as a certificate.
Image without caption

New
Improved
Payments
5 months ago
What's new? Now, connected accounts within Stripe can take control of their payment methods. This new feature puts the power in the hands of each sub-account, allowing them to tailor their payment processes to fit their unique needs and clientele. Customers can now fine-tune their payment options, enabling or disabling specific methods with ease. This flexibility means they can curate a payment experience that aligns perfectly with their business goals. We're also rolling out customizable configurations for different product areas, giving users even more control. For example, they can offer "Buy Now, Pay Later" options in their online store for small purchases, while only keeping card and Bank debits in high value Invoices . Previously Unavailable Flexibility Before this update, connected accounts had limited control over their payment methods. This lack of flexibility meant that all customers had the same set of options, regardless of their preferences. Now, with the ability to manage their own payment methods, users can adapt their payment processes to better suit their needs and preferences.How to customise Sub-account users need to navigate to their **Stripe dashboard** for specifically turning on/off payment methods to display. Navigate to **Settings -> Connect -> Payment methods -> Your account** to see the list of payment methods activated by LeadConnector. Remember to select LeadConnector configurations in the dropdown here since there can be more platforms your Stripe account is connected to. Refer to the image below
Image without caption

New
Automations
5 months ago
**Problem Statement** - As there was no multi select functionality and users were not able to select the same filters again they had to create multiple triggers. - After this release the same can be achieved in 1 single trigger. **New functionality** - Now users will be able to select multiple options in Forms, Surveys, Contains Phrase and Exact Match fields. - This will work as an "Or" functionality. For eg. if in FB - Comments on a Post trigger, contains phrase field 5 options are present then the trigger will execute if the contact has commented any one of the phrases. **How to use?** - Forms & Surveys- In the trigger the ability to select multiple options by clicking on them from the dropdown will be available for filters. - Contains Phrase & Exact Match - In the trigger the ability to select multiple options will be available by pressing "Enter" or "Return" after typing the text.
Image without caption

New
Improved
Fixed
LC Phone System
5 months ago
🪄New Feature*✍️ Call Transcriptioncall transcriptions for recorded calls. With call transcriptions, users can now maintain accurate records of all conversations, aiding in documentation and compliance requirements..
Automatic Transcriptions: Transcriptions will be automatically generated for all outbound and inbound recorded calls, saving you time and effort. Easy Activation: Location/Agency administrators can enable call transcription conveniently under advanced settings in the voice calls tab, streamlining the setup process..
Enhanced Visibility:** Transcriptions will be seamlessly integrated into the conversation page, providing easy access and reference to call content.
*How will this help?. Efficient Documentation: With automatic transcriptions, you can maintain accurate records of all conversations without manual effort, improving documentation and compliance.. Convenient Review:** Easily review call content without the need to listen to entire recordings, enhancing accessibility and efficiency.
*How It Works:. Navigate to the Settings > Phone Numbers. Go to Advanced Settings > Voice Calls. Enable Call Transcription***⚙️ Enhancements**. Outbound SMS and Calls are now automatically disabled for paused or deleted locations. Revised outbound messaging logic to seamlessly support international messaging. Now, in addition to checking the country code, we also verify same-country requests using phone number extensions like +43 or +91, enhancing message delivery accuracy. Implemented proper error messages and notifications for suspended sub-accounts. Updated the Lead Connector logo to its new design. Enhanced user experience by displaying accurate error messages for the Missed Call Text Back feature on the UI*
🐞Bug Fixes**. Fixed an issue where saving a single custom SMS provider was causing errors, ensuring smooth functionality.. Resolved an issue where sub-accounts were not automatically linking to the telephony system for agencies with automatic linking enabled, ensuring seamless integration and functionality.. Fixed an issue where moving an agency out of the ISV endpoint was not functioning properly on the support portal, restoring the functionality for smooth operation. Corrected an issue where manual entry of area codes in the Add Number Pool feature was not yielding search results, ensuring users can efficiently find and manage numbers.. Added a backup condition to determine number type, resolving an issue where the A2P banner was not displaying correctly, ensuring accurate representation of number types.

New
Improved
Automations
5 months ago
**What is new?** - Nested Folders is now supported by Snapshots. - Users will be able to organise their folders and carry the same through Snapshots to their multiple sub accounts.

Improved
Fixed
Communities
5 months ago
Hey there! We've got some exciting updates this release to make user engagement, experience & security of the data even better: **New Features:** - Push notifications for all existing in app notifications are enabled for android, windows, linux and MacOS devices via browser. - Sharing comments is now possible via Copying links to comments (click on 3 dots on a comment to share) **Enhancements:** - Web Updates: 1. Post & Comment editor: Improved user experience for add links to post content for both Web and Mobile UI. Improved attachment adding flow for mobile UI. 2. Managing notification redirection for deleted posts: Clicking a notification for a deleted post will now display a message indicating that the post has been deleted. **Mobile UI Transitions:** On switching tabs in mobile UI, users get a premium experience because of smooth UI transitions. Bug fixes: - Fixed a bug in the grant group access action of the workflow, which failed to add users to a group if they were already marked as in the requested state. - Fixed bug in post view where comment editor was not visible in case of lots of existing comments. - Sidebar & Channel settings bug fixes for both web and mobile.

New
Documents & Contracts
5 months ago
If you were not able to send quotes so far because you wanted your clients to be able to select optional services alongwith the fixed ones in the contract, not anymore. **What’s New? / Key Features / Benefits:** - Ability for Document Creators to add optional items in the Product List - Ability to Toggle and make the quantity editable for the signer and set limits on minimum and maximum quantity that can be selected - Ability for Toggle and make the item optional for the signer. - Product List gets assigned to the primary recipient by default. - Total Amount gets updated on the basis of items that are in selected stage only. **How to Use?** - Add a Product List - Add a new product - Enable Quantity editing from the **Edit Quantity** Toggle - Make a product selectable/unselectable from the **Optional Item** Toggle **Why This Feature?** - Clients will now be able to send custom quotations with selectable items with ease.
Image without caption

Improved
Invoicing
5 months ago
**What's New?** We're excited to announce an enhancement to our Apple Pay and Google Pay support! Now, Apple Pay and Google Pay will seamlessly integrate with branded domain names at the Sub-Account level for Invoice, Text2Pay, and Payment Link functionalities. **Was this Already Available?** Previously, when we introduced branded domain names at the Sub-Account level, this feature encountered a hiccup due to Stripe's compliance requirements to register each domain name. However, we've made significant upgrades to our infrastructure. Our workers now actively monitor branded domain name changes and automatically register them with Stripe. Please note that this automatic registration feature is contingent upon enabling the "Register domains for Apple Pay" toggle from the Stripe integration page. Moreover, to provide even greater control, we've introduced a new button on the Stripe integration page. This button allows you to manually resync the registered branded domain name with Stripe, ensuring seamless operation.
Image without caption

New
E-Commerce Stores
5 months ago
**About**: Store owners will now have the ability to partially fulfil their orders manually on the platform. Specific items which are partially fulfilled by the store owners will have their separate tracking details. Users will receive communications of tracking details over email for the orders partially fulfilled.**Steps to partially fulfil an item in an order:** 1. Partial fulfilment can be accessed under Payments > Orders > View Order Details > Fulfil items. 2. In Fulfil items, choose the quantity of each item that needs to be fulfilled in an order. Add tracking details i.e, Tracking Number, Shipping Carrier, & Tracking URL. Store owners can also choose an option to notify users regarding their shipment details via email. 3. In the order details page, items that have been partially fulfilled will have their details along with item name, quantity & tracking details under Fulfilment(s).
Image without caption

Improved
Fixed
Conversations
5 months ago
👀 **What's New:** 📆 **Cancelled Appointments:** - The "View Appointment" option is now enabled for cancelled appointment activities. - Users can now view and update the details of cancelled appointments from Conversations module. 🗑️ **Deleted Appointments:** - The activity title now reads as "Appointment Deleted" when an appointment is deleted. - Users can view deleted appointments but cannot edit them.
Image without caption

New
Automations
5 months ago
What is New? Now, you can easily rename your workflows without having to open them individually. Previously: You had to open a workflow and click on its name to rename it. Now: You can rename workflows directly from the landing page! How to do this? 1. Locate the workflow you want to rename on the landing page. 2. Click on the vertical three dots menu to reveal additional options. 3. Select "Rename Workflow" from the menu. 4. Enter a new name for your workflow in the provided field. 5. Click the "Save" button to confirm the changes.
Image without caption

Improved
Fixed
Social Planner
5 months ago
We're thrilled to announce our latest update to Social Planner, we have extended and enhanced the calendar view showcasing the recurring posts queue to get the full picture. This is quick win for the team. How It Works: 1.Go to Marketing > Social planner 1. Create new posts with the content and media. 2. Click on the Post Now option - Select Schedule Recurring Post 3. Set the recurring post the day, week, month and year to create everygreen content In the Calendar View, the user will be able to see the future recurring post to plan and organise the content marketing. When the user edits the post, it will allow them to edit the parent recurring post.
Image without caption

New
Improved
WhatsApp
Chat Widget
5 months ago
We're thrilled to introduce one more option in Chat Widget with the option of Whatsapp Chat Type. 😇 🤗 🤗 **Prerequisite** \- Add a new Whatsapp business number from Settings > Whatsapp 😎v**How to enable Whatsapp Chat Widget?** 1. Go to Sites > Chat Widget 1. Go to the Chat Widget, navigate to Chat type and select the option of Whatsapp Chat 1. With the Whatsapp chat option, go to widget window to do the customisation of text, colors, branding and forms with email/phone. 2. Once the setup is done, the last part is to select the Whatsapp number. This is the number to which the message from the user will be redirected to when the chat is initiated. 1. Once the setup is done, please save the settings. **How does it works?** 1. Add the code to the landing page (external providers) to header code or use it by enabling toggle in Funnel/Website Settings 2. Once the chat widget is embedded, it will show on the landing page. 3. When the user visits and fills the form with name and other field 4. On submission, it will redirect to Whatsapp web option with the message to the number selected in widget window.
Image without caption

New
Email Builder
5 months ago
We're thrilled to announce the addition of Google Fonts to our email campaign and template builder, providing you with a diverse range of font options to elevate your email designs. 📌 **Problem Statement:** Previously, users lacked the ability to add Google Fonts to their email campaigns, restricting their styling options and design creativity. ✅ **What We Did:** Now, users can seamlessly access and utilise Google Fonts directly within the font selector of our email builder. Furthermore, font management is made effortless through the settings page, enabling users to add, delete, and control fonts with ease. 👷 **How to Use It:** 1. Navigate to the email builder section of our platform. 2. Open an existing email campaign or template, or start a new one. 3. Select a text element within your design. 4. Choose the font selector option. 5. Click on "**Add fonts**." 1. Select the desired font from the drop down in the modal 2. Select the desired font and save it by clicking on **"Add font".** 1. Select the desired font and save it. 2. The font will now be available in the font selector for every builder. 1. Additionally, the font can be managed from the **settings page.** Navigate to the Settings section of Campaigns and select "Fonts" 1. To delete a font, simply click on "**Delete**" next to the respective font. 2. To add a font from settings, click on the "**Add font**" section and follow same process We're excited to witness the creativity and impact that this new feature will bring to your email marketing efforts. Happy designing!
Image without caption

New
5 months ago
Developers can now subscribe to OrderCreate and OrderStatusUpdate in the marketplace for their custom app development.This is available as OrderCreate & OrderStatusUpdate in app settings with payments/orders.readonly scope configurable at location level (Screenshot attached for reference)OrderCreate \- This occurs whenever an order is created. OrderStatusUpdate \- This occurs whenever an order status is changed. Possible order status are pending, completed, or cancelled
Image without caption

New
Mobile Payments And POS
5 months ago
We're thrilled to announce our latest update to Payments on Mobile - the ability to accept payments using Cash, Cards on File, and Manual Entry for your mobile Point-of-Sale! Admin and users can now record payments for a POS transaction on Mobile using either Tap to Pay, Cash, Cards on File, Cheque, Bank Transfer, and more!
🚀 What's New
  1. Cards on File for POS: Accept POS payments using credit/debit cards. Everytime a payment is accepted with a new card for a particular contact, that card gets saved automatically for future use, making it super convenient for repeat customers!
  1. Cash Payments on POS: POS can now record cash payments, displaying the exact change that needs to be tendered for each transaction.
  1. Manual Entry on POS: If a payment has been accepted via Cheque or Bank Transfer, an entry can be recorded for that particular POS transaction.
👷‍♂️ How It Works
  1. Open the mobile app with your preferred account selected.
  1. Head over to the POS tab from the bottom bar and initiate a new transaction using your Product Catalog/Keypad.
  1. Link a contact to the transaction and review all the details of the transaction. Once you're good to go, tap on "Choose Payment Instrument".
  1. Select your preferred payment method.
  1. Enter the tip amount.
  1. Accept payment via your chosen payment method!
Note: If you choose to accept payment via a saved card, make sure you link the relevant contact on the Review Payment screen. If the transaction does not have a linked contact, no saved cards will show up.
⭐️ Why it Matters
This update finally removes the restriction of POS running on devices with NFC support only. Now Point-of-Sale will work on every device (including iPads and tablets) that have the app installed. Happy transacting!
📝 Tap to Pay and Cards on File are supported for Stripe Provider only as of now.
Image without caption

New
Invoicing
Mobile Payments And POS
5 months ago
We're thrilled to announce our latest update to Payments on Mobile - the ability to record payment for an existing invoice! Account admin and users can now record payments for an invoice on Mobile, provided they have specific permissions enabled from the agency settings. Payment can be recorded using Cards (new or saved), manual entry (cash, cards, bank transfer, cheque, others), and tap to pay (only applicable to devices with NFC support). This feature will be available on the mobile app. 🚀 **What's New** 1. **Tap to Pay for invoices**: Now record a payment for an existing invoice using Tap to Pay. 2. **Cards + Manual entry**: Record a live payment using a new/saved card or record a manual entry for an already paid invoice. 👷‍♂️ **How It Works** 1. Open the mobile app with your preferred subaccount selected. 2. Using the hamburger menu from the top left of the screen, head over to the "Invoice" section. 3. Choose and long-press on an invoice for which you would like to record payment. 4. Select record payment. 5. Select the payment instrument. 6. Accept payment via your chosen payment method! ⭐️ **Why it Matters** This update allows subaccount admins and users to finally start recording invoice payments directly from the mobile app, also allowing for payments to be accepted via Tap to Pay.
Image without caption

New
Improved
Calendar
5 months ago
Introducing Audit Logs for Calendar Settings! Now, users can easily track edits made to their calendars, including the timestamp, editor, and all modifications. **What's New?** - Users can effortlessly check edits to their calendars, including who made the changes, when they occurred, and what specific settings were modified. - This feature simplifies troubleshooting and provides precise insights into any adjustments made, ensuring transparency and accountability. - To make it simpler, we are now also showing calendar ID in the calendar settings. **How to Use?** 1. Navigate to Settings > Audit Logs. 2. Select "Calendars" under the module to view changes across all calendars. **Alternatively, for a specific calendar:** 1. Access Calendar Settings and copy the calendar ID. 2. Proceed to Settings > Audit Logs. 3. Paste the calendar ID in the 'Document ID' search box and get all details specific to that calendar.
Image without caption

Improved
App Marketplace
5 months ago
We are excited to announce a new enhancement in our platform that allows users to delete custom conversation providers from their apps seamlessly. **Important Considerations:** - Irreversibility: Please be aware that the deletion of a custom conversation provider is a permanent action. Once deleted, the provider cannot be reinstated or readded to the application. - Data Loss: Deleting a provider will result in the removal of all associated data. We recommend ensuring that all necessary information is backed up before proceeding with deletion. - Confirmation Required: To prevent accidental deletions, users will be prompted to confirm their action before a provider is permanently removed. Should you have any questions or require assistance with this new feature, please reach out to our support team.

New
Mobile App
Conversation AI
5 months ago
**Suggestive Mode** Receive AI-based suggestions for new messages on supported channels. Quickly send suggestions or edit them before sending. **Auto Pilot Mode** Automatically send responses to new incoming queries in messages. **Feedback and Bot Training** Provide feedback to train the AI bot from auto-generated responses.
Image without caption

New
Automations
5 months ago
**What is this enhancement?** - We have revamped the current action and added multiple new enhancements. This new enhancement will make the GPT action extremely powerful and users will be able to use the power of GPT 4 Turbo in the workflows at same price we were offering GPT 3. **What are the new feature?** **Select Model** - Users will be able to select from a "Model" to select from. By default GPT 3 Turbo will be selected but the users will have the option to select GPT 4 Turbo from the dropdown. **Select Action Type** - ​Don't know what prompt to use, try some of our pre made action types. The prompt will auto populate and the action can be used based on that. Below options are available to select from. 1. Analyze Text Sentiment 2. Summarize Text 3. Translate 4. Custom **How to use this feature?** - Click the "+" icon and search for "GPT powered by OpenAI" - Select the Model - Use Custom action type if you want to write the prompt - Use Any other Action type to get pre populated prompts **Pricing** - GPT 4 Turbo - $0.03 per execution - GPT 3.5 Turbo - $0.015 per execution​ ​
Image without caption

New
Conversations
5 months ago
Now you can effortlessly create tasks and add notes while engaging in conversations simultaneously. 🙌 👀 **What's New:** - 📝 **Seamless Notes and Task Creation:** Users can now create notes and tasks directly from the conversations module's right pane, eliminating the need to navigate outside the conversations module. - 💯 **Parallel Action:** Users can effortlessly take notes and create tasks while engaging in conversations, enhancing multitasking capabilities. - ✍️ **Edit and Delete Tasks/Notes:** Seamlessly manage your tasks and notes within the conversations module with the ability to edit and delete. - 😃 **Undo Delete Option:** Introducing the 'Undo Delete' feature for both tasks and notes, allowing users to effortlessly restore accidentally deleted items and prevent data loss. **How It Benefits:** - **Boosts Productivity:** Managing notes and tasks within the Conversations module saves time and allows users to quickly multitask. ⏰ - **Improves User Experience:** Integration into the conversations module reduces interruptions, providing a smoother and more intuitive workflow. 😊 - **Easy Recovery**: The 'Undo Delete' feature allows users to recover accidentally deleted tasks, minimizing disruptions and preventing data loss. 👍 👉 **Note** \- This feature can currently be accessed via Labs.
Image without caption

New
6 months ago
**About this enhancement:** End IVR call allows workflow owners to terminate the IVR call from their end. This will allow the contact to move further in the workflow for the non-IVR actions. **What problem is it solving?** Presently, workflow owners lack the option to terminate calls from their end. This means that after IVR actions are done, the contact waits with elevator music until the subsequent non-IVR actions finish(if any), and the call ends only at the workflow's conclusion. This leaves contact either listening to endless elevator music till the workflow reaches the end or hanging up themselves.**With this enhancement we are solving for** **Better User Experience** - Preventing users from being indefinitely subjected to elevator music. - Directly decrease IVR call durations for users once IVR actions are completed. **End IVR call options** Users can choose three different custom types : **End abruptly** \- By default IVR would be terminated instantly without any warning or a message. **Text message** \- Workflow owners can type a message along with the number of loops before the IVR call is terminated **Custom music** \- Workflow owners can choose to upload a voice message or branded music or any other audio format to be played before the IVR call is terminated along with the loops image.png
Image without caption

New
Documents & Contracts
6 months ago
What’s New?
  • Introducing the Signing Order feature for documents and contracts.
  • Clients/Users now have the flexibility to enable/disable Signing Order while sending documents. This will help all the users who need approvers for their documents to use it with ease.
  • Drag and drop functionality facilitates easy reordering of signers/recipients.
Key Features
  • Enable/disable Signing Order: Clients/Users can choose whether to enforce a signing order for recipients or not.
  • Drag and Drop Reordering: Easily reorder signers/recipients according to preference.
  • Sequential Email Triggering: When Signing Order is enabled, emails are triggered based on the order of signers/recipients.
  • Simultaneous Email Sending: When Signing Order is disabled, all recipients receive emails simultaneously.
Benefits
  • Enhanced Control: Clients/Users can dictate the signing order, ensuring a streamlined process.
  • Improved Efficiency: Drag and drop functionality simplifies the management of signers/recipients.
How to Use?
Enabling/Disabling Signing Order:
  • Navigate to the document or contract sending interface.
  • Toggle the Signing Order switch to enable or disable the feature as per your preference.
Image without caption
Reordering Signers/Recipients:
  • Click and hold on the signer/recipient’s name.
  • Drag it to the desired position in the list.
  • Release to apply the new order.
Image without caption
Managing Email Triggering:
  • When Signing Order is enabled, emails are sent sequentially based on the order of signers/recipients.
  • When Signing Order is disabled, emails are sent to all recipients simultaneously.
Image without caption
Why This Feature?
  • Signing Order adds a layer of sophistication to our document management system, addressing the need for sequential workflows in various business scenarios.
  • This feature caters to clients/users who require precise control over the signing process, ensuring compliance and efficiency.
  • By offering flexibility in email distribution and clear notifications, we aim to enhance user experience and streamline document workflows for our valued clients.

New
6 months ago
**What’s New?** - On clicking the "Create Workflow" button now you will see 2 options in a dropdown. - Users can select to choose from a Recipe - Or directly start the workflow from scratch **How to Use?** - Click on "Create Workflow" button in Automations.
Image without caption

New
Automations
6 months ago
**What’s New?** - Before you were only able to see 10 workflows at once. - Now you can choose how many workflows you will see in the landing page. - And that value will be set as default when you are logging in next. **How to Use?** - At the landing page select from the dropdown how many workflows you want to see on the landing page.
Image without caption

New
Automations
6 months ago
What is Custom Code?
  • Custom Code is a powerful tool that will allow users to create custom logic they want to achieve that are not available in automations currently. This provides flexibility and control beyond the pre-built actions, enabling users to automate complex tasks and integrate with various services not natively supported.
  • This is a Premium Action.
How it works
1. Add Action
In the workflows select the "+" icon to add an action and search for "Custom Code".
Image without caption
2. Programming Language
The code can be written in JavaScript. This will be the default language selected.
Image without caption
3. Property to be included in code
  • Now what if there are values in the triggers or actions above the custom code and you want to use them in the code. That's where this field comes to use.
  • These fields allow us to reference values from previous steps in our code by adding them to a dictionary called InputData.
  • You can enter the Key in the "Key" input field and assign a value to it by selecting the value through the custom value picker.
  • You can add multiple properties by clicking on "Add Property"
  • For example, if a trigger gives us information about a customer, which we then need to manipulate, we can add their name to the Input Data fields and reference it with iinputData.keyName or inputData['keyName']
Image without caption
4. Code Editor
  • You can write the code in the Code Editor
  • A sample code is pre populated for your reference.
  • Output should also be written in the code formatter itself.
  • Output should be a JavaScript Object or Array of Objects.
Image without caption
5. Test your Code
  • Testing the code is a mandatory step, if the test is not done then user will not be able to use the output of the code in the subsequent steps.
  • To test the code click on the "Run Test" button.
  • Post clicking on Run test button, if there are no errors in the code them it will show "Test Result Success" and if there is an error in code then the result will be "Test Result Failed" and you would have to recheck the code to remove the error.
Image without caption
Points to Remember
  • Custom value will not be passed when you are testing your code.Only the contact information will be passed when testing a code. Other properties used in the code will not pass while testing.
  • Testing the code is mandatory. No output will be available for untested code in subsequent action.
  • Use the Property fields to assign key names and map values from previous steps. Use inputData.keyName or inputData['keyName'] to access the values within the code.

Improved
Invoicing
6 months ago
For clients in various part of world, it becomes necessary to capture information of Advances/Returns/Buybacks within their invoices. This help them for legal purposes and to provider finer details inside invoice **What's New** - Inside invoice we allow customers to create product on the go. Here we allow the customers to have negative prices - Products with negative prices won't be available to save for later use nor they can have taxes assigned to them as this might break existing apis in places using products - The calculation done here will be same like it used to be so far, with just negative prices subtracted from final total **Why It Matters** - Increased flexibility - Allows user to be move creative while creative invoices. - Stay compliant - Simple, intuitive yet effective way to stay compliant!
Image without caption

New
Email Builder
6 months ago
With the recent release, users can now enhance their reply management of email campaigns. 🚩**Problem Statement:** Previously, users were restricted to setting a global reply-to address or using the sender’s email for managing replies to their campaigns. This setup lacked flexibility for cases where different campaigns needed distinct reply addresses, managed by specific teams like marketing or support. Also, in some cases during replying, if contacts were marking someone in CC, it was not visible from conversation tab 🌟**What’s New:** Users can now specify custom reply-to addresses for individual campaigns, enhancing reply management. 👷‍♂️**How to Use:** 1. Navigate to Email Marketing. 2. Choose your campaign and click “Send” or “Schedule.” 1. If the sender email or global reply-to address isn’t suitable, select “Set a custom reply-to address for this campaign.” 1. Input the desired reply email address. 🚀 **Which Reply-To Address Takes Priority?** **Priority 1:** Custom reply-to address set in the campaign’s Send or Schedule screen. **Priority 2:** Reply address specified in Location Settings -> Email service -> Reply & Forwarding settings.**Priority 3:** Current defaults
Image without caption

Improved
Documents & Contracts
6 months ago
**What’s New?** - Configure from name and from email inside document & contracts settings - Users will now be able to configure from name and from email for every email/notification sent by document and contracts - Earlier this was limited to default name and email of the active user. **How to Use?** - Navigate to Settings under Documents and Contracts - Change the from name and from email within Customer Notifications for customer facing emails - Change the from name and from email within Team Notifications for internal emails **Why This Feature?** Earlier users were not able to change from name and from email that was being sent to the users, thereby creating a hiccup in the flexibility.
Image without caption

Improved
Payments
6 months ago
**What's New** - Addressing numerous agency requests, we've implemented the ability to delete payment links directly from the payment links dashboard. - The purpose of this feature is to remove the payment links from dashboard which are no longer useful for the business users. - Audit logs would be generated for the payment links that are deleted from the system. - Once deleted the payment links won't be accessible to the end user for capturing payments and shows up a 404 page. **How to Use?** - Head over to the Payments Page - Go to Payment Links Tab -> Click on the three dots option for any payment link -> choose delete - Once the confirmation modal opens up -> choose ok and voila your dashboard would now be refreshed and the payment link is deleted. - To check the audit logs one can go to settings -> audit logs -> filters -> payment links for the same.
Image without caption

New
Conversations
6 months ago
**What’s New?** 👀 Sync your Outlook mailbox and CRM effortlessly by connecting 2-way sync! 👏 **New Contacts:** - You can now create new contacts directly from your Outlook mailbox 🤩 - Add the ‘Auto BCC’ address to the CC or BCC field while sending an email in Outlook. - 💥 Your contact will be automatically created, along with the conversation in the CRM. **Existing Contacts:** - All emails sent 📤 from your Outlook mailbox to existing contacts will be visible in CRM. - All Incoming emails from existing contacts are automatically imported into CRM. 📥 **Where can you find this?** - Under the sub-account settings in the 'My Profile' section, you can see Auto BCC Sync address. - This is unique to each user's email and location. **How does it help?** - **Enhanced Visibility:** Syncing your Outlook mailbox and CRM provides a comprehensive view of interactions for better relationship management. - **Efficiency Boost:** Creating contacts directly from Outlook saves time, helping you stay focused on tasks. - **Primary Inbox:** With these added functionalities, you can now use the CRM as one of your primary inboxes for consistent communication management. 👉 **Note** \- This feature can currently be accessed via Labs.
Image without caption

New
6 months ago
With this new feature, you can now have separate owners for contacts and opportunities in your system. This flexibility allows for more nuanced management and delegation of responsibilities within your organization.To enable this feature, follow these steps: - Navigate to Settings > Opportunities & Pipeline. - Find the "Allow different owners for contacts and its opportunities" option. - Toggle the setting to "On." Functionality **Default Opportunity Owner:** When creating a new opportunity, the default owner will be the same as the contact owner. However, this can be updated as needed to reflect the appropriate ownership. **Subsettings:** There are two additional subsettings available - - Allow updating the contact follower based on the opportunity owner change: Enable this setting to automatically update the contact follower when the opportunity owner is changed. - Allow updating the opportunity follower based on the contact owner change: Enable this setting to automatically update the opportunity follower when the contact owner is changed. This will also work in the same manner when opportunities and contacts are created/updated via Automations and Bulk Actions **Note**: 1. Once the setting is turned on, the automations which currently update owners might not update the opportunity owner so please check all automations where owners are updated once the setting is turned on 2. We are also working on adding an opportunity action to add and remove owners which will be coming soon after this release. How It Helps **Improved Customization:** Tailor ownership settings to match your organization's specific structure and workflows. **Efficient Communication:** Automatically update followers based on ownership changes, ensuring seamless communication and collaboration. With the ability to decouple owners for contacts and opportunities, you have greater control and flexibility in managing your CRM.
Image without caption

New
Client Portal
6 months ago
Domain Connect Integration with Client Portal We're thrilled to introduce Domain Connect feature for client portal where user can add and migrate there domain as doing this users domains will me more secure **Key Features:** - Load time for client portal are now 15% faster than before. - Better caching of pages, easy prevention of DDoS attacks. - More added security features. - Migrate existing domain. - User can also modify domain. - User can delete/remove domain.
Image without caption

New
Fixed
Certificates
6 months ago
**Location and User level permissions** - Introducing location level permissions for certificates module, users can now enable/ disable certificates for respective locations. User-level permissions have been implemented to manage access rights within the certificates module for various users. **Undo Redo in certificate builder** - Introducing undo redo functionality in certificate builder. - Users can now seamlessly control there edits, they can now also creatively experiment knowing they can backtrack if needed. **Accessibility in certificate builder** - Introducing keyboard shortcuts in the certificate builder for quick actions such as previewing, saving, and undoing/redoing edits, providing users with greater control and convenience. - Users can now utilize shortcuts like CTRL / ⌘ + Z for undo and CTRL / ⌘ + S for save in the certificate builder, enhancing workflow efficiency. **Bug Fixes:** - Added a close button for Send button nav bar (inside builder)

Improved
Conversations
6 months ago
We have made enhancements to the conversation page's central panel, email composer, and spacing issues: - Central Panel of Conversations: The feature for fetching older messages malfunctioned in terms of scrolling. This has been fixed; now the scroll position is maintained. - Left Panel of Conversation in the Unread Tab: Previously, when a message was replied to, the conversation moved out of the unread tab. This has been fixed; now, when an unread conversation is replied to, it remains marked as unread and does not move out of the unread tab. - Activity Changes in the Central Panel: When changes were made to the Activity, an activity message would be added to the chat. Due to a peculiar bug, only 10 messages would remain visible in the chat; the rest were removed. We have released a fix for this issue. - Message Composer Line Spacing Issue: There was extra space between lines, which caused template and signature issues, and a general mismatch between composed and sent emails. We've released a fix for this.

Improved
App Marketplace
Conversations
6 months ago
Get message by Message ID and get email by Email Id API is now available for public access through the OAuth channel. **What's New?** - User can fetch message details using get message by message id API. - User can fetch Email Message details using get email by email id API. - Email Message ID under a message thread is now available in Get Message by Message ID API and Get Message by Conversation ID API.

Improved
Payments
Invoicing
6 months ago
- Refactored the entire core logic and UI for capturing internal payments by migrating to the payment element. - Adding billing fields on invoice live links as well as internal record payment modals for capturing payments Why It Matters 1. Enhancing Capturing Payments Experience - Eliminating the AVS failures to record payments leads to a significant betterment of customer experience for users of [authorize.net](http://authorize.net) and NMI payment providers. 2. Consistent UI - We now have consistent UI across the entire invoicing system for capturing payments be it a customer facing page or on the invoicing dashboard. 3. Scalability and Eliminating bottlenecks - With the use of payment element we ensure that the invoicing system won't face any scalability issues in the future especially when there arises a need to connect it with different payment providers.
Image without caption

Improved
Payments
6 months ago
Simplified UI: More compact, intuitive & served from micro frontend app Added new pages to the payment integration section to accommodate future development scopes. Introduced Default Provider Listing, along with Native Providers List. Implemented an All Providers Page, displaying all connected and disconnected providers. (Exciting updates coming soon! Stay tuned)Why It Matters? - Improved User Experience - Enhanced consistency between UX of different payment providers - Better use of screen estate to accomodate more providers
Image without caption

Improved
Conversations
6 months ago
We have started capturing contacts' Phone Numbers and Emails if sent through Live Chat messages. **What's New?** - We capture phone numbers and emails via live chat messages. - For example, if the message is sent through live chat - Hi, this is my number 9876543210 - we will capture this number as the contact's phone number. - If the contact already has a phone number, we will ignore the number coming in the message. - If there is already an existing contact with that phone number, then we will merge the Live Chat visitor contact and conversation with the existing contact. - All the above is applicable for capturing emails as well. **How to Use?** In a Live Chat send a Phone Number or Email as a message. Our system will parse the message and capture the details.

New
Invoicing
6 months ago
**What's New?** - Previously, End Users or Customers could only accept full payments through the Invoices, there was no provision of partial payment for the end customer. With this new feature, Business Users can now set a minimum percentage of the total Invoice Amount to be collected from the end customer. - The customer can pay any amount that is equal to or greater than the percentage amount specified from the Invoicing Dashboard of the subaccount . - Feature available for both one-time and recurring invoices. **Why This Feature?** - This feature empowers business owners with more control over the payment plans for their customers as well as helps them to capture more payments from their potential clients/customers. **Note:** - For recurring invoices the partial payment as a feature is available for invoices that have autopayment disabled. In case of autopayment enabled and customer card it will have the option for partial payment for the first invoice but for the subsequent one's it would autodraft the full amount. **Summary** - This feature introduces partial payments for end customers by allowing businesses to set minimum percentages for invoice payments, empowering them with greater flexibility and control over payment plans, ultimately enhancing client payment capture rates. **How to Use?** - Ensure that a payment gateway (Stripe / [Authorize.net](http://authorize.net) / NMI) is integrated. - Go to Payments -> Invoices -> Invoices Settings. - From this page menu click on Payment Settings and enable the Partial Payments Toggle - Add a percentage in the input field (Percentage is calculated based on the total amount of the invoice amount to be paid). - Click on "Save." and Voila you now have Partial Payments Enabled !
Image without caption

Improved
App Marketplace
Conversations
6 months ago
**What's New;** - We are now accepting external IDs as AltId in the Inbound message API. - The external ID will be passed in the Custom Provider delivery payload - We are also returning the external ID in the integration Webhooks This will help to map inbound messages with external message IDs, especially when the user is trying to thread messages appropriately in case of message replies.

New
Improved
Social Planner
6 months ago
We are thrilled to announce upgrades to better version of Facebook API which solves the issue mentioned below - 1. Navigate to Marketing > Social Planner 2. Go to Settings 3. Connect your Facebook Page While connecting it the page, it would mention that the **page doesn't have adequate permissions**. 😇 **With the new upgrade, the people using business manager access will be able to connect.**😎 😎 With the upcoming changes to Facebook Group API, Facebook is shutting down the APIs to connect the Facebook Group, publish the content is taken away. This is market wide initiative, it is same for everyone in market. What to suggest to everyone asking about Facebook Group API? Please use HL Communities with similar concept of Facebook Groups, Social Planner team is going to expand on it soon.
Image without caption

New
Improved
Communities
6 months ago
Hey there! We've got some exciting updates this release to make user engagement even better: **New Features:** - Image cropping New users can now crop the avatars from the mandatory profile modal. - Unsubscribe from emails Users can now unsubscribe from emails, except OTP emails/ invite emails/ payments and cancellation emails.
Image without caption

New
Improved
Calendar
6 months ago
This enhancement empowers users to **configure availability** for service calendars. Now, in addition to staff availability, the system will also **consider calendar availability** when determining free slots. **What's New?** - **Previously**, service calendars only checked the availability of staff members when determining available slots, creating constraints for businesses. - With this enhancement, we've introduced Calendar Availability, allowing users to set up their service calendars' availability **similar** to **other calendar** types. - **Now**, users can configure **weekly working hours** and **date-specific hours** for their service calendars. - When calculating available slots, **both** the configured **calendar** availability and the **staff member's availability** will be considered. **How to Use?** 1. Navigate to calendar settings. 2. Select your service calendar or create a new one. 3. Access the availability settings. 4. Configure your weekly working hours and/or date-specific hours. 5. Click on save.
Image without caption

New
Fixed
6 months ago
**Assignments in Mobile:** No more being tied to your desk! With our latest update, you can now take your assignments on the go, right from your mobile device. Whether you're lounging at the park or stuck in traffic (as a passenger, of course), managing your assignments has never been easier. - Mobile-friendly assignment now available on your phone. Can be accessed through mobile browser and PWA. - Check out your latest assignment submission in a snap! - Peek at your instructor's feedback without breaking a sweat! **Assignment UI optimisations in Desktop for all themes:** - Experience a revamped confirmation message toggle and a sleek new design for mobile devices! - We've created a tidy gap between assignment instructions and your submitted answers and files. - We've boosted the performance of the previous and next buttons for seamless post browsing! **Bugs** - Fixed post completion count issue in PWA.. - Scroll for assignment, quizzes and their inner pages too. - Post completion fix for client portal enabled locations.

New
Forms
6 months ago
We are excited to introduce Order Confirmation support in Forms experience! With this update, users can choose to add order confirmation page on submissions of forms with products. 💪💪**What's New**💪💪 - Order confirmation support is available for product with forms. - After successful payment of purchased product, Order confirmation page with basic details of the customers will be shown. - Theme of order confirmation page is automatically taken from form theme selected. - Details Shown in Order Confirmation: - Name, Email, Phone, Address, Country, Product details and total amount paid 🌟**How to Use**🌟 Under the Integrations, add the "Payment" element. Add products to your forms Under Styles and Options: Go to On Submit actions There is an option to choose order confirmation page on successful payment. 🔥**What's Next** 🔥 - More customization options for order confirmation will come - As per width of the form, the orientation of details in order form can change.
Image without caption

New
Improved
Calendar
6 months ago
We have **enabled** Google Organic Booking for selected locations! This feature is now live for locations that have either **one service menu or one group** created in calendars. With this integration, your bookers can seamlessly schedule appointments directly from Google Search without any additional cost to you. **Key Points to Note** - Google Organic Booking is enabled for sub-accounts with only one service menu or one group. You can **disable** this feature at any time by navigating to **Calendar Settings > Connections > Account Connections.** - Enabling Google Organic Booking is **awesome** as it enhances your online presence and attracts more bookings **organically** through **Google Search.** - For locations with multiple service menus or groups, you will need to enable Google Organic Booking in Calendar Settings and select the specific service menu/group/calendars to upload. **How to Enable or Disable Google Organic Booking?** - Navigate to Calendar Settings > Connections tab > Account Connection. - Toggle the Google Organic Booking option on or off according to your preference. - Any **change** made typically takes **24 to 48 hours** to reflect on your Google Business Profile.

New
Forms
6 months ago
We are excited to introduce new feature Products in Forms to enhance your Forms experience! With this update, users can seamlessly add products to their forms with better customization and layout options.
🔥What's New🔥
  • Payment Type: Now you have an option to either sell product or collect custom amount from the forms.
  • Ability to select products, include descriptions and images, and choose layouts.
  • Users will also be able to select different variants which are available for the specific product
  • Quantity of product will be respected as per inventory management.
  • Inclusion of tax calculation when someone purchase the product.
🌟How to Use🌟
  • Under the Integrations, locate the "Payment" element.
  • Drag and drop the payment element onto your form canvas.
  • Connect the payment gateway
  • Toggle between live and test modes.
  • Click on "Add Product" to select from available options.
  • Customize product details, including description, image, and layout.
  • You can customize the look by choosing themes and styling options.
  • Save your changes and preview the form to see the products in action.
💪💪Key Highlights💪💪
Customizations:
  • You can add upto 20 products
  • Three different layout options are available.
  • These forms can be easily added in the funnels and can be used as one step order form with unlimited customization.
Tracking payments:
  • Upon form submission, the payment amount, order id and payment status are included in the submission details.
  • On clicking OrderId, users will be able order details.
  • These details can also be exported via export options.
Email Notifications:
Email notifications also reflect the status and amount of payment.
Workflow Trigger:
Payment received trigger can be used with "Forms" as source.
🎉Notes:🎉
  • Recurring products are not supported right now.
  • NMI and Authorize.net requires First Name as mandatory field while having payment element in the form.
  • Refund amount will not be captured right now
  • Old way of API based Stripe connect is not supported.
  • In Calendars with custom form payment element, Payment element will not display.
  • Multi payments with Multi native forms not supported in funnel yet
  • Undo/Redo is not supported with Payment element yet
Examples:
Image without caption

New
Improved
Automations
Email Builder
6 months ago
**About this enhancement** We're thrilled to announce the integration of the email template builder into our "Send Email" workflow action. This enhancement brings unparalleled convenience and efficiency to user’s workflow creation process. With this you can now view and edit email templates directly in the workflow! **Key Benefits** - Streamlined User Experience: Say goodbye to the hassle of navigating between tabs. Now, you can conveniently view and edit your email templates within the workflow environment, streamlining your user experience and enhancing productivity. - Reduced Back-and-Forth: Bid farewell to the back-and-forth confusion. By eliminating the need to toggle between different sections, you can focus on creating workflows seamlessly, ensuring swift and efficient execution.
Image without caption

New
Improved
Email Builder
6 months ago
We're thrilled to announce an improvement we made in Email builder integration to ensure seamless experience in Workflows! With this update, users can now both save changes and save them as new templates when using the Email Template Builder within Workflows. **What's New:**🚀 Save as New: Create fresh templates based on your edits without altering the original. Preserve Originals: Your original templates remain intact while you experiment with changes. **Why It Matters:**💃 Flexibility: Tailor templates to specific needs without starting from scratch. Efficiency: Streamline your email workflow with these new options. **Where can you see it?**😎Under Workflows -> Open the Email Action - Choose a Template from the drop down - Click on Edit option on the Thumbnail Make the required edits and " Save as New Template" 1. Specify the name of the new template **Note:** In other integrations (Like Template builder integration with Contacts), we still support only **"Save"** option.
Image without caption

New
Improved
Calendar
6 months ago
We've **resolved** the **limitation** where recurring events edited in Outlook didn't sync properly. Now, **all edits** made in Outlook will **sync accurately**. **What's New?** - **Previously**, our synchronization system only captured **modifications** to the first event in a **recurring** series, resulting in **discrepancies** when changes were made within Outlook. With this enhancement, we've **eliminated this limitation.** - **Now**, whether you edit a single occurrence, choose 'This and following events', or modify all occurrences of a recurring event in Outlook, those **changes** will be **accurately reflected**. This **enhancement ensures** consistency and accuracy across platforms, avoids confusion caused by discrepancies in event details and helps in obtaining accurate slot availability to avoid any double bookings. **Important Note:** For this to work accurately, it's essential to disconnect and then reconnect your Outlook integration.

New
Fixed
Memberships
6 months ago
**What’s New :** 1. Gone are those days of indefinite offers; now, seize the opportunity with limited-time validity, where every moment counts. 2. Explore three distinct pathways designed to empower learners: Offers with Access Start Date Only: - Dive into exclusive offers starting from a designated date, or provide early access. - Offers with Access Number of Days Only: - Seize short-term deals available for a specified number of days, for limited-time accessibility. Offers with both Access Start Date and Number of Days: - Mark your calendars for exclusive launches and enjoy limited-time offers for a set duration, such as our holiday promotion. **Bug Fixes:** - Kajabi fixes to extract posts and videos - Added customization support for Mark as complete button for quizzes and assignments - Common Navbar UI Hotfixes
Image without caption

New
Improved
Automations
6 months ago
**What’s New?** All new UI and action type with a new name. The action is renamed to "GPT Powered by OpenAI" - New UI - Easier and simpler to use with helper text to guide you through the process. - New Action Types - Now there are multiple "Action Types" to choose from. Get pre written prompts for the action type you have selected. **How to Use?** Same as before, click on "+" icon to open the action side bar. Search for or directly navigate to "GPT Powered by OpenAI" **New Action types** - **Analyze text Sentiment** \- Grenerate the analysis of the input text sentiment - **Summarize Text** \- Generate a summary of the input text. Get an option to select the length of the summary. - **Translate content** \- Translate your input text to language of your preference. Select the "From language" and "To Language" to translate the input text. - **Custom** \- Write your own prompt
Image without caption

New
Automations
Payments
6 months ago
Along with the current support for Payment Received, Order Submitted trigger and Invoice trigger, we have added the support for 2 new additional triggers 1\. Subscription Trigger - Allows to automate processes around the status changes for subscriptions - When a subscription is created for a customer - When the subscription moves over from trial to active - When a subscription is cancelled Businesses can also use subscription status filters to create IF conditions based on status changes or the product associated with the subscription and can also make use of the custom values inside Payments custom values. 2\. Refund Trigger Allows automations to be built around payments that are processed as refunds by you or your sales agents. Users will be able to trigger a workflow based on a refund attempt and then branch conditions based on: - Whether the refund was success or failed - Whether the refund was for full amount or partial amount - OR based on the amount or source of the refund Refund custom values are also available inside the Payments section in custom values to allow businesses to send customised notifications based on different scenarios
Image without caption

Improved
Fixed
Email Builder
6 months ago
We've improved the Email Template Builder to make it easier and smoother to use. **Problem Statement:**💥 Previously, users encountered difficulties in adding or rearranging elements, leading to a subpar user experience. Approximately 50% of valid bug reports in the builder were related to this issue, often requiring troubleshooting steps such as removing extensions or using incognito mode. **What we did?**🚀 We've transitioned our Email Template Builder from using to a more efficient Modular Federation approach. With this modular federation release, we have ensured that drag and drop in template builder is seamless. checkout this video to see how Drag n Drop is working seamlessly [Loom Video](https://slack.com/openid/connect/login%5Finitiate%5Fredirect?login%5Fhint=eyJhbGciOiJSUzI1NiIsInR5cCI6IkpXVCJ9.eyJpc3MiOiJodHRwczpcL1wvc2xhY2suY29tIiwic3ViIjoic2hyZXlhLmJhbmVyamVlQGdvaGlnaGxldmVsLmNvbSIsImF1ZCI6IjkyNjU5NDUwMDM3LjMyMjA2MTU4Mjg4NiIsImV4cCI6MTcxMjMyNjI5MywiaWF0IjoxNzEyMzI2Mjg2LCJhdXRoX3RpbWUiOjE3MTIzMjYyODYsImh0dHBzOlwvXC9zbGFjay5jb21cL3VzZXJfaWQiOiJVMDVWQ0VUQzgyMSIsImh0dHBzOlwvXC9zbGFjay5jb21cL3RlYW1faWQiOiJUQkw3NTJETTAiLCJodHRwczpcL1wvc2xhY2suY29tXC90YXJnZXRfdXJpIjoiaHR0cHM6XC9cL3d3dy5sb29tLmNvbVwvc2hhcmVcL2FhM2JiNTc3MjE5YTRlYTM5NzQ3OGJhNGFiZTE3N2Q4In0.qXv-Y0Y82IJSdAFJOtTKiP77pqTWl%5FjR%5FZMBq3%5FBD1jNF6-Ei%5Fl6bmH6t9puPJTahKMSFI1oRrXMZO%5FT0srxS6MUmkUJS7XRUDXURxnVaem6MBRpHFcb94tTaXB17i24lKtDCd8WPF8iA5Dn-czIA9cWXCuG%5FLUS0Ssdk8ySrGvl7bYcuuF6KZOHzBEsuSxPjRONLQez6aA5GCWYsqm4KHGp0bdsz2AeaWrlHfkRJs4hoyR%5F8DFhlCpMQLLgt0DMHssD9ROwGy9fCZlVLZwS2vYjXfEgB7GTwCQM%5FhubKB2uPIN-KuDGumd2cqBtOz29V1%5FektHos4wDLGa80%5Fjftg) **Coming Soon :**😎 The similar seamlessness would be available for the campaign builder as well

New
Email Builder
6 months ago
We're excited to announce a new addition to our template import functionality - the capability to import templates directly from Kajabi! **What's New?**😎 Now, users can seamlessly import templates from Kajabi by simply sending it in an email from Kajabi to our dynamically generated email ID in just a few steps. **Why We Did It?**🚀 Simplicity: We wanted to ensure a straightforward importing flow that can be easily followed by both technical and non-technical users. Reusability: Providing the option to reuse already created templates from Kajabi enhances efficiency and saves valuable time. **How to Import?**🤩 1. Navigate to Email Marketing -> Templates in your account. 2. Click on **New -> Import** Templates. 1. Select **"Kajabi"** from the dropdown menu. 1. Copy the dynamically generated email ID provided. 1. Send the desired template as a test email or campaign to this email ID from your Kajabi account. 2. Click on **"Continue"** to start the import. 3. Specify the desired name for this Template and click on **"Create Template"**
Image without caption

New
6 months ago
In our latest update, we're thrilled to introduce enhancements to the date and time formats across various features, along with a location timezone update. Here's what you need to know: What's Changed : **Updated Date and Time Formats:** We've standardized the date and time formats across all contacts' task areas, opportunity fields, and opportunity notes. The updated format is DD Mon YYYY, HH:MM AM/PM - 04 Apr 2024, 8:00 PM **Location Timezone Update:** Additionally, we've implemented a timezone update to provide accurate time references based on the sub-account/location timezone. Location Timezone setting: Impacted Areas:Why It Matters: **Consistency Across Features:** By standardizing date and time formats, you can seamlessly navigate between different features without confusion. **Standardized UX:** Our goal is to provide a unified and intuitive user experience across the platform.
Image without caption

New
Automations
Conversations
6 months ago
TABLE OF CONTENTS
  • What is this feature?
  • Pre Requisite
  • How to integrate Facebook and Instagram account?
  • What are the new Triggers?
  • When the contact will be saved?
  • What are the new Actions?
  • Here is how the workflow will look
  • Here is how the message will look in Facebook and Instagram
  • Important points to be noted
What is this feature?
  • This is an amazing feature to drive more sales and conversations with the customers on Facebook and Instagram.
  • Attract and engage with customers when they're ready.
  • Never let a lead slip away and never miss a follow-up opportunity. Identify interested leads and reengage them without running expensive retargeting ad campaigns.
  • Instantly engage with each comment so you attract customers faster than ever before and never miss an opportunity with a potential lead.
Pre Requisite
  • To use this feature Facebook account should be integrated.
  • To use the actions in the workflows, the Facebook User comments on a post or Instagram User comments on a post trigger should be available.
How to integrate Facebook and Instagram account?
Follow the below mentioned steps to integrate your account
  • Go to settings
  • Go to integrations
  • Hover over to Facebook and Instagram section
  • Connect your account
Image without caption
What are the new Triggers?
When creating a workflow click on "Add Trigger". The triggers related to comment automation are present in the "Facebook/Instagram events" category. You can directly search for the trigger or scroll down to the category.
  • Facebook - User comments on a post
  • Instagram - User comments on a post
  1. Go to triggers and select from the available triggers based on your use case.
Image without caption
  1. After clicking on the trigger the sidebar will open. There are multiple filters present here. The first step is to select the Page.
Image without caption
  1. After selecting the Page you have to select the Post Type. Post type can be "Published" or "Custom"
  • Published Post - 'Published Posts' tab includes all posts on your business page - it could be text, photo, video or live video types of posts. You can also select the "View on Facebook" hyperlink to take you to the post.
Image without caption
  • Custom Post - 'Custom' tab allows you to find and connect the post by entering the Facebook post's URL or ID. Select Custom in Post type, add the "Post is" filter and paste the URL of the post in the field against Post is field.
Image without caption
  1. After selecting the post you have to enter what are you looking for in the comment. You can select from 2 options "Contains Phrase" and "Exact Match". Below are some examples to understand these 2 dropdown better.
Image without caption
  1. You can also use the toggle to turn on tracking of only first level comments. If this is turned on only first level of comments will trigger the workflow.
Image without caption
When the contact will be saved?
When a contact is coming through the trigger, it will be saved as a contact and First Name and Last Name of the contact will be stored.
What are the new Actions?
There are 3 new actions in the "Communications" category.
Facebook Interactive Messanger & Instagram Interactive Messenger
  1. On selecting any of the above mentioned actions the sidebar will open where you can capture all the relevant details.
Image without caption
  1. First thing to do here is to select the "Reply Type". You have 2 options to select from, Reply to DM and Reply to comment via DM
  • Reply to DM - This is to be selected when you want to send an outbound message to the customer based on a direct message received from the customer.
  • Reply to comment via DM - This is to be selected when you want to send an outbound message based on the comment made by the customer. If you want to use multiple actions in the same workflow remember that first action will be a "Reply to comment via DM" and subsequent actions will be "Reply to DM".
Image without caption
  1. After selecting the reply type we have to configure the message that needs to be sent. You can select from pre existing templates or even right your own message.
  1. User also have the ability to attach files. Click on "Add attachment" and select an attachment from your drive or enter the URL to add the files.
Image without caption
  1. You can also add buttons with your messages. Now what are buttons, buttons are a great way to communicate with your customers and gives you the functionality to perform actions based on the button selection, share your number or share the website link.
Image without caption
Click on "Add Button" to add the buttons, you can add upto 3 buttons.
  1. There are 3 types of buttons to select from -
a. Open website - Add a URL to this button. Enter the link here and user will go to that link when button is clicked.
b. Call Number - You can enter the number here and user can call on that using this button.
c. Perform Actions - This button can be used to further progress the conversation with the customer. You can add actions after this button to continue the flow.
Image without caption
  1. The first thing to be added in a button is the Button Name. Next is the selection from the 3 button types and last is entering the phone number or URL for Call or Website button respectively.
Image without caption
  1. Default Wait Time - This is a mandatory step. By default a wait time for 1 minute is added and it will be editable. After the given time has passed the contact will go to the "Default Branch"
Image without caption
  1. Default Branch - A default branch will be available for the action all the time. If no reply is received from the customer or the "Call" action button is selected the contact will move to this branch.
Respond on comment action
  • With the help of this action you can comment on the comment entered by the customer.
  • You can add multiple replies and system will randomly select from these options and reply to comment.
  • You also have a toggle button, switching the toggle button on will also like the comment.
Image without caption
Here is how the workflow will look
Image without caption
Here is how the message will look in Facebook and Instagram
Image without caption
Important points to be noted
  • In triggers "Page is" is the first field to be selected. All the other fields are dependent on it and if the "Page is" filter is deleted all the other filters will also be deleted.
  • Upto 3 buttons can be added in the Interactive Messenger action.
  • No further actions can be added after the "Call" button.
  • After the call button the contact will directly move to the Default Branch.
  • By default a wait of 10 seconds is added which is editable.
  • If no button is selected, contact will go to the "Default Timeout" branch.
  • If Reply to DM is selected, the system will check if there is any conversation that happened within the last 24 hrs and if yes then it’ll send a message else it’ll fail to send.
  • Reply to DM will be used in 2 scenarios. First one is when you want to start the conversation with the user who has send you a DM and second when you want to continue the conversation with the user after the Reply to comment via DM. For eg. when in the first action Reply to comment via DM is selected as Reply Type, subsequent actions will haveReply to DM as Reply type.
  • When using Reply to comment via DM, if the contact has not replied to the First Interactive Messenger action then Interactive Messenger Action will not work in the Default Timeout Branch.
  • For Reply to comment via DM a 7 day window is applicable. You need to send a reply to the comment via DM in 7 days otherwise the delivery will fail.

New
Funnels And Websites
Domain Connect
6 months ago
🚀 Seamless domain migration is now live 🚀 We've made migrating your existing domains to CloudFlare easier. No deletions and re-additions necessary! 🤩 Introducing One-Click Migration with Domain Connect Benefits: - ⚡️**Speed Upgrade:** Your funnels and websites get a 15% speed boost! - 🛡️**Security Shield:** Enhanced protection against DDoS attacks and other threats. - 🧠**Smart Caching:** Visitors enjoy faster loading times thanks to optimized caching. **❓How to Switch (It's Super Easy):** Automated flow with one-click migration: 1. Click "Migrate Domain" 2. Follow the Domain Connect flow. 3. Simply follow the prompts, and your DNS updates automatically – magic! 🪄 4. Done! Your domain is now powered by Cloudflare. Manual Migration (Unsupported Providers): 1. Click "Migrate Domain" 2. Make these small DNS updates: - CNAME records -> [sites.ludicrious.cloud](http://sites.ludicrious.cloud) - Apex record -> IP address 162.159.140.166 1. Click "Authorize Domain" to verify 2. Congratulations! You're all set! Your domain is now on CloudFlare. Get ready for a faster, safer, more streamlined domain experience!
Image without caption

New
Improved
Calendar
6 months ago
Partial payment offers bookers the opportunity to **secure bookings** by paying a **deposit** upfront, with the remaining **balance** settled at a **later** time. Users can now collect either the full amount or a deposit amount from bookers, aiding in seat reservations. **What's New?** **Previously**, users could accept **full payments** through the booking widget, but there was no provision to specify a reservation fee or **deposit amount.** With this **new feature**, users can now set a **flat amount** or a **percentage** of the total booking cost, which will be charged to the booker at the time of booking. The remaining amount (to be paid) will be displayed in the Payments > Invoices tab, serving as a reference for future payments. **Note:** When partial payments are enabled, **two entries** will appear in the **payments section**: \- **Transaction:** Displays the amount charged during booking (Deposit Amount). \- **Invoices**: Indicates the pending amount to be collected from the booker (Total Amount - Deposit Amount). Invoices remain in draft status, and users must manually collect the pending amount. **How to Use?** 1. Ensure that a payment gateway (Stripe / [Authorize.net](http://authorize.net)) is integrated. 2. Enable the "Accept payments" toggle for the calendar in Calendar Settings > Forms & Payments section. 3. Enter the total amount and select the currency. 4. Enable the "Accept partial payment" checkbox. 5. Choose between a Flat Amount or a percentage (Percentage is calculated based on the total amount). 6. Optionally, enter a description. 7. Click on "Save."
Image without caption

New
Funnels And Websites
6 months ago
🎉 Time to Level Up Your SEO Game 🎉 Get ready to boost your SEO score with these awesome new features: - 🔥 **SEO Suggester:** Get actionable tips and insights to optimize your website's content for better search results. - 🌐 **HTML Language Selector:** Easily set the correct language attribute for your funnel/website pages, improving accessibility and search engine understanding. - 💡 **Meta Preview Enhancements:** Users can now see the domain and path URL of the page in the Meta preview 🤔 **Why this matters** Strong SEO means more visibility, more traffic, and reaching the right audience. With SEO Suggester feature, you can easily optimise your content without the need for extensive SEO knowledge, helping you achieve better results and attract more visitors to your website. ❓ **How to Set the Language Attribute:** 1. Open your page in the builder. 2. Go to SEO Meta Data Settings. 3. Find the new "Language" option and select your language code (default is "en" for English). Start optimizing and watch your website climb the search rankings!

New
Documents & Contracts
6 months ago
**What’s New? / Key Features / Benefits:** - Documents and Contracts will now be available in the document management section under Contacts - This will list documents associated with the contact irrespective of the criteria that the contact was a primary or a secondary recipient - Sent and Completed documents will be listed here. - Users will be able to download the PDF, view source of documents, copy link in case of sent documents **How to Use?** - Go to a Contact - Click on the Document Management Icon - Under All tab: View Documents and their status. Also, get the ability to Download, View the source in the editor and copy link in case of send documents - Get all documents in a folder within Sent Tab **Why This Feature?** - Users will now be easily able to manage documents and contracts related to a particular contact
Image without caption

New
E-Commerce Stores
6 months ago
- E-commerce store owners can now define manual delivery charges based on shipping zones. - A zone can be created by selecting countries (by “Add Zone”) and manual rates can be defined inside a zone using Add Rates - Store owners can define multiple pricing for each zone. Multiple Shipping zones can be created with different delivery charges. - While defining rates, delivery rates can be defined according to the total amount in the cart. For eg- Free Shipping, if the order amount is above $500 or else, charge $10 if it's below $500. This feature can be found at Sub-Account > Payments > Settings > Shipping & Delivery - This feature will help store owners to create differential pricing for multiple shipping zones
Image without caption

New
Improved
Calendar
6 months ago
With this enhancement, we now consider blocked slots when applying pre and post buffers for appointments. This ensures that buffers do not overlap with blocked slots, providing appropriate buffer times for appointments.
What's New?
Previously, if a 30-minute appointment with a 30-minute interval and 30-minute pre and post buffers was set, and a slot from 12:00 PM to 12:30 PM was blocked, the next available slot displayed would be 12:30 PM and the previous available slot displayed would be 11:30 AM, ignoring the blocked slot entirely.
Now, considering the same scenario, the next available slot would be 1:00 PM, accommodating the required 30-minute pre-buffer. The previous available slot would be 11:00 AM, considering 11:00 AM to 11:30 AM as the duration and 11:30 AM to 12:00 PM as the required post-buffer.
How to Use?
  • Choose the calendar to which you want to add buffers for appointments.
  • Navigate to the "Availability" section.
  • Specify the duration you want for both the pre and post buffers and click on save.

New
Funnels And Websites
6 months ago
This new feature allows users to format their text effortlessly with raised (superscript) or lowered (subscript) characters. This enhances the versatility and clarity of their content in funnels or websites.
The superscript and subscript use the sup and sub tags for improved SEO and HTML structure.
Why use this feature? Superscript text is generally used for exponents, measurement units, or trademark symbols like TM, SM, and ®. Subscript text is typically used for mathematics and chemical formulas, but it can also be used to denote footnote numbers.
How to use this feature?
  • Add or edit any elements with a text editor like a headline, sub-headline, paragraph, etc.
  • Select the characters or word.
  • Toggle the subscript or superscript icons from the text editor bubble menu.
Image without caption

Improved
Fixed
Communities
6 months ago
Hey there! We've got some exciting updates this release to make user experience even better: **Enhancements:** - Search Members by email : - Group Admins/Owners can now search for members in members page and also while tagging them in comments and posts using email Ids. **Leaderboard** - Group Admins will **no more** be a part of the leaderboards to allow non admin members to part of the leaderboard. This will bring more engagement in the groups by motivating members to generate quality content. **Backend Caching** Added a layer of redis cache on some extremely frequently database reads. This will significantly lower the read and compute time spent by service on mongo **Bug fixes** - Fixed a bug in leaderboard calculation that was inflating the points of some users of the groups - Fixed known issues with role based filter in members screen. - Fixed 5xx error in reactions API - Optimised & removed extremely heavy reads on database
Image without caption

New
Funnels And Websites
6 months ago
This new feature allows users to effortlessly format their text with raised (superscript) or lowered (subscript) characters, adding versatility and clarity to their content in funnels or websites. The superscript and subscript uses the sup and sub tags for better SEO and HTML structure 🌟**Why?**🌟 - Superscript text is generally used for exponents, measurement units, or trademark symbols like TM, SM, ® etc. - Subscript text is generally used for mathematics and chemical formulas. It can also be used to denote footnote numbers. 🔥**How to use?**🔥 - Add or edit any elements with text editor like headline, sub-headline, paragraph etc. - Select the characters or word. - Toggle the subscript or superscript icons from the text editor bubble menu.
Image without caption

New
6 months ago
Are you struggling to keep your followers updated in contacts? Say goodbye to manual updates and hello to automation with our latest feature release! Here are the details:
Feature Details:
Previously, users faced challenges in automating the addition and removal of followers in contacts, which led to inefficiencies and manual workarounds.
We're thrilled to introduce the ability to add and remove followers directly within contacts via workflows!
How It Works:
You can seamlessly integrate the 'add' and 'remove follower' actions into your workflows in the Contacts section.
Use the "Add Contact Followers" action for automating the addition of followers to a contact by selecting users you would like to add as followers.
Use the "Remove Contact Followers" action for removing all or selected followers from the contact.
Why It Matters:
Streamlined Processes: Automate the management of followers to save time and eliminate manual tasks.
Enhanced Efficiency: Ensure that your contacts stay up-to-date with the right followers, without the need for manual intervention.
Image without caption

New
Improved
Memberships
6 months ago
Introducing Course Notifications!
  • Stay Connected with Comments: You'll now receive notifications whenever someone comments on a course or replies to a comment. This keeps you connected and facilitates smoother interactions within the learning community.
  • Unlocked Content: No more missing out! You'll be promptly notified when a previously locked post or category becomes accessible, ensuring you're always informed and ready to explore new content.
  • Timely Access to Drip Content: Say goodbye to guesswork! Receive notifications when drip content becomes available in your courses. This allows you to access the latest content when it's released.
  • Enabling Instructor Interaction: Instructors will now receive notifications for learner comments, fostering better communication between them and learners.
UI Enhancements:
  • Common Client Portal Navbar Integration: We've integrated a single Navbar component across all the child apps within the client portal to enhance your experience.
Bug Fixes:
  • Fixed the Category Post Tree
  • Implemented a hotfix for the course exporter
  • Made layout changes for the Classic and Neue themes

New
Improved
Certificates
6 months ago
Introducing certificate preview and download in the client portal:
  • Users can now keep track of all their issued certificates in one place.
  • Users are now able to download certificates.
  • Users can copy the link of certificates (from the copy button) to share.
Bug Fixes:
  • Previously, if templates were deleted, the corresponding issued certificates were not visible. This issue has now been fixed.
More Custom Values:
  • Users are now able to use standard custom values like 'user', 'contact', and 'right_now'.
  • In addition to these, users can also use manually created custom values found in Settings > Custom Values.

New
Email Builder
6 months ago
We're excited to introduce our Enhanced Email Campaign Statistics, which offer detailed analysis reports for the past 7 and 30 days. This tool enables you to unlock valuable metrics and effortlessly track performance trends.
Problem Statement: Until now, there was a limited overview available for analyzing sent campaigns.
What Did We Do? We have launched detailed campaign analysis reports under Beta labs, empowering you to better understand performance trends over the past 7 and 30 days.
What Does It Include?
  • Conversion Summary: Gain insights into key metrics such as orders placed, total revenue, order rate, and average order value at a glance.
  • Engagement Summary: View a summarized funnel overview of delivered, opened, clicked, and ordered metrics for deeper engagement analysis.
  • Performance Analysis: Track metric trends over time including sent, opened, clicked, and unsubscribed metrics.
  • Top Performing Emails: Identify the top 5 revenue-generating emails to set performance benchmarks effortlessly.
  • Recent Email Analysis: Access the 10 most recent emails for in-depth analysis.
Coming Soon:
  • Analyze campaigns over the last 60 and 90 days for broader insights.
  • Soon, you'll be able to identify top-performing campaigns based on open rates.
How to Access:
  • Navigate to Email Marketing.
  • Click on Campaigns.
  • Select the Statistics option.
  • Choose the date range: last 7 or 30 days.
  • For performance trend analysis, select the relevant metric from the dropdown in the Performance Analysis section.
Note:
  • These reports currently focus solely on emails from Email campaigns.
  • This feature is currently available on Beta Labs, so ensure you have the permission enabled.
For further details, please refer to the help document.
We're committed to enhancing your campaign analysis experience. Stay tuned for more updates!
Image without caption

Improved
Email Builder
6 months ago
We are thrilled to announce a new enhancement, based on a valid customer request, to elevate the RSS campaign experience for our users.
Problem Statement | Customer Requests: 🌟
Websites, like YouTube, now include media thumbnails in their RSS feeds. Consequently, many of our users have expressed the desire to enhance our RSS campaign capabilities to support this functionality.
What's New? 🚀
In response to this request, we are delighted to introduce support for thumbnails in the media group of RSS feeds. This enhancement ensures a more advanced and visually engaging experience when creating RSS campaigns in Email Builder.
Image without caption

New
Domain Connect
6 months ago
We are delighted to announce the migration of new branded domain connections to CloudFlare.

Key Features & Benefits:

  • Enhanced security features
  • Simple prevention of DDoS attacks
  • Effortless generation of SSL certificates and automatic renewal from CloudFlare

How to Switch?

For New Branded Domains:

  • Domain Connect: Automatically added with the domain connect flow
  • Manual Addition: Customers need to add a new CNAME - brand.ludicrous.cloud

For Old Branded Domains:

  • Navigate to Location Settings -> General Information
  • Remove the branded domain and save
  • Re-add the same domain with the domain connect flow or the manual flow and save

New
Documents & Contracts
6 months ago

What's New? Key Features & Benefits:

Customizable Subject Line for Documents and Contracts

  • Users can now change the subject of the email that is sent along with documents and contracts.
  • Previously, this was limited to changing the body template, not the subject of the email.

How to Use?

  • Go to 'Settings' under 'Documents and Contracts'.
  • Change the subject line within 'Customer Notifications' for customer-facing emails.
  • Change the subject line within 'Team Notifications' for internal emails.

Why This Feature?

  • Previously, users could not change the subject of the email being sent to them, limiting flexibility.
Image without caption

New
6 months ago
Tired of hunting for opportunity IDs and sifting through audit logs? We've got you covered with our latest feature release! Here's what's new:
Streamlined Access to Opportunity ID and Audit Logs
  • You can locate the opportunity ID directly at the bottom left of the opportunity dialog box.
  • Click on the opportunity ID to be seamlessly redirected to the audit logs for that specific opportunity.
Effortless Opportunity Restoration
  • We've added a new option under the kebab menu on the top right of the Opportunities page.
  • Clicking on "Restore Opportunities" opens the audit logs with deleted opportunities filtered.
Why It Matters:
Simplify Workflow: With easier access to opportunity IDs and audit logs, you can navigate your opportunities with confidence and efficiency. Faster Recovery: The ability to quickly restore deleted opportunities streamlines your workflow and minimizes downtime.
Unlock enhanced opportunity management and experience unparalleled ease in tracking and restoring opportunities. 🌟
Image without caption

New
Forms
Surveys
6 months ago
We are excited to introduce the ability for users to incorporate Opportunity Custom Fields within forms and surveys in this release. This feature allows users to improve their data collection process by seamlessly integrating opportunity-related information into their forms and surveys.
What’s New?
  • Opportunity Custom Fields: Users can now effortlessly add Opportunity Custom Fields to their forms and surveys, enabling them to gather specific data related to opportunities.
  • Opportunity Settings Configuration: Users have the flexibility to configure Opportunity Settings by selecting a pipeline, stage, status, and opportunity value for each form or survey.
  • Create Pipeline Option: In the Opportunity Settings modal, users can conveniently create a new opportunity pipeline by utilizing the Create Pipeline option.
  • Dropdown Categorization: Custom fields are now categorized into two dropdown categories - Contact and Opportunity, facilitating organized data management.
  • Collapsible Format: All custom fields are neatly displayed under their respective parent folders in a collapsible format, ensuring a streamlined user experience.
  • Automated Opportunity Creation: Upon form or survey submission, an opportunity is automatically created and mapped to the contact generated from the submission, enhancing efficiency in opportunity tracking.
How It Works
  • Access the form or survey builder.
  • Navigate to the custom fields section under Add Form/Survey Element.
  • Select the Opportunity category.
  • Add desired Opportunity Custom Fields to the form or survey.
  • Configure Opportunity Settings as needed and save the form or survey.
  • Submit the form or survey to automatically generate an opportunity for the associated contact.
Image without caption

New
Improved
Automations
LC Phone System
6 months ago
About this enhancement:
This enhancement introduces "Match condition" branching options to the IVR Gather action. Now, users can configure the Keypress options they want directly within the "IVR Gather" action.
What problem does this solve?
Previously, users had to first configure the IVR Gather step by entering the message that would be played for the caller. The caller would then make a choice by pressing a key. Afterward, users had to add a separate “If/Else” action to map further actions based on the keypress.
This process was not very intuitive and required an additional action to achieve the outcome from the IVR gather action itself. This enhancement improves:
  1. User Experience
  1. Efficiency by reducing the number of actions needed to perform the same task
Image without caption

New
Improved
Calendar
6 months ago
Summary
This enhancement provides bookers with a more informative rescheduling experience. By displaying essential details such as Meeting Location and Former & New Appointment time, bookers can better understand their adjusted appointments.
What's New?
Previously, the reschedule confirmation page did not display the Former Time or the Meeting Location. Now, when using the reschedule link, bookers will be presented with the following details for enhanced clarity:
  • Duration of the appointment
  • Former appointment time, displayed with a strikethrough for differentiation
  • New appointment time
  • Meeting location
  • Timezone information
In addition to this, bookers can seamlessly add scheduled appointments to their Google, Outlook, or iCloud Calendar with the 'Add to Calendar' button.
Image without caption

New
Forms
6 months ago
We are thrilled to announce the launch of the Email Verification feature for our Forms and Surveys module. This new functionality allows form and survey participants to verify their email addresses directly within the form or survey, enhancing the integrity of the data collected and providing a more seamless user experience. 🚩**What’s New?**🚩 - **Email Verification Button**: A “Verify Email” button is now displayed next to the email input field in forms and surveys. - **Verification Code**: Users receive a unique verification code via email, which they need to enter into the form to confirm their email address. - **Enhanced Data Accuracy**: This feature aims to minimize errors and fraudulent submissions by ensuring that the email addresses collected are valid and accessible by the users. - **User-Friendly Process**: Designed to be intuitive, guiding users through the verification process smoothly. - **Verified Email Field**: In addition to the email verification feature, we’ve introduced a “Verified Email” field in form and survey submissions. When an email is successfully verified, it will be marked as “Yes” under the “Verified Email” field, allowing for easy identification of verified email addresses. 🌟**How It Works**🌟 - Users will enter their email address in the designated field of a form or survey. - Upon entering a valid email, the “Verify Email” button will become visible. - Clicking this button sends a verification code to the user’s email. - Users must enter this code back into the form or survey to verify their email address. 🤩 **Why This Feature?** 🤩 The introduction of email verification is a response to the need for generating more quality leads. By ensuring email addresses are verified, we can significantly reduce the chances of receiving inaccurate data, thus benefiting both the data collectors and the participants.
Image without caption

New
Improved
Communities
6 months ago
**New Features:** **Support for custom HTML, CSS and Js:** - Group admins can now add custom JS, CSS and html code specific to each group. - Group admins can also preview custom css ,html and javascript before making it live for all users. - Using this feature admins can have custom headers and footers of each group. **How to customise groups:** - You can add custom code from group settings -> Branding -> Advanced **Enhancements:** - Leaderboard UX We have now updated the Leaderboard web UI, making it more easy to use.

New
Funnels And Websites
6 months ago
🎉 Power-Up Your Funnel Pages with the Custom Field and Value Picker! 🎉 Get ready to streamline your funnel building with this awesome new feature. Designed to simplify and accelerate the page-building experience for our valued users. 🚀 Enhancements Implemented - **✨ Custom Data Option Picker**: We've put the power of custom fields and values right at your fingertips. Easily access and insert them in two ways: 1. **Toolbar**: Find the Custom Data Option Picker directly in the funnel page builder toolbar. 2. **Speedy Shortcut**: Type "{" in your text editor and the picker magically appears! - **🚀 Build Faster, Smarter:**: Simplifying the way users create pages within our Funnel Builder. By automating the process of selecting and inserting custom data options, unnecessary steps are eliminated. - **💪 Maximize Your Workflow**: Say goodbye to tedious custom data tasks. This picker lets you focus on creating amazing funnels by quickly selecting a custom field/value. We're always listening to your feedback and working to make your funnel building experience even better! 😄
Image without caption

New
Forms
Surveys
6 months ago
We're excited to streamline your form and survey experience with new date formats and an improved picker. Our new date format offers improved clarity, flexibility, and usability, catering to a diverse range of preferences and international standards. **Key Features:** ✨ **Clarity is Key:** Update ensures clear representation of dates, minimizing ambiguity and confusion. With support of multiple date formats, choose the format that works best for you and your audience (DD/MM/YYYY, MM/DD/YYYY, YYYY-MM-DD, MM.DD.YYYY etc). No more confusion! 🌍 **Global Flexibility:** Easily collect accurate dates no matter where your respondents are located. ⛔️ **Say Goodbye to Errors:** Built-in smart validation helps users enter the correct date format, improving your data quality and preventing submission errors with real-time feedback. ✅ **Seamless Integration:** Easy integration from builder. 🗓️ **Improved Date Picker:** Easy visible month selection from date picker. 🛑 **Disable Picker options:** Easy way to disable the picker from builder, customer can write out the date. **How to Get Started:** 1. Add a date field to your form or survey. 2. Click the field to open settings. 3. On right side, choose your preferred format and separator. **Effect on existing Forms:** - Existing form won't be affected by this update. - Old form will still work with default format YYYY-MM-DD. - Customer can edit the old form to opt for new formats. **Upgrade your forms and surveys with better dates today!**
Image without caption

New
7 months ago
We’re excited to announce and add an exciting new feature to our Email Builder tool: the addition of a “Preview in Browser” link. With this update, users now have the ability to include a preview link in their email campaigns, ensuring consistent rendering across various email clients. **Problem Statement:**⚡ Emails may appear differently across various email clients, leading to inconsistent user experiences and potential loss of campaign effectiveness. **What we did:** 🚀🚀 Users can now easily include a “Preview in Browser” link to accurately represent the email design, to their new and existing campaigns. **How to Add:** 👷 **Default Inclusion**: All blank email templates will now include the “Preview in Browser” link at the top by default. **Manual Addition to existing campaigns/ templates:** - Navigate to email marketing and open any campaign/template. - Add the element - Preview URL. - Customize the text styling/formatting by editing or using the add link option **How to test it? 🤔** 1. You can preview the email and click on the preview link to view the browser version of the document 1. You can also send a test email and click on the view in browser link. **Note**: If under the settings, agency or location has provided API Domain, it will be used by default in the preview URL adhering to whitelabel guidelines.
Image without caption

New
LC Email System
7 months ago
**Overview:** We are excited to announce the release of SMTP credentials for dedicated sending domains, enhancing your email delivery capabilities and providing seamless integration with warm-up services. This feature empowers you to efficiently manage and optimize your email sending practices while ensuring maximum deliverability. **Key Features:** - **SMTP Credentials for Dedicated Sending Domain:** Users can now generate unique SMTP credentials specifically for their dedicated sending domain. This ensures secure and authenticated access for sending emails via SMTP servers. - **Streamlined Configuration:** Setting up SMTP credentials for dedicated sending domains is straightforward and user-friendly. Our intuitive interface guides you through the process, making integration with warm-up services hassle-free. **Here's how to access this Feature:** Navigate to **Sub-account Settings - Email Service -> SMTP Service -> Dedicated Domain and IP -> SMTP Settings** under the dedicated domain.
Image without caption

Improved
Fixed
Conversations
7 months ago
We’ve added enhancements and fixes in this update, enriching your experience with our conversations page. **Here’s what’s new:** **Enhancements:** - PPTX Attachment Support: We’ve added support for uploading PPTX attachments. This expansion broadens the types of files supported for attachment uploads. - Extended Messaging Support: We’ve enhanced our API to now include support for adding Webchat, Facebook, and Instagram messages. - Custom Field Date Format Update: We’ve updated the date format used when compiling custom contact date-type files. The new format is “Mar 22nd, 2024”. This change ensures consistency across our service’s date formats, making them unambiguous for users across different locales. **Fixes:** - Enhanced Segment Count Logic: Previously, customers reported inconsistencies in segment calculation, leading to inaccurate estimations. We’ve revamped our approach by integrating Twilio’s SMS-segments-calculator package. This upgrade ensures precise segment calculations, guaranteeing reliable message delivery. - Improved Twilio Attachment Download: Some customers didn’t provide Twilio apiKey and apiSecret, causing difficulties in downloading attachments for incoming messages. We’ve addressed this by enhancing our attachment download logic. Now, regardless of whether apiKey and apiSecret are provided, attachments will be retrieved accurately, ensuring seamless display on our UI.

Improved
Integrations Marketplace
7 months ago
We have added an enhancement to how agency admins and owners are notified of any user-level email changes. **What's New;** Now, the agency owner and the top 20 agency admins will be notified by email if a user changes their email address. This step was taken to enhance security and communication with key stakeholders, enabling them to understand account-level activity and proactively identify if any unusual activity is taking place.

New
Conversations
7 months ago
We are excited to introduce new functionalities to our workflows, focusing on enhancing how you interact with and manage Contact Engagement Scores. These features provide you with greater flexibility and control, allowing for more personalised and responsive engagement strategies. What's New?**Contact Engagement Score - Trigger** This new trigger allows users to initiate any workflow actions when there's an update to a contact's Engagement Score. To offer precise control, we've included the ability to apply filters based on various numerical conditions related to the score. These conditions include: - Equal to a specific score - Not equal to a specific score - Greater than a specific score - Greater than or equal to a specific score - Less than a specific score - Less than or equal to a specific score - Is empty - Is not empty **Modify Contact Engagement Score - Action** This action allows you to add to or subtract from a contact's existing score, providing a straightforward method to update engagement levels based on interactions or behaviours.

Fixed
Improved
Conversations
7 months ago
We're excited to share improvements to the conversations module, specifically addressing the email messages experience. Our goal is to ensure a seamless and efficient interaction with email messages, recognising the importance of quick and reliable access to email content. Email View Freezing: Customers experienced occasional freezing when clicking on email messages, caused by delays in fetching email content, which took an average of 2-3 seconds. We've addressed this issue by improving the message load time within email threads, enhancing the overall user experience. This enhancement is a step towards optimising user experience on the conversations screen, ensuring smoother customer interactions and bolstering the performance overall.

New
E-Commerce Stores
7 months ago
1. E-commerce store owners can now customize the number of products shown per page in the product list page. (Previously restricted to 6 products) 2. The minimum and maximum limit for number of products that can be shown per are restricted to 3 and 24 respectively. 3. This setting can be found upon selecting the product list element under "Layout options", as shown in the image. 4. This feature would help store owners to build better layouts around the products list
Image without caption

New
Funnels And Websites
Domain Connect
7 months ago
🎉 We are thrilled to announce the migration of custom hostnames for domains to CloudFlare. Get ready for a faster, safer, and more streamlined domain experience. 🎉 🤩 **Key features & benefits** - **Enhanced Security:** Enjoy robust protection against DDoS attacks and other online threats. 🛡️ - **Turbocharged Performance:** Websites and funnels will load up to 15% faster 🚀 - **Optimized Caching:** Intelligent caching means quicker load times for your visitors. ⚡️ - **Effortless SSL:** Easy generation of SSL certificates and auto renewal from CloudFlare ✅ 🤔 **How to switch?** - New domains: automatically added during the domain connect process. - Existing domains: 1. Navigate to settings -> Domains 2. Select the domain which is already connected to flash funnels/level0 and click "Remove" 3. Reconnect the same domain using the domain connect flow Important note: Moving forward there won't be level0 or flash funnels to ensure a better experience.
Image without caption

New
Funnels And Websites
7 months ago
🎉 We are thrilled to announce one of the most requested features from our customers - cookie consent for website and funnels 🎉 Helps you ensure compliance with data protection regulations by obtaining user consent before collecting any personal information. 🤩 **Key features & benefits** - Effortlessly implement cookie consent across your entire website for a streamlined user experience - Ensure compliance with customizable cookie settings - Easily customizable cookie categories and settings to meet specific business requirements 😎 **How to use ?** - Navigate to funnel/website builder interface - Click the cookie icon within the action header bar - Toggle the switch from cookie consent sidebar on the right - Accept the T&C and click on agree - Personalize the look and feel of cookie consent banner to match funnel/website's branding - Finalize your changes by saving or publishing the updated settings 🎨 😎😎 How to use Marketing tools? If you are planning to use any of the following marketing tools please follow this [documentation](https://help.leadconnectorhq.com/support/solutions/articles/155000002126-marketing-tools-to-use-in-funnel-website-cookie-banner) - Facebook Pixel - Google Analytics - Google Tag Manager Other marketing tools or 3rd party codes are not supported and has to be whitelisted in the advanced settings of the cookie banner and the owner of the funnel or website is responsible for adding them to the cookie policy and getting a consent for the same LeadConnector Cookie Policy - [Link](https://help.leadconnectorhq.com/support/solutions/articles/155000002118-what-things-you-should-include-in-your-cookie-policy) Loom explanation: <https://www.loom.com/share/a0d33a1d3f854716af34e3b23cc4362d>
Image without caption

New
Forms
Surveys
7 months ago
🎉 We're thrilled to introduce Version History to Forms and Surveys! 🎉 This update gives you the tools to track changes to your forms and surveys, allowing more robust management of form and survey versions 👀 What's New? 💾 **Automatic Version Creation:** Every time you save changes in form or survey, a new version is automatically created ✅ **Edit Tracking Simplified:** Every edit is captured as a distinct version, allowing for detailed version tracking.Never worry about losing track of your edits! ⏳ **Version Preview:** Take a peek back in time! Preview any previous version of your form or survey directly within the builder. Click on the versions icon to see a list of all available versions, complete with timestamps and version numbers ↩️ Restore Previous Versions: Made a change you regret? Easily restore your form or survey to any previous version in a snap! 🕹️ Enhanced Version Management: Our improved interface makes navigating and comparing different versions a breeze, so you can choose the most appropriate version for your current needs. Get ready for streamlined form and survey management! This feature gives you the power to confidently track your changes and always have the option to revert if needed.
Image without caption

New
Documents & Contracts
7 months ago
**What’s New? / Key Features / Benefits:** **New fillable element: Initials** - While going through a multi-page PDF, a lot of senders wanted to add option for the signer to add Initials on every page to ensure that they have gone through it. - Editors will now be able to drag and drop initials and assign it to the recipient that they want. - Signers will be able to click on the initials element and either type or draw their initials. **How to Use?** For Document Editors: Drag and drop initials from the side tab and assign it to recipients For Document Signers: Click on the initials field -> Use Pre-filled text or edit your initials -> Click on Accept **Why This Feature?** This helps to make the editor for documents and contracts more powerful and increases the usability.
Image without caption

Improved
Fixed
Communities
7 months ago
Hey there! We've got some exciting updates this release to make user engagement even better: **New Notifications:** New Comment - Post author will now get Email & In-App notifications when other members of the group comment on their post New Comment Reply - Comment Authors will now get Email & In-App notifications when other members reply to their comments Invite Link Flow: Now group members can also invite users to a group using invite links which was previously restricted to admins only. **Enhancements:** Creation of Default channels for new groups On creation of a new community a new default channel will be automatically created, making it more easy to get started with a new group. Mandatory complete profile Now its mandatory for all the members to complete their profile by adding profile picture, title and bio. This will help members of community to know each other better.

New
Improved
Reputation
7 months ago
We're delighted to announce the launch of our latest enhancement: Email Builder Integration in Reputation Management. Now, managing your review requests just got easier and more stylish than ever before! **Key Highlights:** 🖇️ **Seamless Integration:** Access the Email Builder directly from your Reputation Settings. 🎨 **Customise Your Emails:** With the Email Builder, users can now design visually appealing and personalised emails for their review requests. Add your brand logo, customize colors, fonts, and layout to create eye-catching emails that reflect your brand identity. 🚀 **Enhanced User Experience:** Say goodbye to generic review request emails. With our Email Builder Integration, users can now craft engaging and compelling messages that resonate with their audience, increasing the likelihood of receiving positive reviews. ⚙️**Effortless Setup:** Setting up your email campaigns is quick and easy. Simply follow the intuitive interface of the Email Builder to design your email templates, and start sending out review requests in no time. **How to Access Email Builder in Reputation Management:** 1. Go to Reputation Settings ⚙️ 2. Navigate to Email Review Requests section 📍 3. Click on 'Open Email Builder' to customise your emails 📂 **Some Screenshots for Email Builder:** Unlock the power of personalized communication and elevate your review management strategy with our Email Builder Integration. Start creating impactful review request emails today!
Image without caption

New
Opportunities And Pipelines
7 months ago
We've just added two new filters under Contacts that make finding the right contacts a breeze! **1\. Last Email Clicked Date:** Reach out to contacts who recently clicked on your emails **2\. Last Email Opened Date:** Find contacts who've opened your emails recently We've made it super simple to fine-tune your search: **Is Empty / Is not Empty:** Find contacts with or without activity. **More than / Less than:** Set a timeframe that suits you. **Range / This month / in month:** Customize your search based on dates. Accessing these filters is simple: - Navigate to the Contacts tab within your dashboard. - Click on the Filters option. - Select either "Last Email Clicked Date" or "Last Email Opened Date". - Choose your desired filter options to tailor your search criteria. Voila! Instantly access segmented contact lists tailored to your specific needs. **Note:** Please be aware that we will only store dates for new and upcoming email data subsequent to this release.
Image without caption

New
Improved
Fixed
LC Phone System
7 months ago
🪄New Features **1\. Introduced Direct Lending and Age Gated Content checkboxes while A2P submissions** **2\. Introduced agency/sub-account audit logs capturing the below updates:** - A2P Brand and Campaign Submissions/Re-submission - Delete Connection for sub=-account from agency Phone Integration page 🐞**Bug Fixes** 1. The Save button was disabled in the case when one custom provider was present, this has been fixed now. 1. For new agencies, that had not integrated with a phone system were not able to send test messages, this has been fixed now. 2. When call recording for a number was enabled, a few call reporting metrics were getting wrongly attributed this has been fixed now. 3. When Verified CallerID was enabled, then forwarding the call to the agent's number was getting rejected or giving a busy tone, we made a fix to not show the verified callerID in that case instead showing the actual Phone System number. 4. Sub-account migration from one phone system to another was causing issues with Mobile App calling, this has been fixed now.
Image without caption

New
Automations
LC Phone System
7 months ago
**About this enhancement** We had observed for some carriers the DTMF tone after keypress was not recognised by twillio. As a fix and an enhancement, we have provided a toggle "CONNECT CALL AFTER KEYPRESS". When enabled (default), we will wait for the agent to press any key to connect the call with the contact. When disabled, we will play the whisper message three times and automatically connect the call. Also we have moved this and DISABLE VOICEMAIL DETECT toggle under advanced settings.
Image without caption

New
Improved
Payments
7 months ago
We are excited to announce stripe support for updating payment method for an subscription.Key Highlights - Business users can now conveniently send customers a link to update their payment method for ongoing Stripe subscriptions. - This feature enables customers to easily update the card on file used for their subscription charges. - With this release the feature to update payment method for a subscription is available for [Authorize.net](http://authorize.net), NMI and Stripe. How it works - The option to send this link is available through the quick action menu on the subscription list page and the Actions section on the subscription detail page. - Business users can either email the link directly to the customer or copy it to send separately. - These links are one time use only, and valid only for 30 days. - Customers simply click the link to view and update their subscription details. - Upon updating, the new payment method will be charged starting from the next billing cycle. - Business users can generate multiple links, as well as deactivate all outstanding links right from the subscriptions page for any given subscription.
Image without caption

New
E-Commerce Stores
7 months ago
We are thrilled to announce a new addition to our ecommerce store - the ability for users to buy a product directly through a "Buy now" button. This enables users who would like to buy a single item to directly skip all the cart addition steps and just click on one button to go directly to the checkout page with the selected product. Some key aspects: - Ecommerce store owners now have an option to add a "Buy now" button to their product detail page. - This option will by default be switched off for new and existing stores. The option can be toggled on by the toggle as shown in the image. - By default, the buy now button will have a border and transparent background. - Border color, text color, button color, and button texts for add to cart, as well as buy now, can be customised. - Upon clicking on buy now, the user will be taken to the checkout page directly with only 1 quantity of the item selected. The item selected for buy now will be added to the cart too. - Upon abandoning a cart, the abandoned cart notification will only contain the product that has been added via buy now, in case of buy now flow. - Upon a successful purchase, any other items apart from the selected buy now item is present in the cart remain unaffected.
Image without caption

New
Improved
Fixed
Chat Widget
7 months ago
We’re thrilled to unveil enhancements in our latest update, enriching your experience with Chat Widget - the Consent Checkbox. This new addition allows you to include a consent checkbox in your chat widget settings, which will be displayed on the chat window form when your contacts provide their phone numbers/email during filling chat widget form. 🤩 **Here's what you need to know:** **Why it matters:** - **Compliance:** The Consent Checkbox is crucial for compliance, especially regarding A2P 10 DLC regulations. It helps you avoid compliance issues with telecom providers. 😎 **Enabling the Consent Checkbox:** 1. When Selecting a default the chat type - SMS/Email and Live Chat option 2. In the Widget Window, it will allow users to add the legal message to take consent and enable the checkbox for HIPPA to collect. You'll now find an option called "show consent checkbox." 3. By default, this option is enabled for your convenience. However, if needed, you can disable it. 4. Recommendation: We strongly recommend keeping it enabled to ensure you capture vital information such as consent and the IP address of the contact who agrees by checking the checkbox during the appointment booking process. **Customizable Text:** You have the flexibility to customize the text of the consent checkbox to align with your specific requirements. 🐥 **Benefits** - Compliance: This release ensures adherence to upcoming A2P regulations by providing an easy way to include consent for phone information collection. - Customisability: Users have the flexibility to add, modify, or remove the Terms and Conditions element as required, tailoring it to their specific needs. We’re dedicated to enhancing your experience and welcome your feedback. Enjoy the improved functionality of our app!
Image without caption

New
Documents & Contracts
7 months ago
**What’s New? / Key Features / Benefits:** **New filter: Template** - Users will now be able to select a Template from the list of templates made by them in the Documents and Contracts section while configuring the workflow. - This will enable users to configure different workflows for different templates **New filter: Recipient Type** - Users will now be able to trigger a different workflow based on whether the document is being sent to the Recipient Contact or the Business User itself **New Status: Viewed** - Users will now also be able to trigger different workflows based on the fact that the document has been viewed or not by the recipient **How to Use?** - Filter: Recipient Type, Template Type Customize the filter based on Recipient Type and template type to have different workflows for different types. - New Status: Viewed Customize the workflow based on whether the recipient contact has viewed the document or not by configuring the status to viewed. **Why This Feature?** This helps to make the workflows for documents and contracts more powerful and increases the usability.
Image without caption

New
Payments
7 months ago
We are thrilled to announce one of the most requested feature on our ideas board, updating payment method for subscriptions.Key Highlights - Business users can now conveniently send customers a link to update their payment method for ongoing subscriptions. - This feature enables customers to easily update the card on file used for their subscription charges. How it works - The option to send this link is available through the quick action menu on the subscription list page and the Actions section on the subscription detail page. - Business users can either email the link directly to the customer or copy it to send separately. - These links are one time use only, and valid only for 30 days. - Customers simply click the link to view and update their subscription details. - Upon updating, the new payment method will be charged starting from the next billing cycle. - Business users can generate multiple links, as well as deactivate all outstanding links right from the subscriptions page for any given subscription. - **This feature is currently supported only for [Authorize.net](http://authorize.net) and NMI connections** Coming up next We are adding support for this to work with Stripe as well.
Image without caption

New
Payments
7 months ago
- Customers can now apply a 100% coupon or apply a full fixed amount discount on subscriptions - This is useful when businesses want to sell a subscription for free and have upsell purchases configured in the next step - The credit card added for 100% discount will be saved on file to charge the customer at a later date
Image without caption

New
Payments
7 months ago
- Business admins will now be able to configure user permissions for exporting payments data as CSV from the sub-account - This applies for exporting invoices, transactions or subscriptions CSV - This is useful when businesses do not want specific users to have export permissions on their payments data - The toggle is turned on by default for all users, which means that they will have the permissions to export data by default
Image without caption

New
7 months ago
We have brought another exciting enhancement to the Array Functions. Before this update, an array should be inside a variable in order to be visible in Array Functions, like this: { "users": \[ { "name": "John Doe", "email": "john@example.com", "age": 30 }, { "name": "Jane Smith", "email": "jane@example.com", "age": 25 } \] } In this case the user was able to select the array source, and then the field users **After this update, the array can be in this format:**\[ { "name": "John Doe", "email": "john@example.com", "age": 30 }, { "name": "Jane Smith", "email": "jane@example.com", "age": 25 } \] The user will select only the array source, and we’ll use the root level.

New
Payments
E-Commerce Stores
7 months ago
- Business users now have the ability to assign to products to different collections for easy navigation in online stores - This is available as an option for existing as well as new products under **Payments -> Products** - Collections page will be available under Products to delete or update existing collections for businesses. - Once collections have been assigned to products, business users will be able to use the navigation menu inside the website builder to list collections under custom menu items names - This solves a lot of challenges in providing easy navigation to customers on online stores, specially for businesses who deal with a lot of products falling into different categories - Along with placing menu items having different categories, users are already to place a cart icon as well inside the navigation menu
Image without caption

New
Automations
LC Phone System
7 months ago
**About the enhancement:** The connect call action now supports the ability to add a custom phone number, which earlier was not possible. This would be helpful in case when you don't want to have users in connect call, specifically in cases where the call is getting connected to someone in a different location. Ex: A central store would have the IVR inbound call, and based on the inputs this can be redirected to different stores (sub accounts) IVRs. **How to set it up** With this enhancements users can simply click on the "Add Custom Number" field and add the phone number along with the country code.
Image without caption

New
Payments
E-Commerce Stores
7 months ago
- E-commerce store owners can now map each variant combination with a unique image for that variant selection. - This feature can be accessed via the variants section while editing or adding a product. Each variant combination will have a small thumbnail on the left representing the image. Upon clicking on the thumbnail, a modal will open up allowing the users to select from already existing media images or upload a new image. - In the product detail page, upon selecting a variant, the associated media image will automatically be selected if there exists a variant image. - However, selection of an image will not change the variant, even if there is a variant combination associated with the image.
Image without caption

New
Email Builder
7 months ago
We're thrilled to introduce an update that lets you easily resend emails to people who missed them the first time, helping you increase engagement. Following best practices in resending can significantly increase engagement while keeping the risk of complaints or unsubscribes at minimum. **Problem Statement:**💥 Research shows that a considerable number of emails are overlooked in crowded inboxes. This update is designed to capture this missed opportunity, ensuring that your carefully crafted messages get the attention they deserve. **What we've Implemented:**💃 Now users can easily resend campaigns to non-openers with just a few clicks. They can also modify the subject line (if required) to refresh your message and reduce the chance of user complaints. **Benefits:**🚀 1. **Boosted Engagement:** By targeting non-openers, you're likely to see improved engagement metrics. 2. **Efficient Use of Content**: Maximize the reach and impact of your meticulously created content without additional effort. **How to use?:**😎 1. Navigate to Email Marketing -> campaigns 2. Select your sent campaigns and click on the three dots 3. Choose "Resend email to Unopened" 4. Update the settings for the email with desired subject and schedule time 5. This will ensure the resend camapign gets rescheduled **Note:**🔎 1. Resending is available within the default window of 12 hours to 10 days after sending the original email. This timing minimizes complaints and aligns with industry norms. 2. Resending isn't supported for Batch schedule and RSS campaigns. 3. For tips on maximizing engagement and reducing complaints, check our help document. **Coming Soon:**🤩 - Soon, you'll be able to set up resend options in advanced settings when sending or scheduling the original email. Look out for this feature on the send or schedule screen. - Soon you will have the analytics of original and sent email linked
Image without caption

Improved
Automations
LC Phone System
7 months ago
**What's New:** We've implemented a subtle yet impactful improvement by displaying the phone number alongside each user, streamlining the configuration process within the IVR. This enhancement is designed to make the setup more intuitive and user-friendly, empowering our users with an enhanced level of control. **Impact** 1. User-Friendly Configuration: Now, users can effortlessly configure the IVR with the phone number conveniently presented next to each user, ensuring a seamless and efficient experience. 2. Enhanced Visibility: The addition of phone numbers provides clear and concise information, allowing users to make informed decisions during IVR setup. **User Selection Optimization:** To further refine the user experience, we've disabled the selection of users who do not have an associated phone number in the Connect Call action. This ensures that the call forwarding process remains efficient and avoids any potential roadblocks that may arise in the absence of a phone number.
Image without caption

New
7 months ago
Inbound webhook trigger will accept XML payload also going forward. This will provide more flexibility to trigger the workflows.
Image without caption

New
Email Builder
7 months ago
We’re thrilled to announce significant improvements to our test email feature, aimed at optimizing your email testing process for efficiency and effectiveness. Save time and don’t waste writing emails to - from addresses in every test email. This along with access to test emails on send or schedule screen were one of the top voted requests on ideas dashboard. **Problem Statement:**💥 a. Previously, users had to manually input the 'from' and 'to' addresses for each test email when evaluating new campaigns. b. To assess email appearance across different clients or systems, it was necessary to send out several test emails. **What we did?**🤩 - We’ve introduced the ability to set default ‘from’ and ‘to’ addresses for your test emails, eliminating the need to enter these details for every test email you send. SAVE TIME, MORE EFFICIENCY. - Our update now facilitates sending test emails to multiple recipients simultaneously by simply separating email addresses with a comma. **How to Use:**😎 - Go to 'Email Marketing'. - Choose a template or campaign, click 'Test Email'. - Input 'from' and recipient addresses, tick the box to save as default. Embrace a more streamlined and efficient way to test your email campaigns with our latest update. **Support Video** \- [Video Link](https://drive.google.com/drive/u/0/folders/1XhwXkK1HpXy9HoS8OF35Zap8oG6Tio0g)
Image without caption

New
Template Library
7 months ago
We're thrilled to announce a new feature in our template library to enhance your preview experience. Admins now have access to settings where they can customize view preferences for each product in the template library **Problem Statement:**💥 - All products previously had similar view styles (4 thumbnails per row), with no admin control. - Users had to open each template to preview, which was time-consuming and inefficient, especially for websites needing a larger landscape thumbnail for proper representation. **What's New:**😎 - Introducing a settings page for agency admins to select view preferences for individual products. - Now users can customize view styles to enjoy a 2 X list view for funnels and websites, and a list view for forms. **Benefits:**🤩 - Better representation of templates for easier and faster decision making. - Empowerment for agency admins with more control. **How to Use:**🚀 1. Go to the template library. 2. Click on "Settings." 3. Choose your preferred view for each product (e.g., landscape view for websites, list view for forms). 4. Click "Save." This will change the view style for the library and ensure all locations would have this optimised viewing option **Note :** - The settings access is provided only to Agency owners - The change in settings would be reflected to all locations Enjoy a more tailored and efficient preview experience with our updated template library!
Image without caption

New
Improved
Certificates
7 months ago
**Introducing manual/offline certificates** - Users can now send offline certificates to any contacts. - Offline certificates will facilitate users to send certificates manually. **How to send manual/offline certificates** - Go to Memberships > Certificates - Choose a template or create from scratch > Click on Send Button - Add an instructor name, recipient mail (or add a new contact via Add New) - Click on Send **Pagination & Filters** - Added Date and Search filters in Certificates templates and Issued Certificates for refined use. - Users can now search for templates and issues certificates based on a date range.
Image without caption

New
WhatsApp
Conversations
7 months ago
We've made some awesome enhancements to make your experience even better! Check it out: **🚀 Enhancements** **1\. Real time update of conversation timestamp** The timestamp in the conversations tab now updates correctly after sending WhatsApp messages, ensuring accuracy in your communication history.**2\. Last activity Icon on the Contacts Page** The "Last Activity" column on the contacts page displays WhatsApp icon whenever your most recent communication with a contact occurred through WhatsApp. Previously, this column relied on a generic email icon **🐛 Bug Fixes** - Resolved an issue that previously prevented users from setting a WhatsApp number as the default. - Addressed a problem with the WhatsApp template to show the correct error message in case of update or creation failures. - Fixed an issue in WhatsApp onboarding flow to display an appropriate error message when the integration process fails. - Ensured backward compatibility for the attachment API in the WhatsApp Mobile API used in the mobile app. - Addressed a scenario in WhatsApp Name Change where alterations to WhatsApp names were not consistently reflected on the WhatsApp Settings Page. - Fixed an issue in WhatsApp Workflow where, during execution, certain variables were replaced with empty values instead of their correct values.
Image without caption

New
7 months ago
We're thrilled to introduce a highly anticipated enhancement to our platform: the ability to **reorder custom fields in opportunities**! Here's what you need to know:What's New Now you can easily rearrange custom fields in opportunities to better organize your data and streamline your workflow. The updated order of fields will be reflected in the opportunity add and edit dialog boxes. Important Details **Customization Limitation:** Please note that only custom fields, not standard fields, can be reordered. The same applies to folders.Simple Steps 1. Navigate to Settings. 2. Go to Custom Fields. 3. Select "Opportunity" from the dropdown. 4. Drag and drop fields to reorder them according to your preferences. Why It Matters **Enhanced Flexibility:** With the ability to customize your views, you can tailor your opportunities to meet your unique needs and workflows. **Improved User Experience:** This much-requested feature empowers users to take control of their data and optimize their productivity.
Image without caption

Improved
Automations
7 months ago
We have made a small but significant change in Go To action to make it more easier and simpler to understand. After selecting the Go To action in addition in addition to the glowing action steps you will also see the prompt stating "Click on the Go To destination.
Image without caption

New
Social Planner
7 months ago
Short form videos are in trend with ever-growing way in social media marketing world. With the same, in social planner we are launching Facebook Reels. 🤩 **How to create Facebook Reel?** 1. Go to Marketing > Social Planner 2. Connect your Facebook account by going to settings > integrations. Give the permissions to the facebook account. 3. Go to Create New Post 4. When creating new post, select Facebook Page for posting the Reel. Note - Reels are only available for pages at the moment. If you choose a group it'll be shared as a feed post. 5.Go to Reels Tab 6.Add caption and add one video attachment😍 7.Schedule your Reel**Specification for Facebook Reels** 1. 1 GB video size 2. Duration - 3 seconds to 90 seconds (1 mins 30 sec) 3. Video Format - .MP4, .MOV, .webm 4. Aspect - 1080 \* 1920 pixels (recommended) Minimum required is 540 x 960 pixels 5. Aspect Ratio - 9:16 6. Thumbnail support is not available for Facebook Reels.
Image without caption

New
Documents & Contracts
7 months ago
**What’s New? / Key Features / Benefits:** **1\. Fillable Date Field Element** - Users can now easily drag and drop a fillable date field element into uploaded PDFs or documents, streamlining the process of adding date-related information. **2\. Custom Values in Fillable Text Field** - The new drag and drop element allows users to incorporate custom values in fillable text fields, facilitating the dynamic customization of fields that need to be changed for each PDF sent. Eg: Custom name field on a Fixed PDF template which needs to have receiver’s name on it can now be filled automatically using Custom values. **3\. UI Enhancements** - Added support for moving draggable element via keyboard. - Users can utilise Shift+Arrow keys to easily move (signature/text/date) elements, improving precision in document arrangement. - Use Shift+Arrow keys for precision - Use Ctrl+Shift+Arrow keys for moving the elements faster. - Added new tooltip over every assigned fillable elements (Date, Text) - Editors can now hover over fillable elements to view the assigned signer, making it easier to edit documents with multiple signers. - Signature Element is now resizable instead of scale . **How to Use?** **1\. Fillable Date Field Element** - Drag the “Fillable Date Field” element from the toolbar and drop it onto the desired location in your document. - Click on the field to fill the date, customize the date format and other properties. **2\. Custom Values in Fillable Text Field** - Drag the “Fillable Text Field” element from the toolbar and drop it onto the document. - Single click on the field and select Custom Value icon to input dynamic values. **Why This Feature?** - The addition of fillable date fields, customizable text elements, and improved UI aims to provide users with a more flexible and efficient document editing process.
Image without caption

New
Payments
Funnels And Websites
7 months ago
Product description in order forms: 1. The product description toggle will now display the product description that is added by the user in the products screen. This allows the user to show their customized description in order forms. 2. This option is by default turned OFF in new and existing order forms. 3. The existing product description (Recurring and trial information) now comes under the new label of "Pricing information". This toggle is turned ON for new funnels, and existing funnels will retain the user's preference. 4. This overall improves the understanding of these toggles as we noticed customers were confused with the existing product description toggle. Full name validation in order forms: - Order forms now have a toggle called "Full name validation" present which would enable these forms to validate names entered. - Upon turning this on, names entered will now need to have atleast two parts, and some other small validations such as not allowing two special characters as a name, limited special characters, etc. - Turning this option off will retain the existing behaviour of the field.
Image without caption

New
Improved
Fixed
Communities
7 months ago
**New UI** - The new layout can be turned on from Labs. - The look and feel of communities has changed: Changed the default colours, improved the fonts to make it more readable - All fresh and more readable with the all new Reading Mode - We are introducing a Reading mode which will give more real estate while you are scrolling through the posts - This will make the transition from Discussion to Learning Tab seamless **Gamification** - Introducing "Gamification" - Points, Levels and Leaderboards - Points - You get 1-point when someone likes your post/comment - Levels - Your avatar and profile will display a blue badge with a number, indicating your level. Gain more points to move up to higher levels - Leaderboards - You can find members who earned the highest points in the past 7 days, 30 days, and overall - Rewards - Group admins/owners can choose to add offline rewards as texts. Example- Get a chance to win $2000

New
Payments
Invoicing
7 months ago
What’s New? Business users would now have a detailed breakdown of the invoice line items in a particular invoice on export. The detailed breakdown for the invoice would consist of invoice line item details like item name, item description, tax on item, discount on item, itemId, currencyWhy is this Important Having the line item details in invoices export is very crucial from a reporting and accounting point of view as it allows to build reports based on the line items mentioned on the invoices How to Use it Go to Payments Tab -> Invoices --> Click on the Export Button and you'll receive a mail with CSV link for your export!

New
Improved
Calendar
7 months ago
**What's New?** - **Previously**, the service menu collected only **default information** like name, email, and phone number from bookers. With this update, you can create personalized forms with all the fields you desire. - These custom forms can be **seamlessly integrated** into your service menu. - When a booker schedules an appointment, they'll be prompted to fill out your **tailored form.** - You can conveniently view the submitted details within the app under **Sites > Forms > Submissions.** **Note:** Custom form selected in the service menu will **supersede** any form selected at the individual calendar level. **How to Use?** 1. Begin by creating your custom form. Navigate to **Sites > Forms > Builder.** 2. Craft your form with the specific questions you wish your clients to answer. 3. Once your form is ready, proceed to **Calendar Settings > Service Menu.** 4. Select the desired service menu and navigate to **Service Menu Details.** 5. Under Forms, **choose the custom form** you've created and save your selection.
Image without caption

Improved
LC Email System
7 months ago
We're thrilled to announce an enhancement to our existing feature. Users can now add up to five email domains for email types: Workflow, 1:1, Campaign, and Bulk emails. With that error notification was provided if a domains lacks a default header, helps avoid potential DMARC and other deliverability issues. **Here's how to access this Feature:** Sub-account Settings - Email Service -> SMTP Service -> Dedicated Domain and IP -> Domain Configuration. **Key Benefits:** **Improved Deliverability:** By spreading email sending volume across multiple domains, reduce the risk of triggering spam filters or being marked as spam by internet service providers (ISPs). This can lead to better inbox placement and higher deliverability rates. **Reduced Risk of Blacklisting:** If one sending domain gets blacklisted or flagged for spam, having multiple domains ensures that entire email marketing operation won't be affected. **Distributed Workload:** Distributing email sending workload across multiple domains can prevent overloading any single domain and ensuring consistent performance. **Upcoming:** The sending domain can be selected for individual workflow, campaign and bulk email level. **Support article:** <https://help.leadconnectorhq.com/support/solutions/articles/48001226590-how-to-set-up-a-dedicated-sending-domain-within-a-sub-account#How-to-set-up-a-dedicated-sending-domain-for-Targeted-Email-Categories>?
Image without caption

New
Payments
7 months ago
**What’s New?** Agency plans now support adding one-time setup fees, which means users can configure setup fees for any agency plan in their sub-account - This provides a way to sell subscriptions along with a setup fees or a trial period or both, which typically increases conversions and revenue for agencies. This is a also small step in our endeavor towards allowing users to manage Agency plans on **Payment>Products** section

New
Improved
Calendar
7 months ago
**Buffers** represent **additional time** that can be added **before and/or after an appointment.** **Previously**, calendars only had post buffers. We are now excited to introduce **pre-buffers** as well, allowing users with more flexibility. **What's New?** - You can now add both pre and post buffers for an appointment. **Pre buffer** is added **before** an appointment whereas **post buffer** is added **after** an appointment. - Adding this would **allocate buffer** time to be considered when scheduling any **new appointments.** - This feature can be beneficial if you need **extra time** to get ready before an appointment, or wind down after a presentation. **Important points to note:** 1. Buffers **only apply** to events booked through the **booking widget** or **directly from the app**. However, events created outside the app (e.g., Google, Outlook, iCloud) are taken into consideration when finding a free slot while scheduling a meeting with a buffer from the widget / app. This means that buffers **cannot overlap** with any other existing calendar event. 2. If there's a 30-minute appointment with **15-minute buffers before and after,** someone else booking on the same day will see an available slot 30 minutes after the existing booking. This is due to **two buffers being applied consecutively**, as there will be a 15-minute post buffer for the existing appointment and a 15-minute pre-buffer for the new appointment. **How to Use?** 1. Choose the **calendar** to which you want to add buffers for appointments. 2. Navigate to the "**Availability**" section. 3. Specify the duration you want for both the **pre and post buffers** and click on save.
Image without caption

Improved
Fixed
WhatsApp
7 months ago
We've made some awesome enhancements to make your experience even better! Check it out:🚀 Enhancements **1\. Subscription Check & Visibility:** - Goodbye, confusion! We've introduced a WhatsApp subscription check on both the conversation and contact pages. This means you'll only see the WhatsApp tab and relevant options in the message type filter dropdown if your location has an active WhatsApp subscription. This ensures you see the features you need and avoids clutter in the interface. **2\. Outbound WhatsApp Number Selection** - We've enhanced how we handle phone number selection for outbound WhatsApp messages, ensuring smoother communication and addressing previous limitations. **Previously:** - Outbound messages always use the default WhatsApp number configured in your settings. **Now:** - The system attempts to prioritise the contact's last used WhatsApp number for each conversation, providing a more personalised experience. This number is retrieved from the most recent inbound message received from the customer. - If no recent inbound message exists, the default WhatsApp number is still used as a fallback. **This change addresses:** - An issue where attempting to reply to a contact using the default number might fail if your location has multiple WhatsApp phone numbers. - Previously, the system wouldn't necessarily use the number the customer originally messaged you on, potentially leading to a 24-hour window closure error **3\. Outbound WhatsApp Number Selection** - **Improved Error Messaging:** Enhanced error handling for Facebook error messages in edge cases, providing more specific reasons for message failures.
Image without caption
Powered by Notaku